

Many of us already have heard about EOS, a new blockchain project of Steemit’s visionary cofounder Dan Larimer. From this detailed guide you will learn how to buy EOS tokens using MyEtherWallet, one of the safest Ethereum wallets out there.
Why I’ve decided to invest in EOS
There are two main reasons why I've chosen to invest in EOS tokens when there’s such a plenty of opportunities.
First, because I believe this project will bring to us more freedom, be it financial freedom, freedom of enterprise or freedom of speech. It will create a thriving ecosystem for thousands of decentralized apps. It will be fee free for end users. The EOS blockchain will even have its own constitution! :)
Second, because I believe it will be huge. EOS is meant to be lightning fast and very advanced technically. EOS is positioned as a blockchain operating system with unmatched operational capacity for commercial scale decentralized apps. It will directly compete with Ethereum and a few smaller platforms. EOS based apps won’t require users to pay for every action they take. Instead of fees, blockchain capacity will be allocated proportional to the percent of EOS staked by an app.
Please note it's a long term investment as the EOS sale will end in almost a year and you’ll get native EOS tokens only after that.
Overview
The process has these three main steps: send Ethereum to buy EOS ICO (Initial Coin Offering) tokens, claim these tokens and register for claiming native EOS tokens after the ICO ends.
If you want to invest some SBD or STEEM in EOS, you can quickly send them to MyEtherWallet using blocktrades.us.
1. Buy Ethereum based EOS tokens
The first step is easy — you need to send ether for Ethereum based EOS ICO tokens.
- Open
eos.io(type the link manually and check twice whether you're on the correct website). - Scroll down and click
GET EOS. - Review the conditions, check all the boxes if agree and click Continue.
- Copy the Ethereum address for the token distribution.
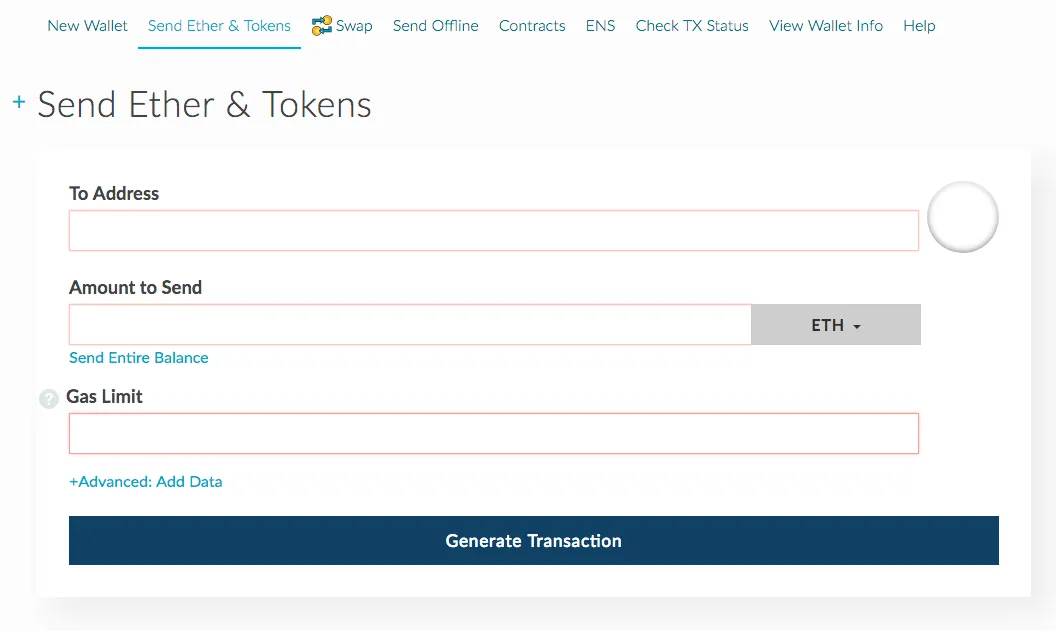
- Go to MyEtherWallet and click
Send Ether & Tokensfrom the main menu. After unlocking your wallet put the address copied at the previous step to the address field and a desired amount (minimum 0.01 ETH) to the Amount field. Don't send all the balance you have — leave something for transaction fees. Press Generate Transaction and submit.
2. Claim the tokens you've paid for
In about 24 hours you can claim your tokens. You can see when exactly a current sale period ends at eosscan.io website.
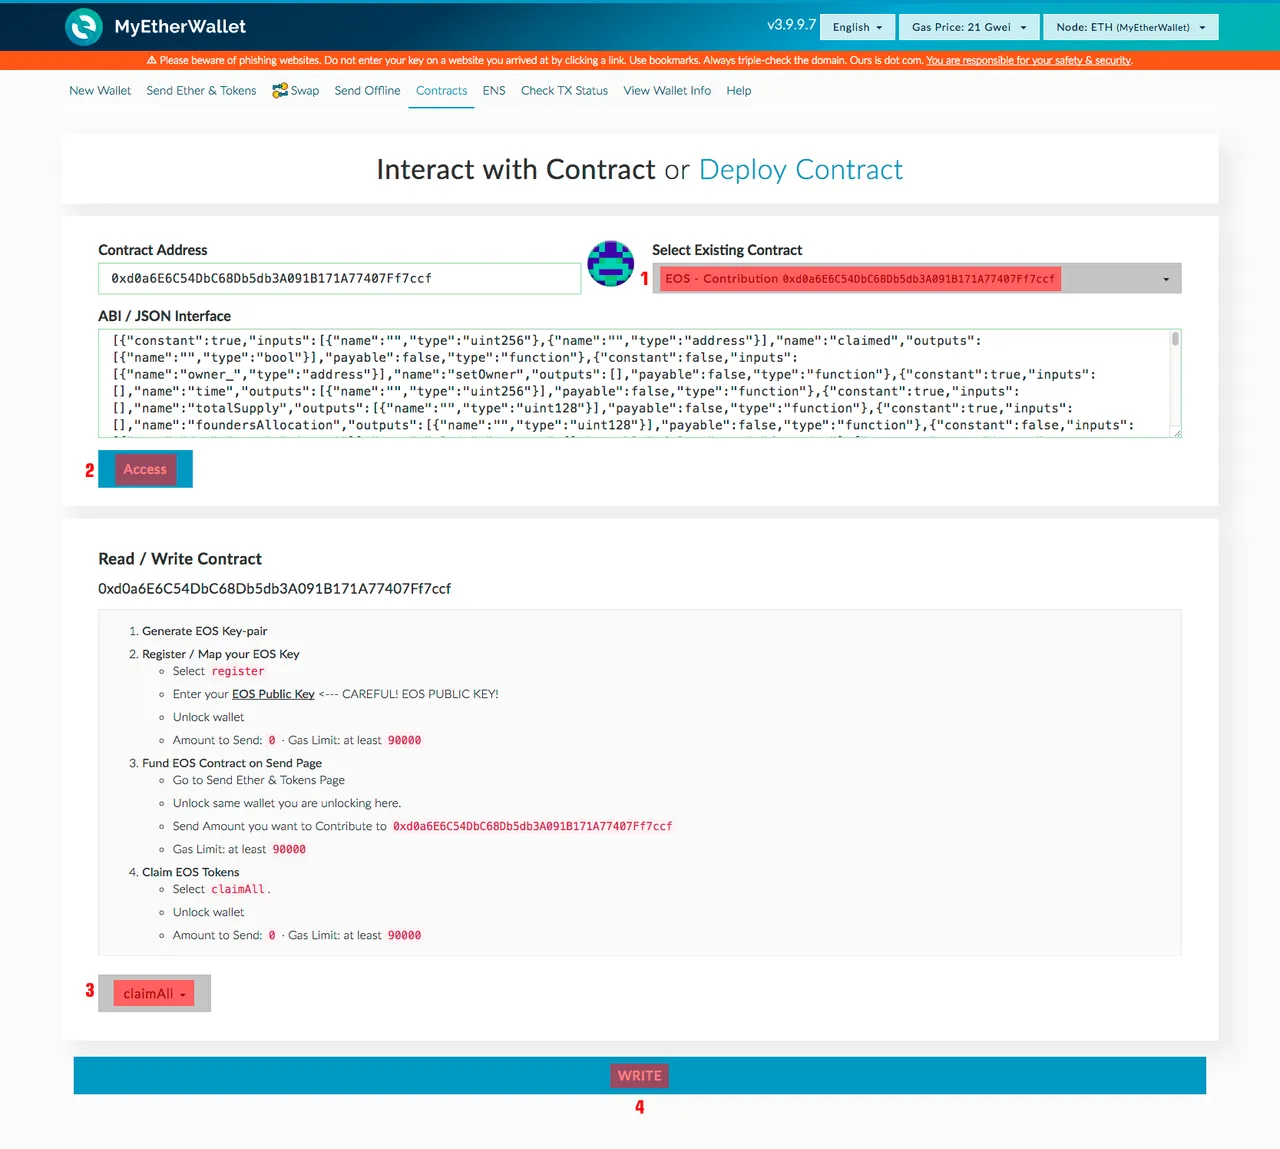
- Go to MyEtherWallet and click Contracts from the top menu.
- Select
EOS - ContributionfromSelect Existing Contractdropdown. The address you've previously sent ETH to will appear. Click Access. - Select
claimAllfrom theSelect a functiondropdown at the bottom. - Unlock your wallet and press
Writebutton. - In the popup leave all as it is (0 in the Amount field and the suggested gas) and submit.
3. Register to claim native EOS tokens after the sale ends
The steps here are the same as for claiming the tokens except that before going to MyEtherWallet you should generate your EOS keys elsewhere and on MyEtherWallet in p. 3 you should choose register from the dropdown menu.
- As I said, you will need an EOS key generator first. The good news is that @nadejde has one for us. It's a lightweight fork of the eos.io team generator and it works without the need to install the MetaMask browser extension.
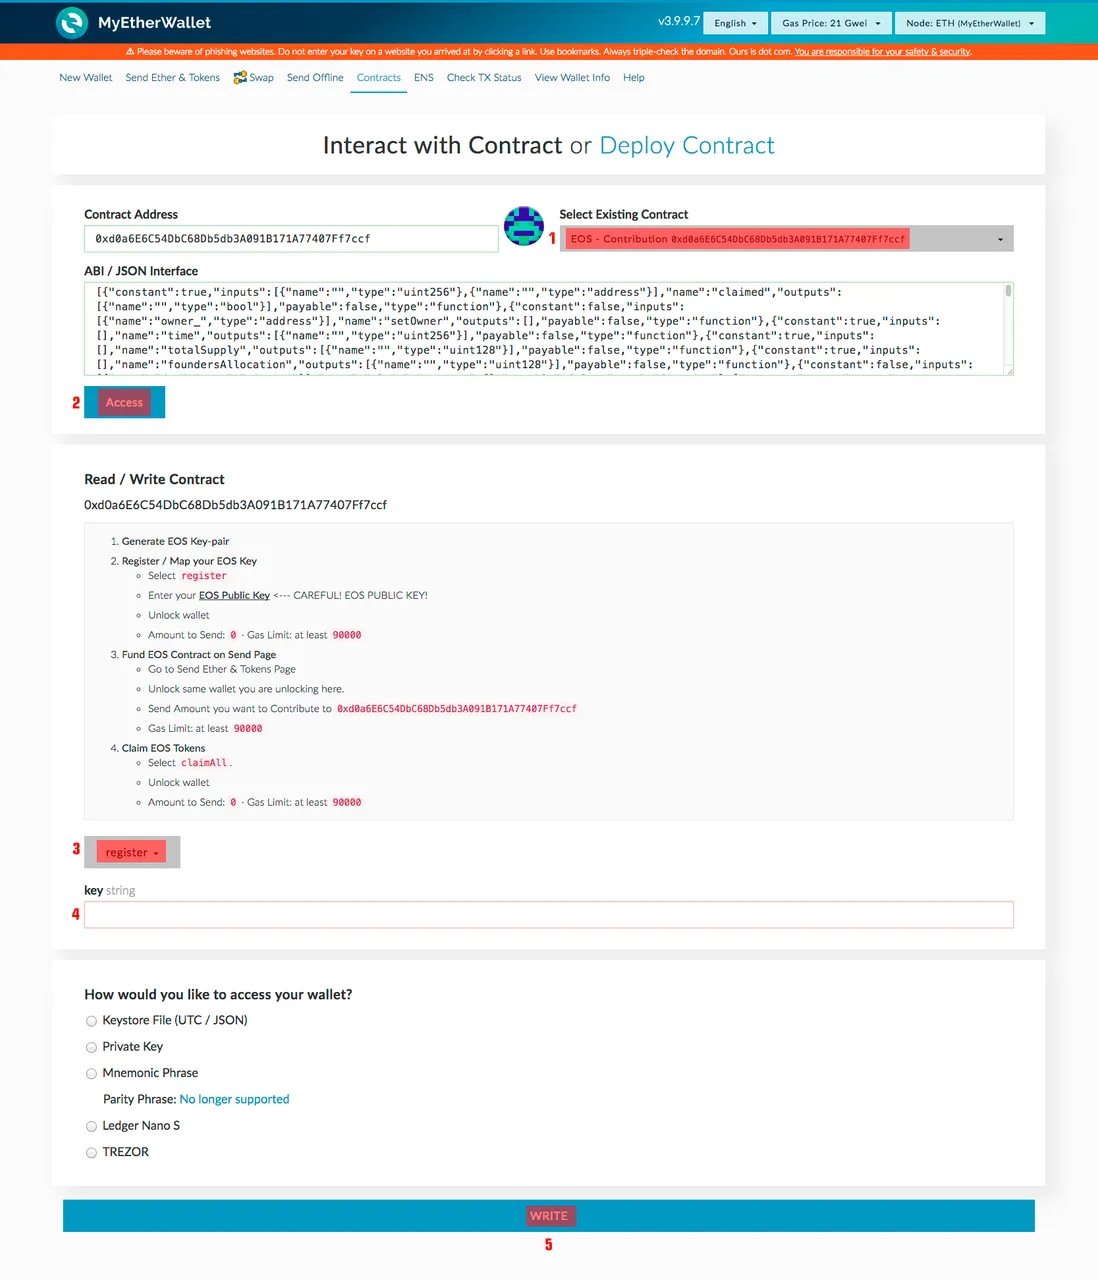
- Go to MyEtherWallet and click Contracts from the top menu.
- Select
EOS - ContributionfromSelect Existing Contractdropdown. The address you've previously sent ETH to will appear. Click Access. - Select
registerfrom theSelect a functiondropdown at the bottom. - Put your PUBLIC EOS key to the
keyfield. - Unlock your wallet and press
Writebutton. - In the popup leave all as it is (0 in the Amount field and the suggested gas) and sign.
To see if your claimed tokens are in your wallet, add the EOS custom token:
- Go to MyEtherWallet and click
Send Ether & Tokensfrom the main menu (you won't send anything this time). - Look for Token Balances on the right-hand side of the page.
- Click Add Custom Token. For the field named Token address, enter
0x86fa049857e0209aa7d9e616f7eb3b3b78ecfdb0. For Token Symbol enterEOSand for Decimals enter18. Click Save. - After your claim is procesed, you will see your EOS token balance by choosing `View Wallet Info’ from the main menu.
Finally, don't forget to claim the native tokens after the sale ends.
"Within 48 hours after the end of the final period on June 1, 2018 at 22:59:59 UTC, all EOS Tokens will become fixed (ie. frozen) and will be non-transferrable on the Ethereum blockchain."
Notes
- Basically these operations aver very simple, but first time they look geeky, so better try with a small amount first and double check everything.
- I disclaim responsibility for possible mistakes and losses which could happen from the use of this tutorial.
- This is not an investment advice.
Useful links
- EOS White Paper
- Article about Dan Larimer on Steem Center WIki
- Article about EOS on Steem Center Wiki
- EOS Sale tutorial - the MyEtherWallet version by @nadejde
- How to use MyEtherWallet: a guide from cryptocompare.com
There's also a contest on EOS market analysis going on — take part and win some whaleshares! If you don't know what is whaleshares, read this post.
Feel free to share more hints and links about EOS and its ICO in comments!
Image 1 background photo by Billy Huynh
