


¡Hola, hola! Mi gente de Hive, LiekTu y hermosa comunidad de DIYHub, espero todos se encuentren súper bien, animados e inspirados, y también preparados para el Hallowen 🎃 👻 💀 🎃
Hoy les presento mi entrada al 🎃 Concurso Especial del mes “Halloween” con Liketu
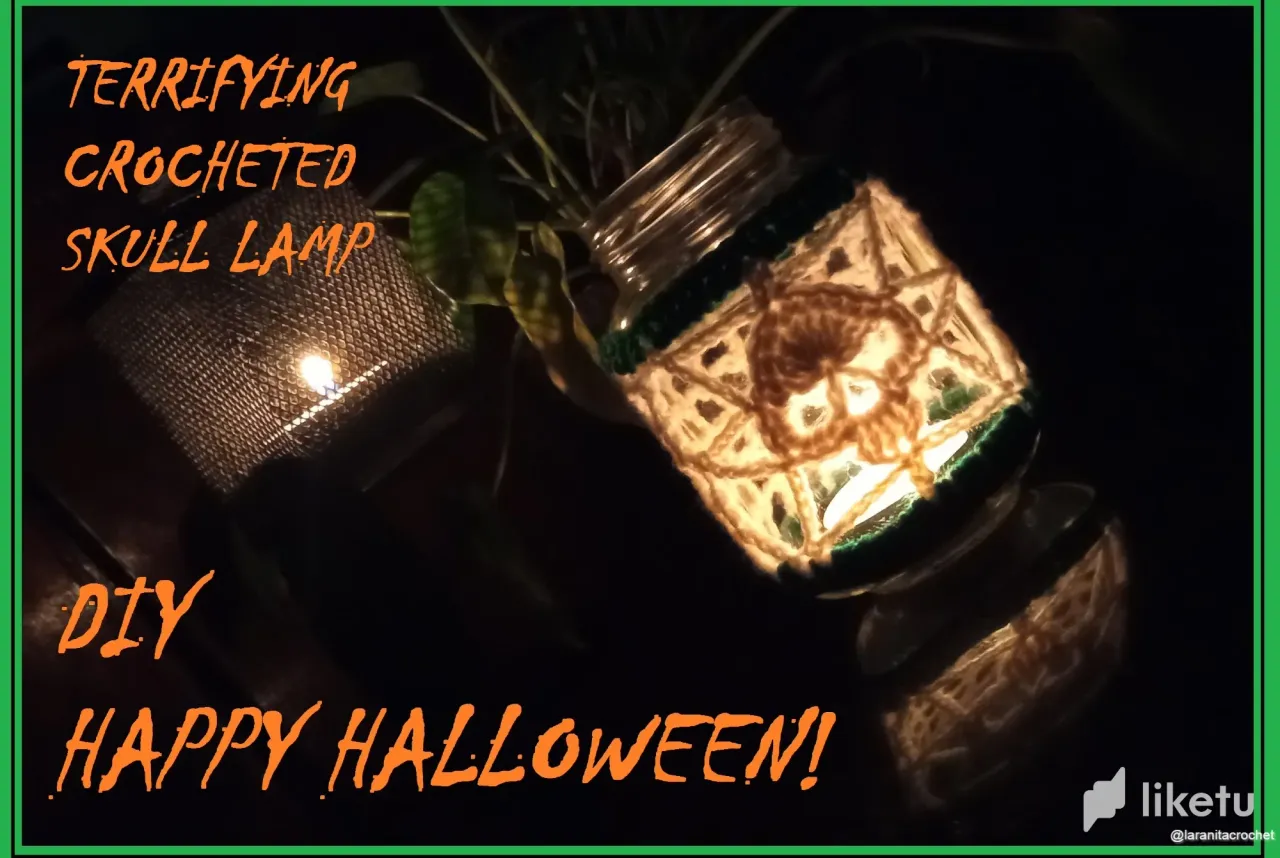
Este concurso, me ha inspirado a crear varios adornos y en este post le traigo uno de ellos, una ATERRADORA LÁMPARA DE CALAVERA TEJIDA A CROCHET, el patrón de la calavera lo octubre de uno de tantos que hay en internet, simplemente escogí el que más me gusto y el resto del tejido si es todo creación mía. Hasta quiero hacer un disfraz completo, y quien sabe y hasta me anime a ir a alguna fiesta de Halloween con mis amigos y ya tenga listo mi disfraz jajaja… sin más preámbulos les dejo mi proceso creativo.
Hello, hello! My Hive people, LiekTu and this beautiful DIYHub community, I hope you all are super well, encouraged and inspired, and also prepared for Halloween 👻 💀 🎃
Today I present you my entry to the 🎃 Special Contest of the month “Halloween” with Liketu.
This contest, has inspired me to create several decorations and in this post I bring you one of them, a THRILLING CROCHET WOVEN SKULL LAMP, the skull pattern I october it from one of many that are on the internet, I simply chose the one I liked the most and the rest of the fabric if all my creation. I even want to make a complete costume, and who knows, I might even go to a Halloween party with my friends and have my costume ready hahaha… without further ado I leave you with my creative process.
🎃 👻 💀 ESPAÑOL 💀 👻 🎃
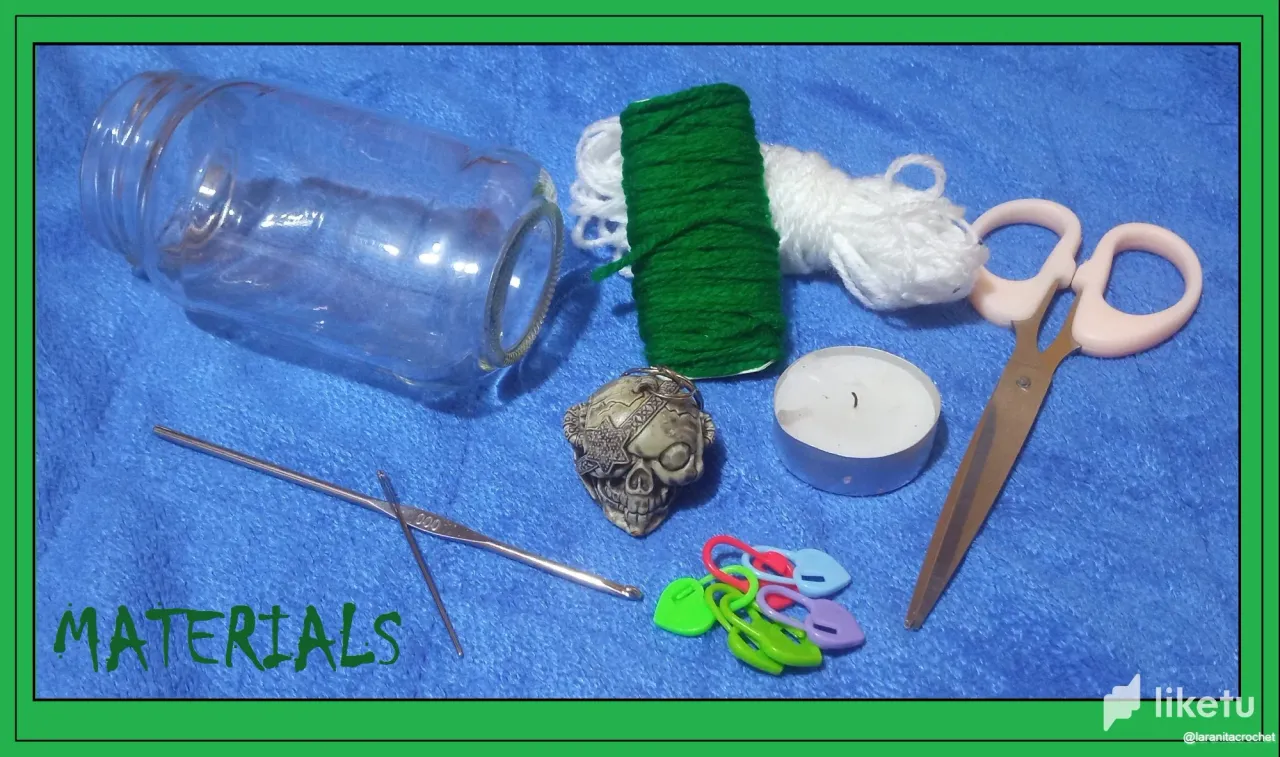
Materiales
💀 Estambre o Hilo acrílico blanco y verde.
💀 Aguja de crochet 000.
💀 Frasco de vidrio. (Este era de una mayonesa)
💀 Aguja lanera, tijera y marcadores de puntos.
Para realizar este tejido emplearemos los siguientes puntos: cadeneta (cad.), anillo mágico (Am), punto bajo (Pb), punto alto (Pa), y punto deslizado o punto raso (Pr). Las vueltas serán abreviadas con una V.
Paso a paso:
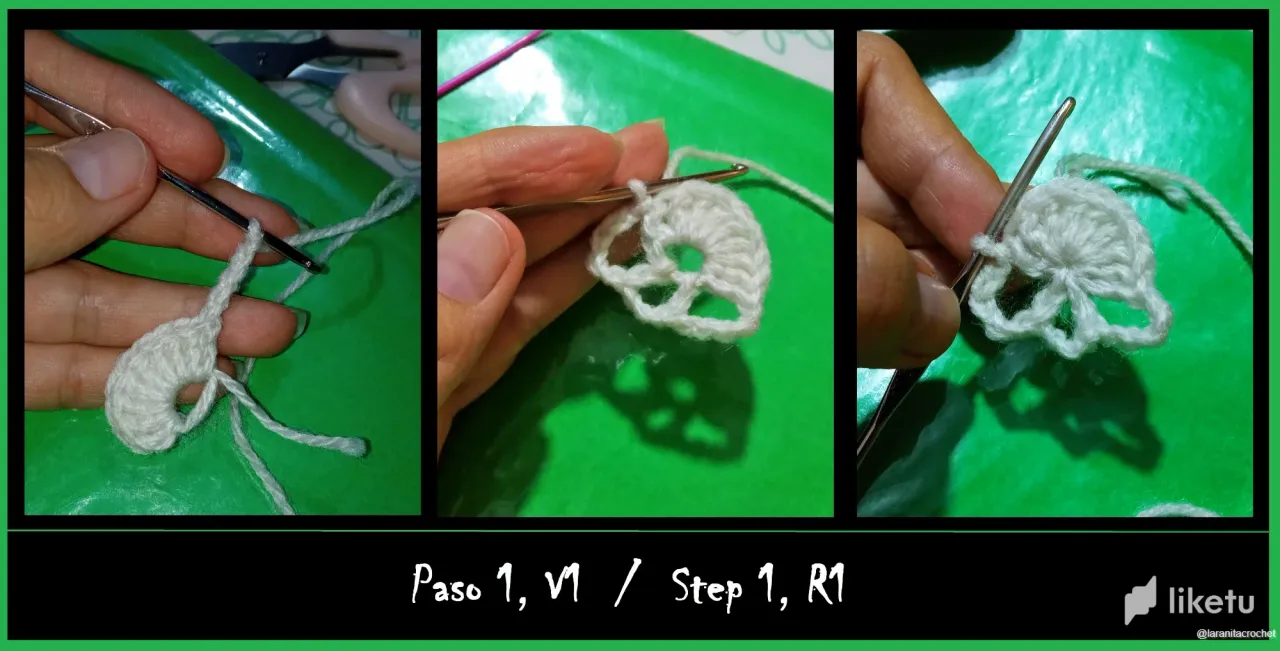
Paso 1:
Iniciaremos tejiendo la calavera.
V1: hacemos un anillo mágico con 9 Pa, 5 cad, 1 Pa, 3 cad, 1 Pa, 5 cad, y cerramos con un punto deslizado.
Una recomendación que les doy es que el primer punto sea un falso punto alto, y es que no se puede iniciar a tejer con un punto alto dentro de un anillo mágico; para hacer el falso punto alto simplemente hice un Punto bajo y sobre este tejí otro punto alto y seguidamente hice 8 puntos altos para completar los 9 puntos altos.
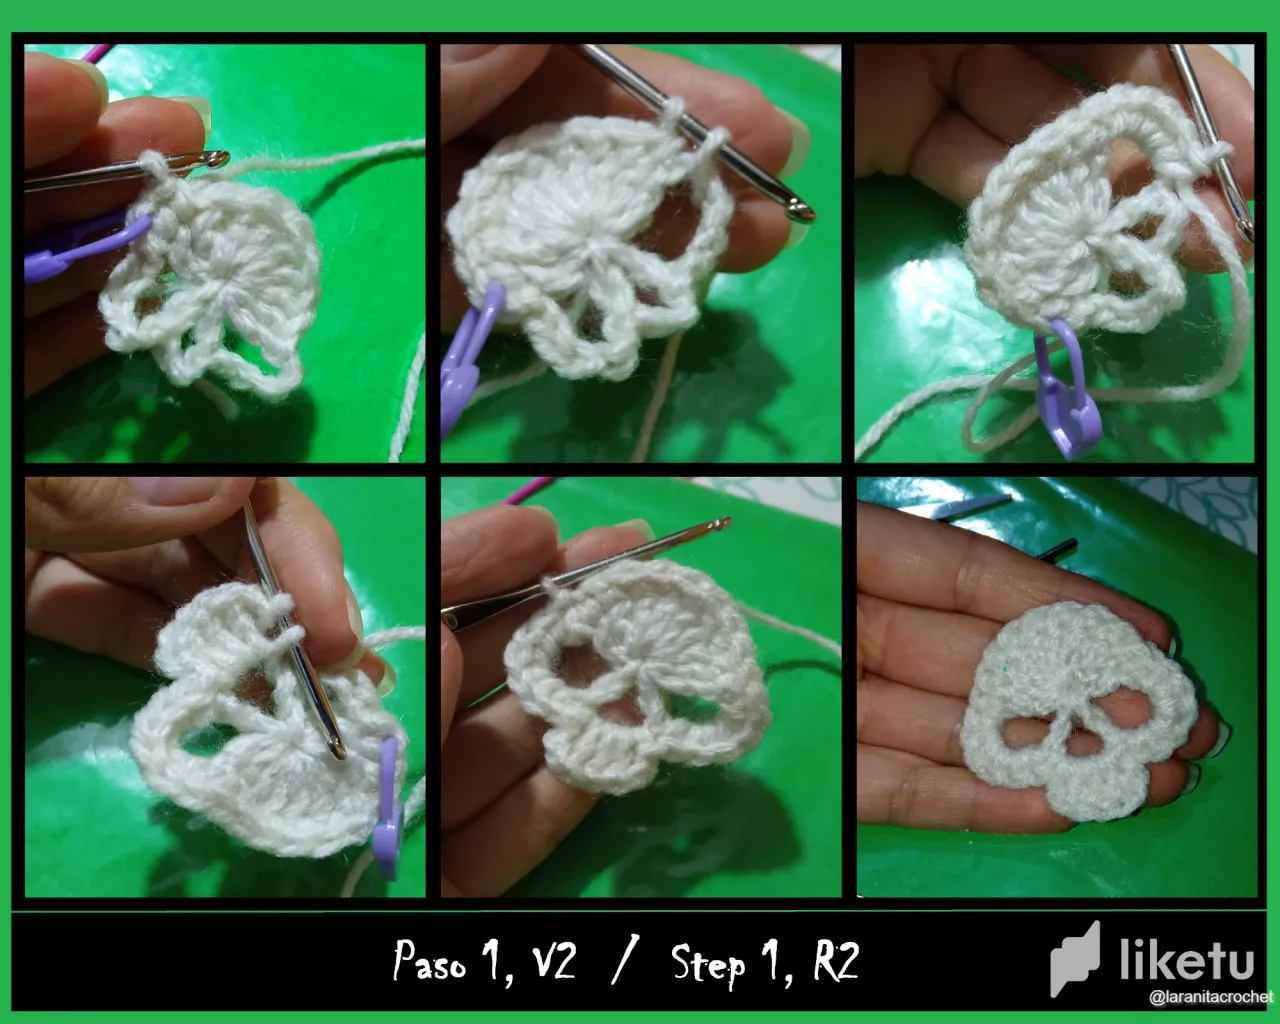
V2: Subimos con 1 cad y hacemos 1 Pb sobre cada uno de los Pa de la vuelta anterior, sobre las 5 cad tejemos 6 Pb, al llegar sobre las 3 cad que son la nariz de la calavera hacemos la siguiente secuencia (Pd, 2cad, 3Pa, 2cad, Pd), y pasamos al siguiente segmento de 5 cad donde también tejeremos 6 Pb, y cerramos la vuelta con un punto deslizado en el primer Pb del inicio de la vuelta, luego cerramos el anillo mágico.
Ya tenemos lista nuestra aterradora calavera.
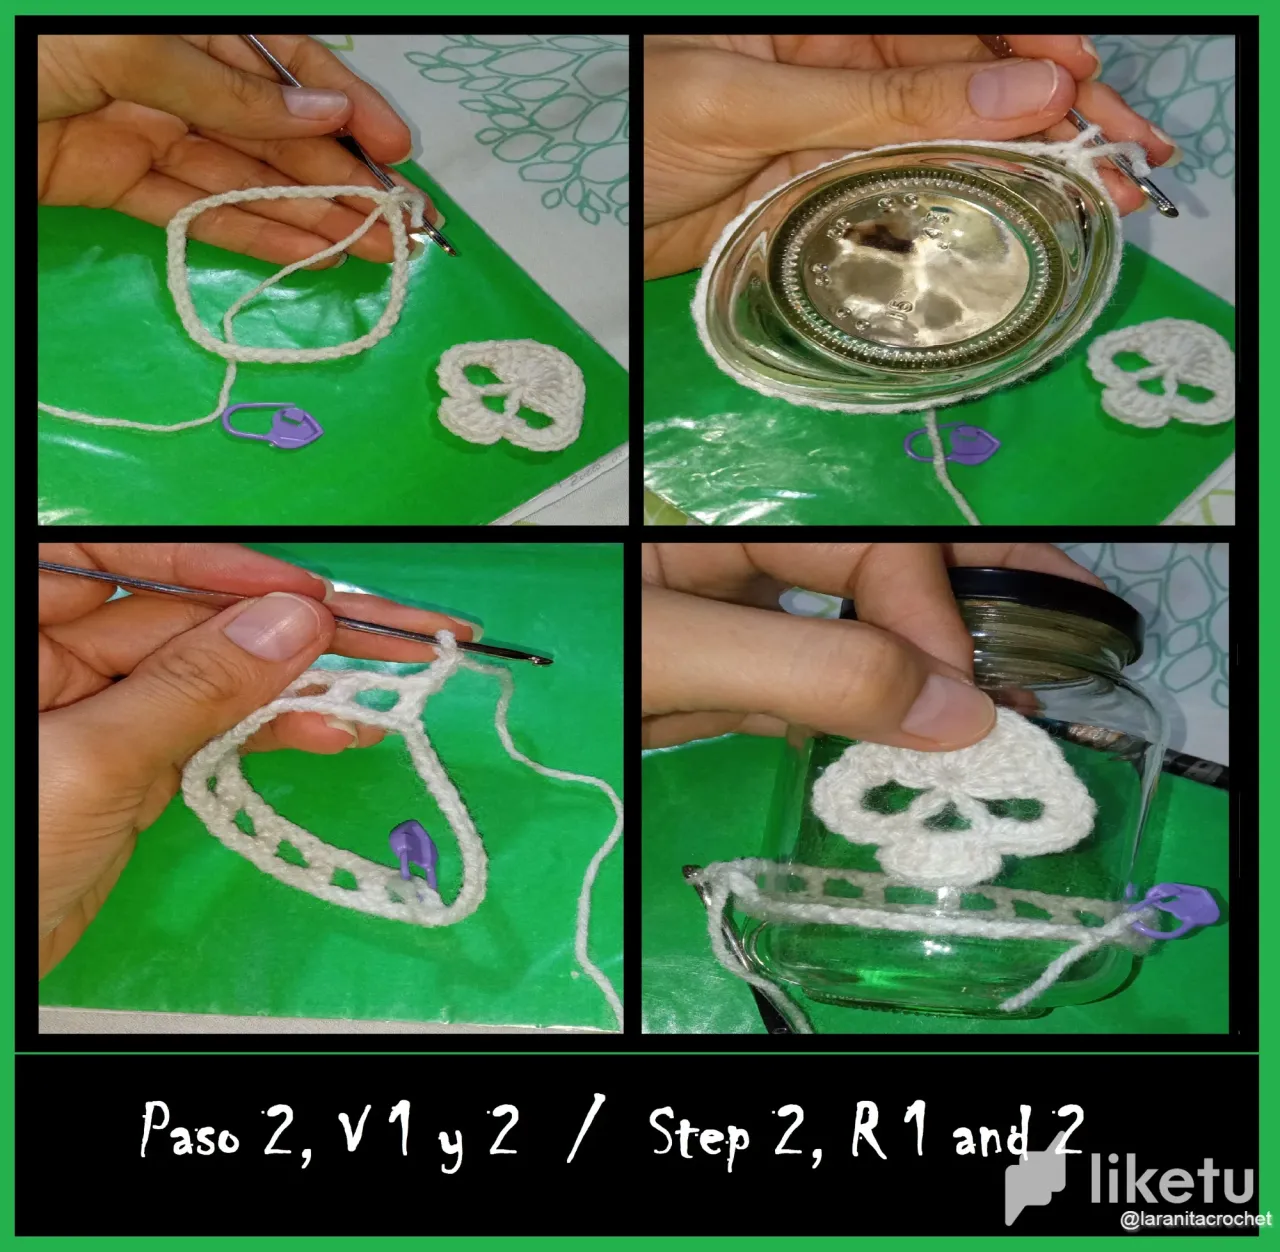
Paso 2:
Ahora tejeremos la red que cubrirá el frasco de vidrio y a la cual uniremos la calavera que acabamos de tejer.
V1: para iniciar haremos una base de cadenetas, en mi caso fueron 40 cad. La idea es tejer tantas como se requieran para obtener el mismo diámetro del rasco que estemos usando, y cerramos con un Pd.
V2: iniciaremos haciendo 5cad, nos saltamos 2 puntos de cadena y en el tercero hacemos 1Pa y nuevamente hacemos 2 cad al aire nos saltamos 2 puntos cadena y en el tercero tejemos 1Pa, esta secuencia de (1Pa. 2cad) la repetiremos hasta cubrir toda la cara trasera del frasco y un poquito en los lados; en mi caso repetí la secuencia 10 veces (debo acotar que las 5cad del inicio cuentan como la primera secuencia ya que las 3 primeras cad sustituyen un Pa).
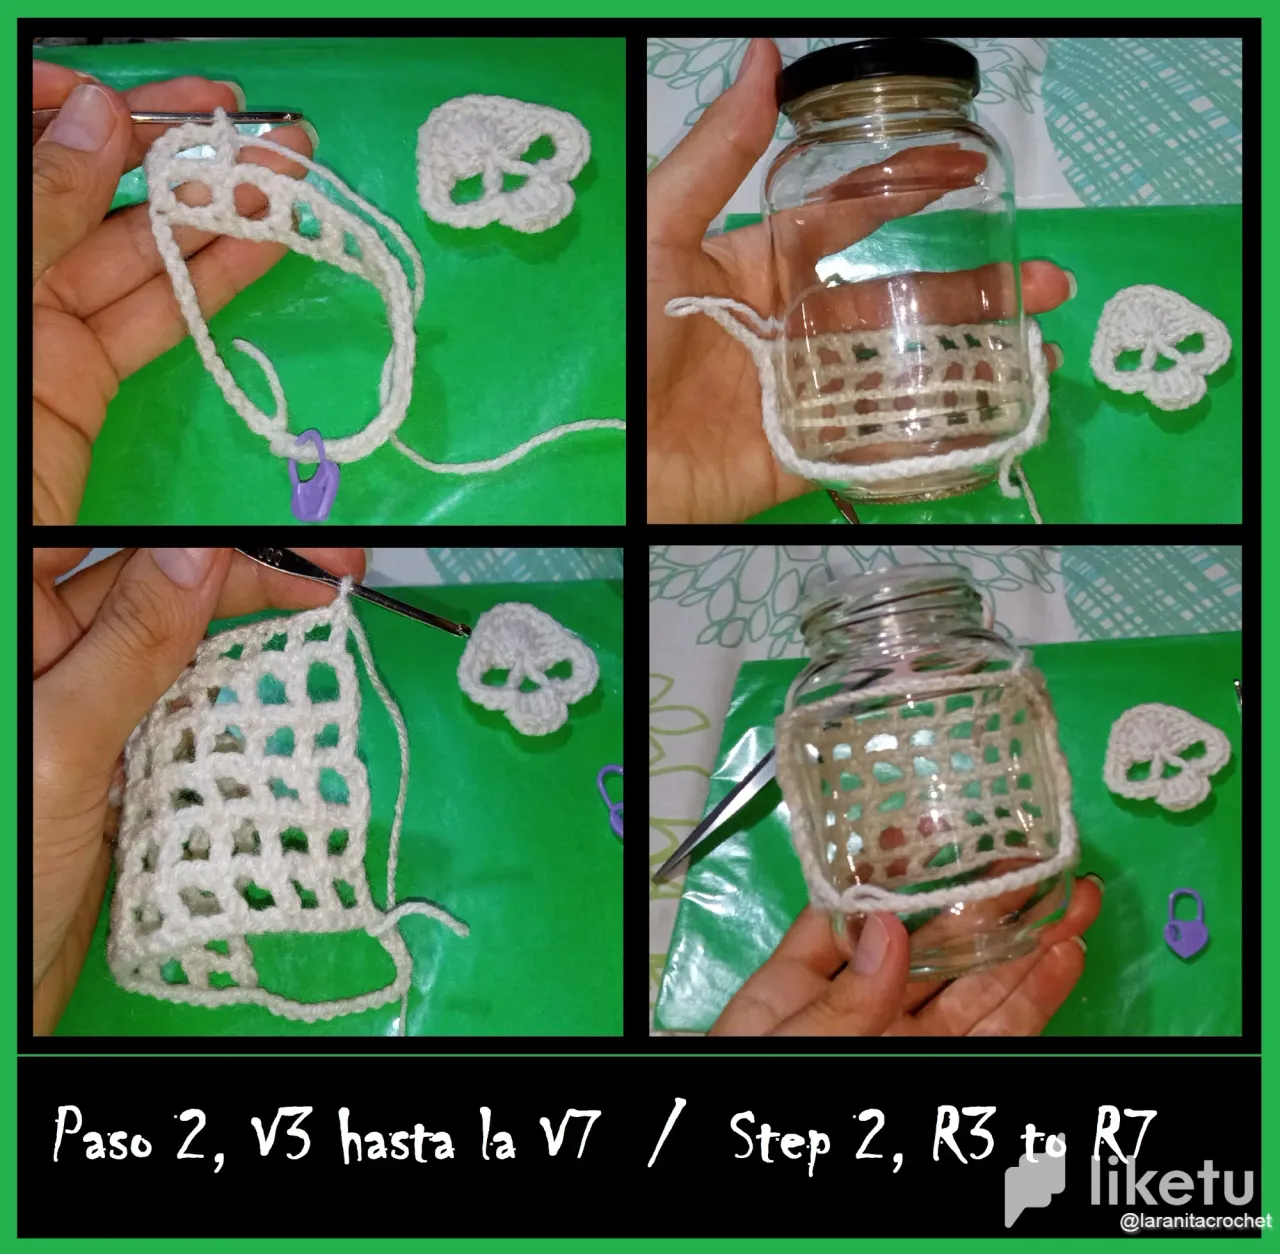
V3-V7: en el último Pa de la vuelta anterior subiéremos con 5 cad (recordando que las 3 primeras cad cuentan como 1 Pa), y haremos 1Pa sobre el Pa de la vuelta anterior, y con esta secuencia de (1Pa, 2cad) seguiremos hasta completar la vuelta.
Esta vuelta la repetiremos tantas veces como sea necesario para lograr la altura requerida para cubrir la sección deseada del frasco, en mi caso fueron 6 vueltas.
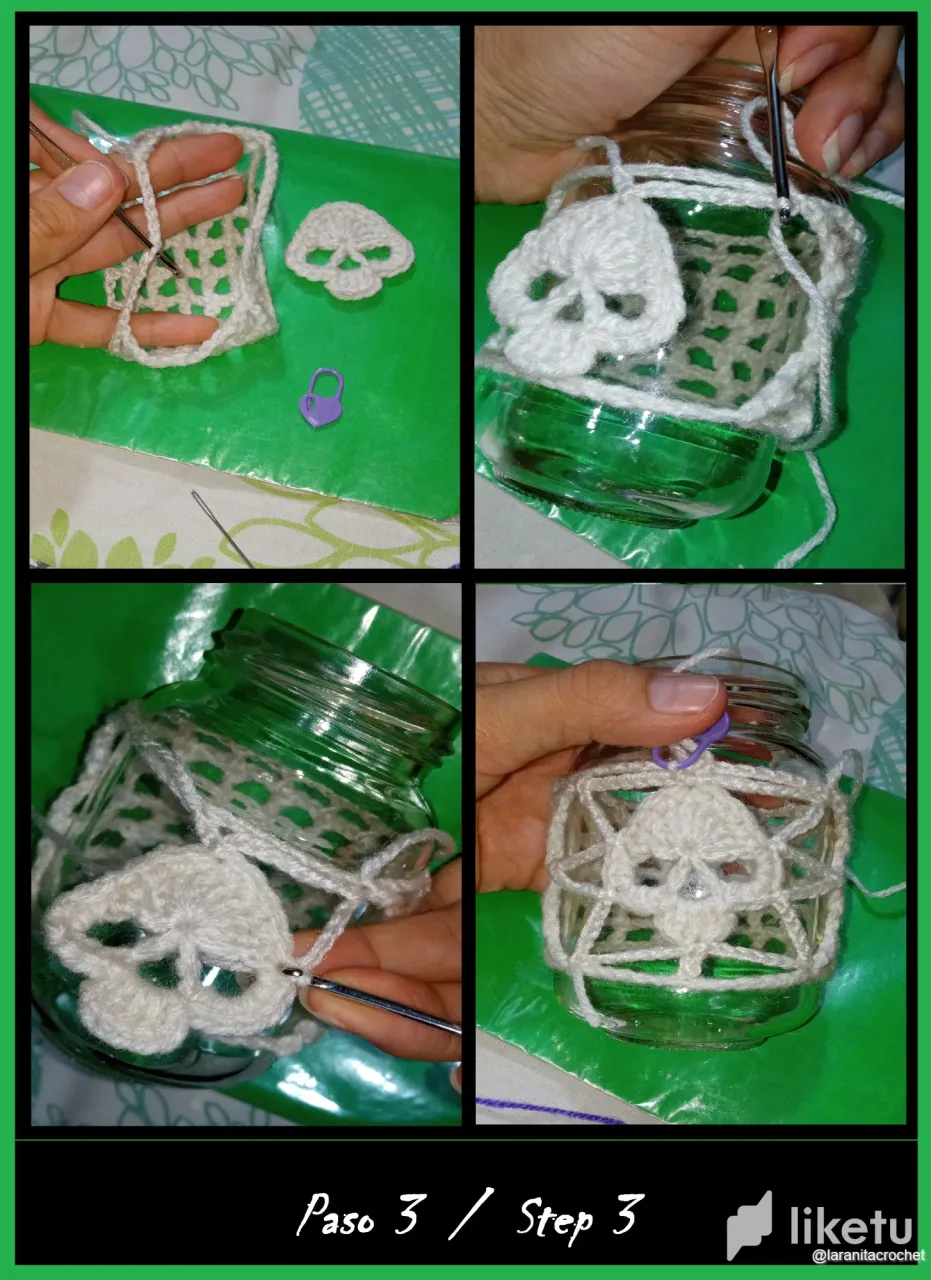
Paso 3:
una vez tenemos lista la red, procedemos a unir la calavera; y esto lo haremos mediante cadenetas y puntos deslizados. Y lo que haremos será ubicar el centro de las cadenetas que hacen el agujero donde ubicaremos la calavera y también el centro tanto de la parte superior como inferior de la calavera, y otros dos puntos en la parte del pómulo de la calavera. Para que se guíen mejor les dejo una imagen que dibuje a mano alzada de la calavera señalando los puntos que les menciono.
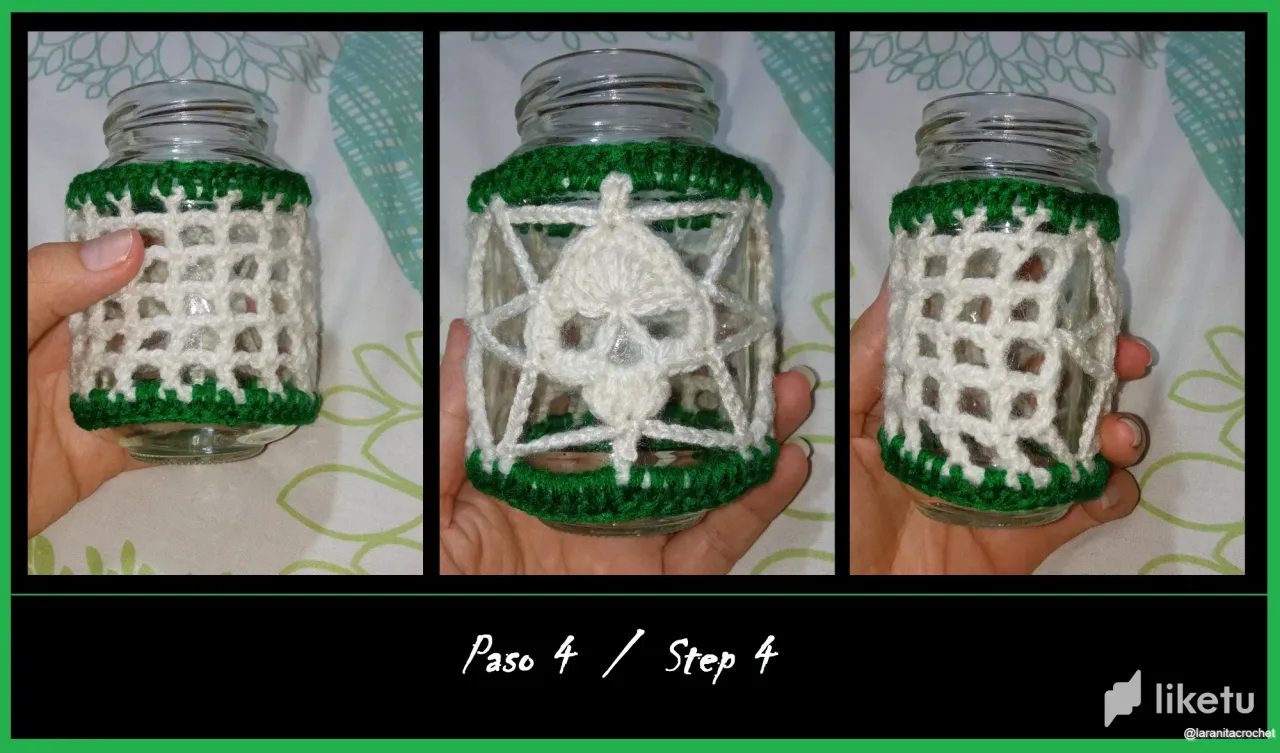
Paso 4:
para finalizar realizamos Pa en los bordes del tejido para darle un mejor acabado, yo lo hice en color verde veneno jajaja… pero podrían hacerlo también en color negro, morado, naranja y hasta en blanco. En total realice 40 Pa tanto en el borde superior como en el inferior ya que mi base inicial fue de 40 puntos cadena.
Y de esta manera terminamos de tejer esta original y ATERRADORA LÁMPARA DE CALAVERA para usarla como parte de nuestra decoración de Halloween.
🎃 👻 💀 ENGLISH 💀 👻 🎃
Materials:
💀 White and green acrylic yarn.
💀 Crochet needle 000.
💀 Glass jar (this was a mayonnaise jar).
💀 Wool needle, scissors and stitch markers.
To make this fabric we will use the following stitches: chain stitch (ch), magic ring (MR), single crochet (Sc), double crochet (dc), and slip stitch (sl st). The rounds will be abbreviated with a R.
Step by step:
Step 1:
We will start by knitting the skull.
R1: we make a magic ring with 9 dc, 5 ch, 1 dc, 3 ch, 1 dc, 5 ch, and close with a slip stitch.
A recommendation I give you is that the first stitch should be a false double crochet, because you can't start knitting with a double crochet inside a magic ring; to make the false double crochet I simply knit a single crochet and over it I knit another double crochet and then I knit 8 double crochets to complete the 9 double crochets.
R2: We go up with 1 ch and make 1 sc over each of the dc of the previous row, over the 5 ch we knit 6 sc, when we get over the 3 ch that are the nose of the skull we make the following sequence ( sl st, 2ch, 3dc, 2ch, sl st), and move to the next segment of 5 ch where we will also knit 6 sc, and close the row with a slip stitch in the first sc of the beginning of the row, then we close the magic ring.
Now we have our scary skull ready.
Step 2:
Now we will knit the net that will cover the glass jar and to which we will join the skull we just knitted.
R1: to start we will make a chain stitch base, in my case there were 40 chains. The idea is to knit as many as we need to obtain the same diameter of the scratch that we are using, and we close with a sl st.
R2: we start by making 5 chains, we skip 2 chain stitches and in the third one we make 1dc and again we make 2ch in the air, we skip 2 chain stitches and in the third one we knit 1dc, this sequence of (1dc, 2ch) we will repeat it until we cover the whole back side of the jar and a little bit on the sides; in my case I repeated the sequence 10 times (I must point out that the 5 cad of the beginning count as the first sequence since the first 3 cad replace a dc).
R3-R7: in the last dc of the previous row we will go up with 5 ch (remembering that the first 3 ch count as 1 dc), and we will make 1dc over the dc of the previous row, and with this sequence of (1dc, 2ch) we will continue until completing the row.
We will repeat this row as many times as necessary to achieve the required height to cover the desired section of the jar, in my case it was 6 rows.
Step 3:
Once we have the net ready, we proceed to join the skull; and we will do this by means of chain stitches and slipped stitches. And what we will do will be to locate the center of the chains that make the hole where we will place the skull and also the center of both the top and bottom of the skull, and two other points in the part of the cheekbone of the skull. To guide you better I leave an image that I drew freehand of the skull pointing out the points that I mention.
Step 4:
To finish we make dc on the edges of the fabric to give it a better finish, I did it in poison green color hahaha ... but you could also do it in black, purple, orange and even white. In total I made 40 dc in both the upper and lower edge since my initial base was 40 chain stitches.
And in this way we finished knitting this original and AMAZING SKULL LAMP to use it as part of our Halloween decoration.
DESEO LES HAYA GUSTADO TANTO COMO A MI EL RESULTADO Y ESPERO SUS IMPRESIONES SOBRE ESTE ESPELUSNANTE Y ATERRADOR TRABAJO REALIZADO EN CROCHET Y TAMBIEN SUS BONITOS COMENTARIOS Y/O VOTOS, ASÍ ME MOTIVAN PARA SEGUIR COMPARTIENDO MIS CREACIONES CON USTEDES.
Se despide de ustedes con mucho cariño su amiga Nathalie @laranitacrochet
*Todas las fotografías utilizadas en la publicación son propiedad de la autora.
*Las fotografías fueron tomadas y editadas con mi REDMI 9 y con la App FotoRoom.
*La traducción la hice en https://www.deepl.com/es/translator
I HOPE YOU LIKED THE RESULT AS MUCH AS I DID AND I HOPE YOUR IMPRESSIONS ABOUT THIS SPOOKY AND SCARY CROCHET WORK AND ALSO YOUR NICE COMMENTS AND / OR VOTES, SO I WILL BE MOTIVATED TO CONTINUE SHARING MY CREATIONS WITH YOU.
Your friend Nathalie @laranitacrochet bids you a fond farewell.
*All photographs used in the publication are property of the author.
*The pictures were taken and edited with my REDMI 9 and the FotoRoom App.
*The translation was done at https://www.deepl.com/es/translator