
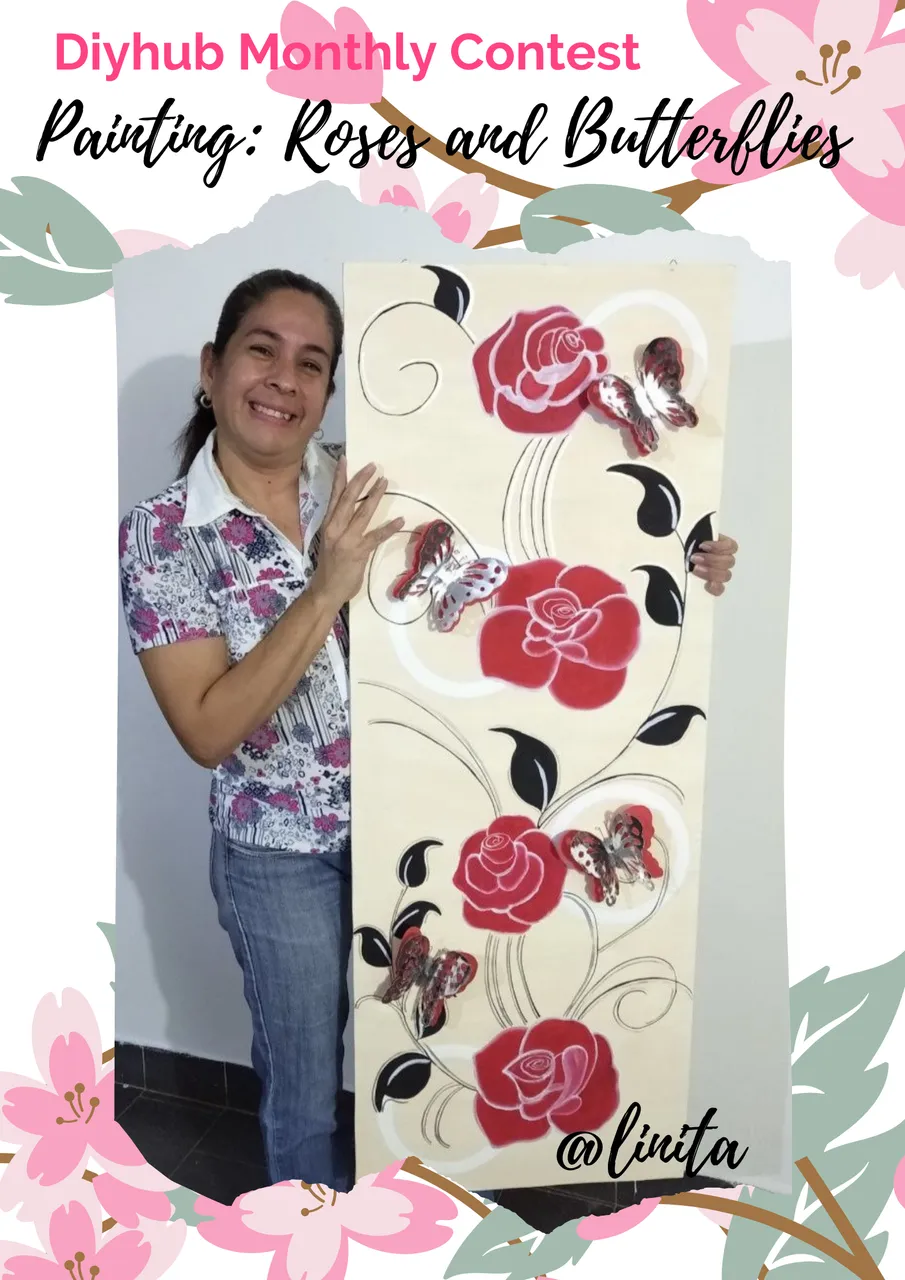
WELCOME TO MY BLOG
Hellooooo, hellooooo! As always, a real pleasure to greet you and share new content with you. This time and finally with my participation in the new contest of the month. As I had told you before, I couldn't decide what I wanted to do to participate. Sometimes I have conflicts with myself, I always demand more from myself than I can give or cover, but at the same time I feel comfortable because I know that I can at least try. When I saw that they launched this proposal, the brainstorm of ideas that came to my mind were many, so many that I couldn't decide, not so much because I didn't have the materials or the time, but because of my health condition. The first idea was to make a mural on a recently painted wall, this type of art on the walls has always caught my attention, in fact, when I had my daughters I wanted to decorate their room with children's motifs and I bought magazines and some materials to make them. , but I never managed to get enough motivation to do them. And today that enthusiasm wins me, the physical energies are no longer the same, however I tried to start the project but unfortunately I couldn't due to my neck pain problem. So I changed the same project but it would no longer be a mural type but a painting that would allow me to express the same enthusiasm and achieve the goal in the same way.
So today I present to you this beautiful project, at least it seems so to me and it fills me with great pride and joy because as always my expectations of achieving it are sometimes negative and I myself am surprised with what I manage to do, because my abilities In painting they are scarce and I like them so much that even so I try to capture all my love in each painting I do. With these roses, we not only start the spring season, but I will give harmony and a lot of joy to my house. I hope you like it. Without further ado let's begin.
BIENVENIDOS A MI BLOG
¡Holaaaaa, holaaaaa! Como siempre un verdadero placer saludarlos y compartir con ustedes un nuevo contenido. Esta vez y ya por fin con mi participación en el nuevo concurso del mes. Como les había comentado anteriormente no me podía decidir en lo que quería hacer para participar. A veces tengo conflictos conmigo misma por siempre me exijo más de lo que puedo dar o abarcar pero a la vez me siento a gusto porque se que puedo por lo menos intentarlo. Cuando vi que lanzaron esta propuesta la lluvia de ideas que vinieron a mi cabeza fueron muchas, tantas que no me decidía, no tanto por no contar con los materiales o el tiempo, sino por mi condición de salud. La primera idea fue realizar un mural en una pared recién pintada, siempre me ha llamado la atención este tipo de arte en las paredes, de hecho, cuando tuve a mis hijas quise decorarles su habitación con motivos infantiles y compré revistas y algunos materiales para hacerlos, pero nunca logré tener la suficiente motivación para hacerlos. Y hoy que el entusiasmo me gana, ya las energías físicas no son las mismas, sin embargo hice el intento de iniciar el proyecto pero lamentablemente no pude por mi problema de cervicalgia. Así que cambié el mismo proyecto pero ya no sería tipo mural sino un cuadro que me permitiría expresar el mismo entusiasmo y de igual manera lograr la finalidad.
Así que hoy les presento este bello proyecto, por lo menos a mi me lo parece y me llena de mucho orgullo y alegría porque como siempre mis expectativas de lograrlo algunas veces son negativas y yo misma me sorprendo con lo que logro hacer, porque mis habilidades en pintura son escasas y me gusta tanto, que aún así hago el intento de plasmas todo mi amor en cada pintura que hago. Con estas rosas, no sólo iniciamos la temporada de primavera, sino que daré armonía y mucha alegría a mi casa. Espero les guste. Sin más comencemos.
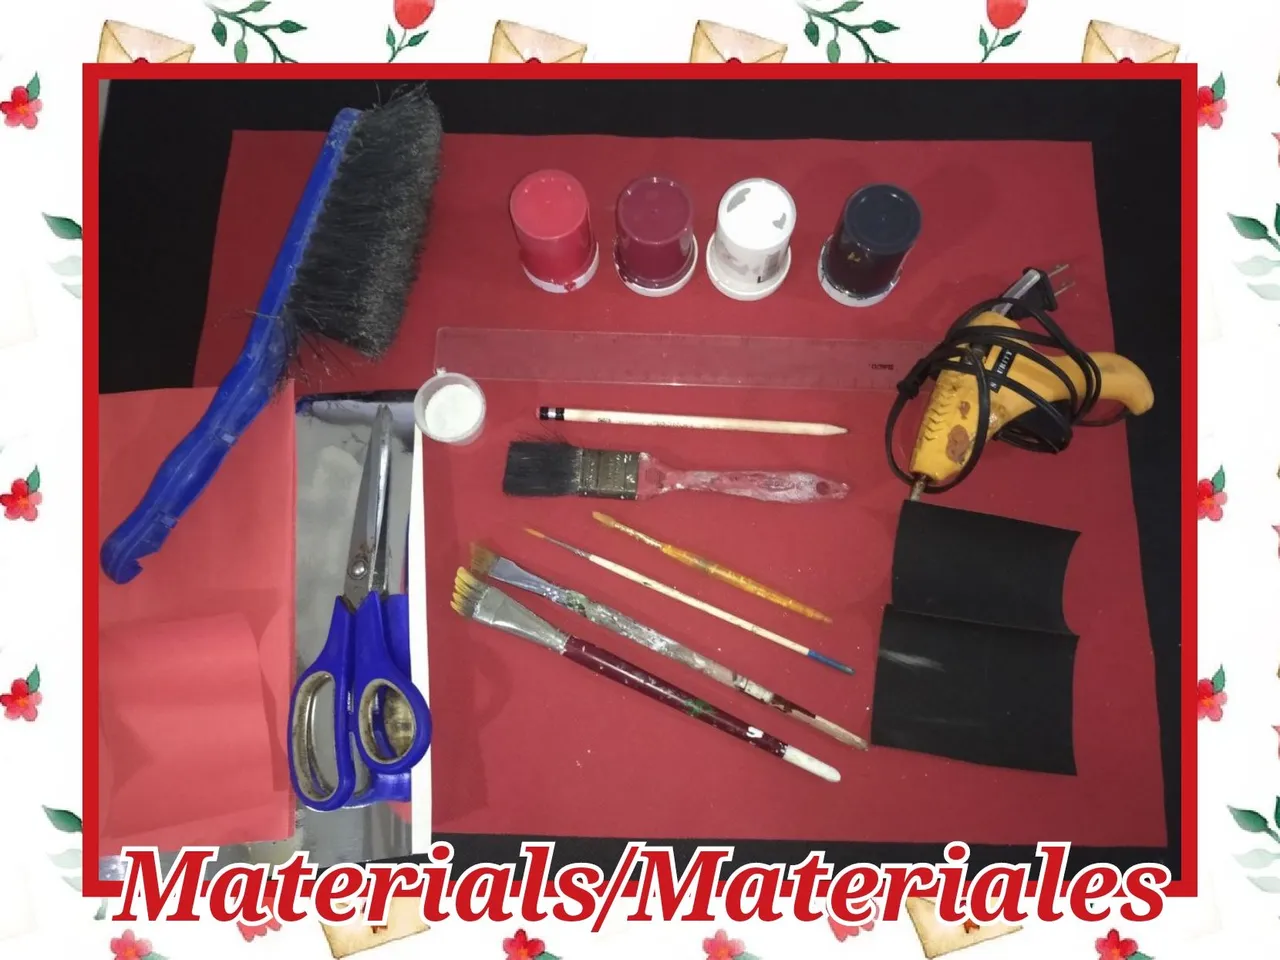
MATERIALS
- 1 sheet of 9 mm MDF measuring 120 cm x 50 cm
- Red, wine, white, black, gray and cream cold paints
- White wall paint
- Sandpaper No. 180 and 150
- Silicone gun
- Butterflies made in 3D
- Brushes
- Brush
- Compass
- Graphite pencil
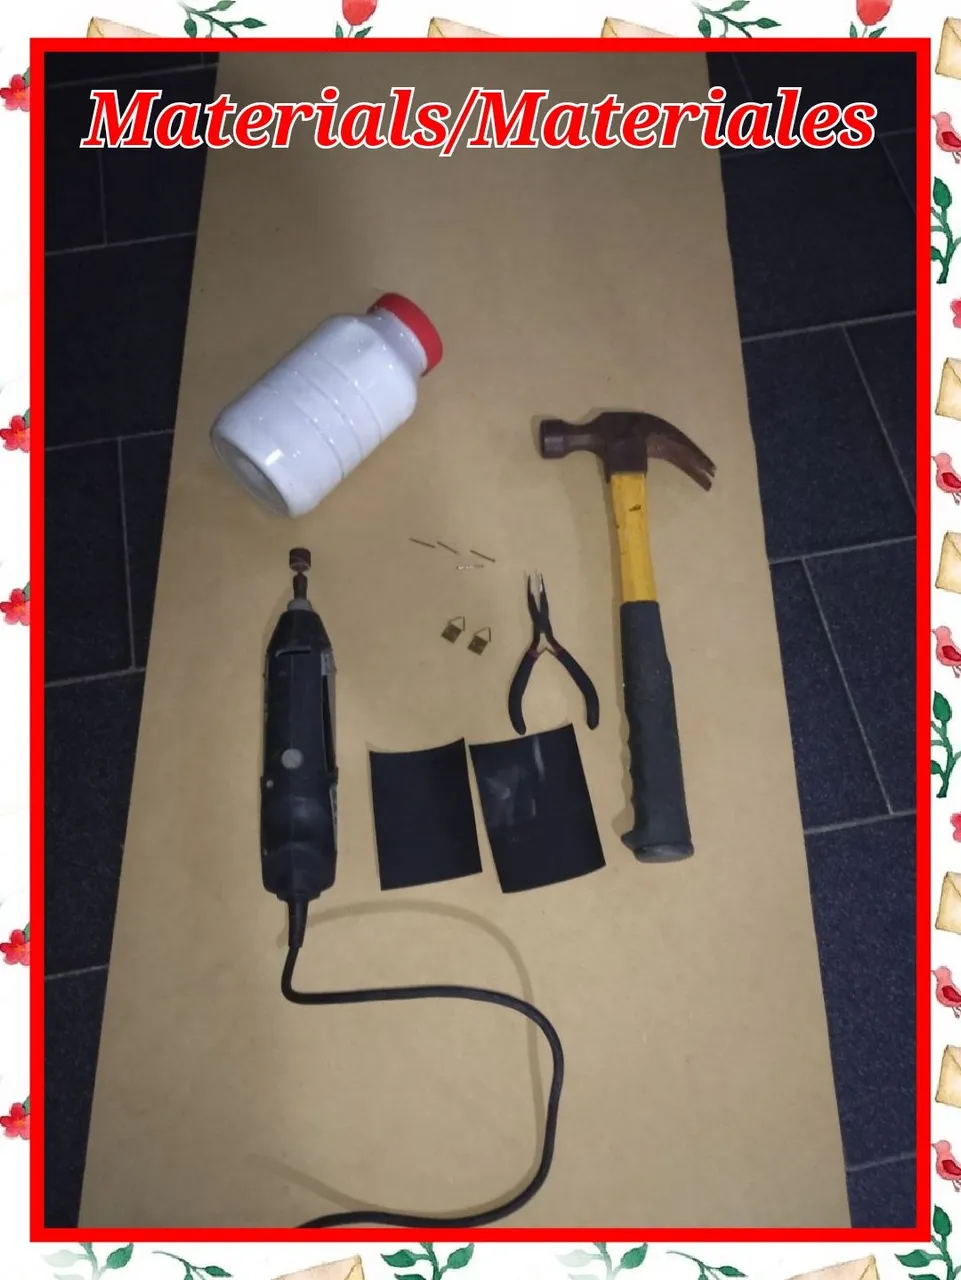
- Dremel
- Hammer
- Gripper
- Marquetry hooks
- Wooden nails
- Hand brush
MATERIALES
- 1 lámina de MDF de 9 mm de 120 cm x 50 cm
- Pinturas al frío roja, vino, blanca, negra, gris y crema
- Pintura blanca de pared
- Lijas Nº 180 y 150
- Pistola de silicón
- Mariposas hechas en 3D
- Pinceles
- Brocha
- Compás
- Lápiz de grafito
- Dremel
- Martillo
- Pinza
- Ganchos de marquetería
- Clavos de madera
- Cepillo de mano
STEP BY STEP // PASO A PASO
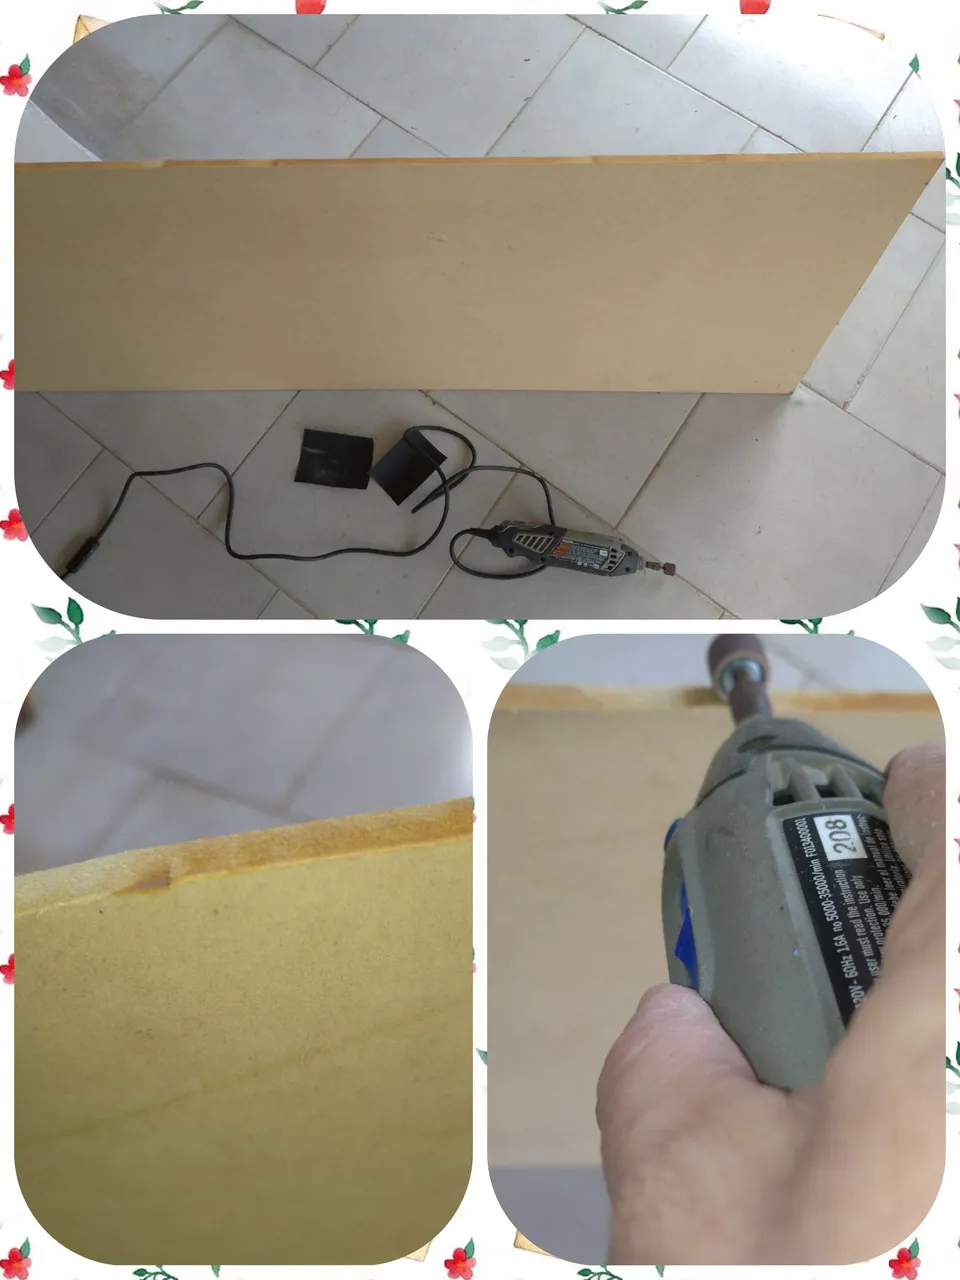
STEP #1
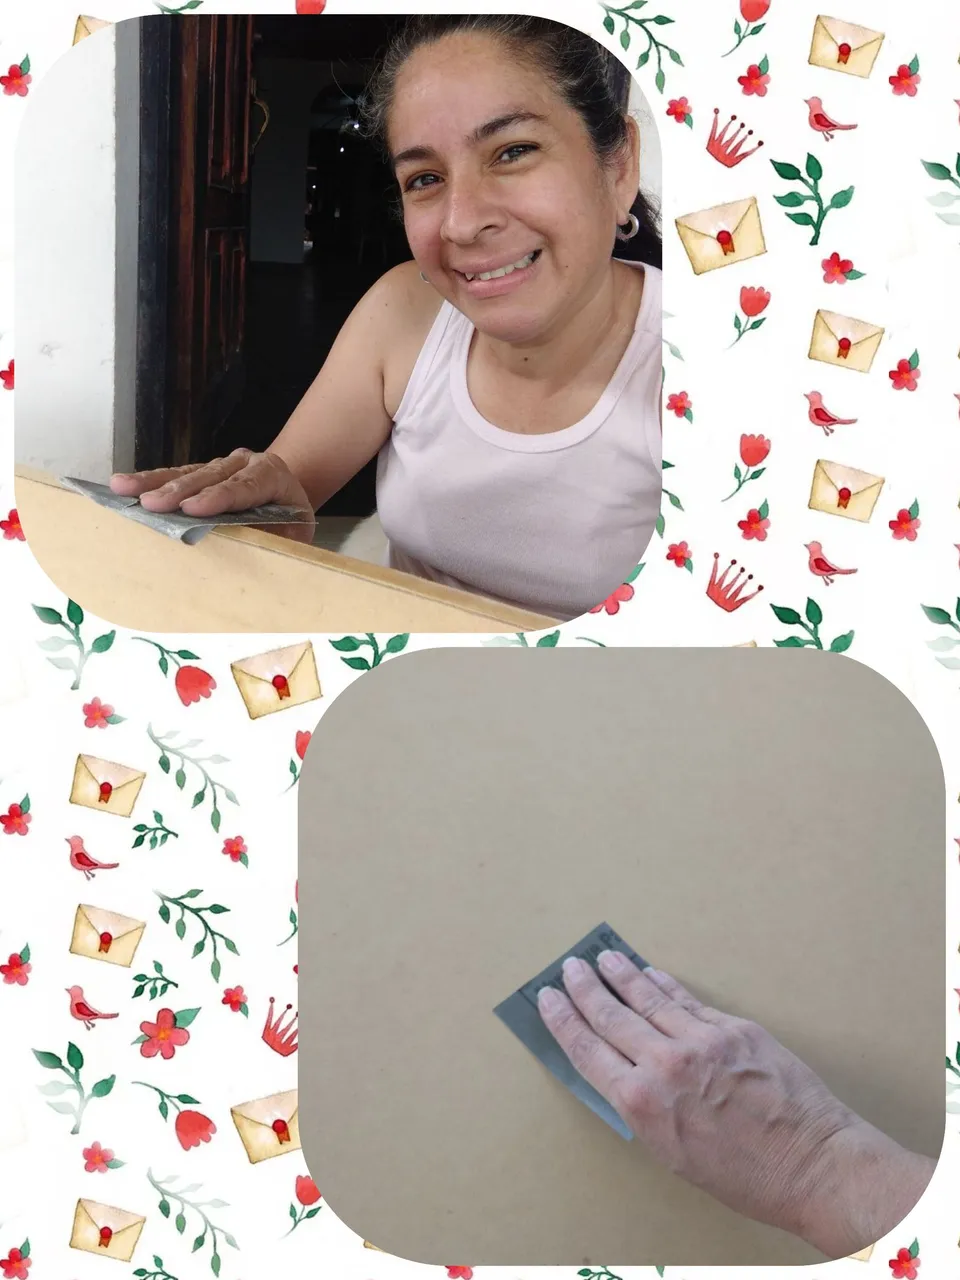
We start by removing any possible imperfections in the MDF sheet. Being a piece chopped at home with a manual jigsaw, sometimes the short has small curvatures that we can eliminate with the dremel and the sanding band. Then with the #180 sandpaper, we eliminate the edge of the edges.
We pass the #150 sandpaper through the rest of the MDF until we get a smooth texture, which facilitates the sliding of the paint.
PASO #1
Comenzamos eliminando las posibles imperfecciones en la lámina de MDF. Al ser una pieza picada en casa con caladora manual, algunas veces el corto tiene pequeñas curvaturas que podemos eliminar con el dremel y la banda para lijado. Luego con la lija #180, eliminamos el filo de las orillas.
Pasamos la lija #150 por el resto del MDF hasta conseguir una textura suave, que facilite el deslizamiento de la pintura.
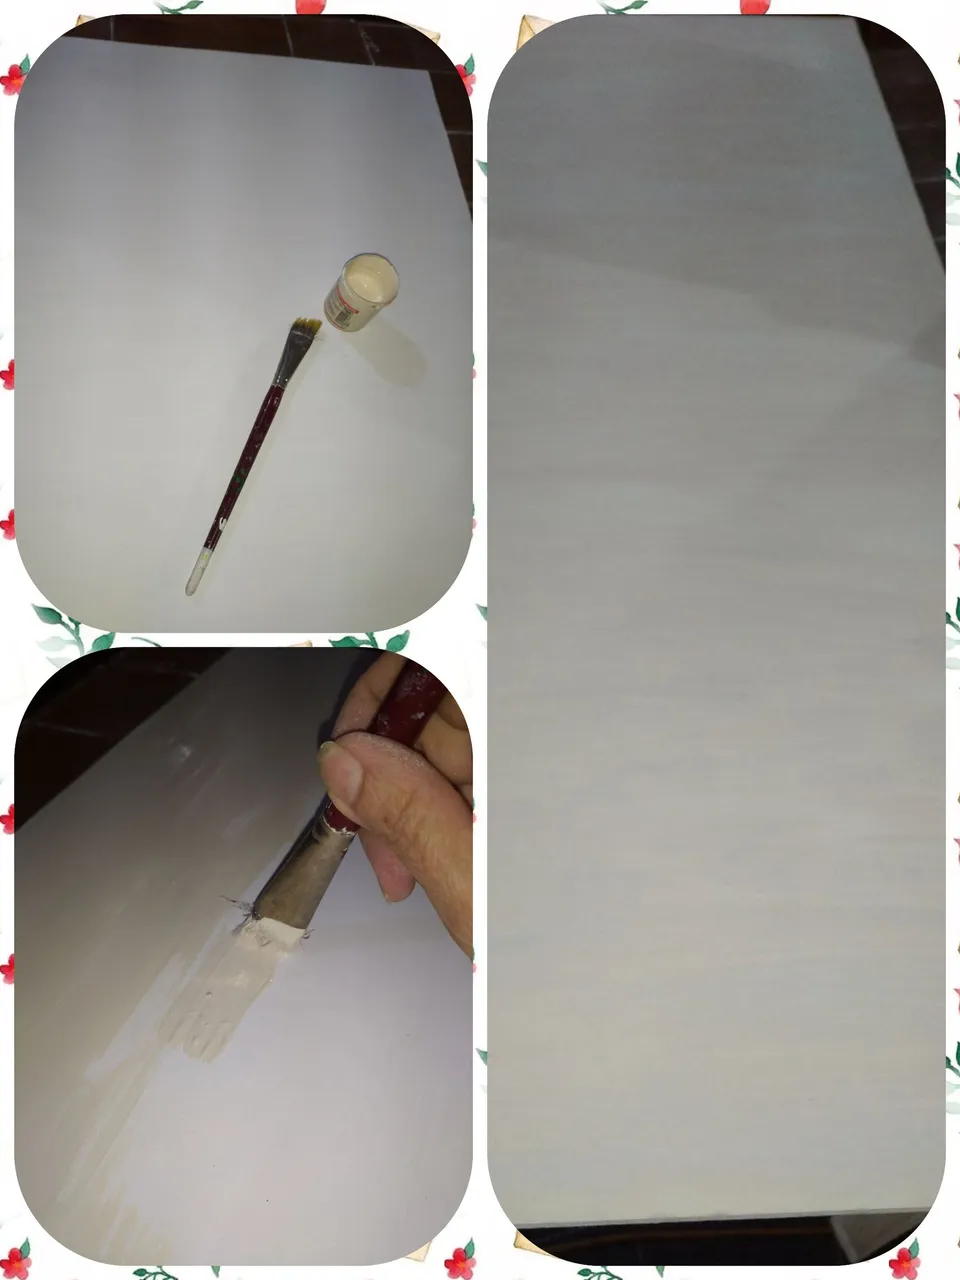
STEP #2
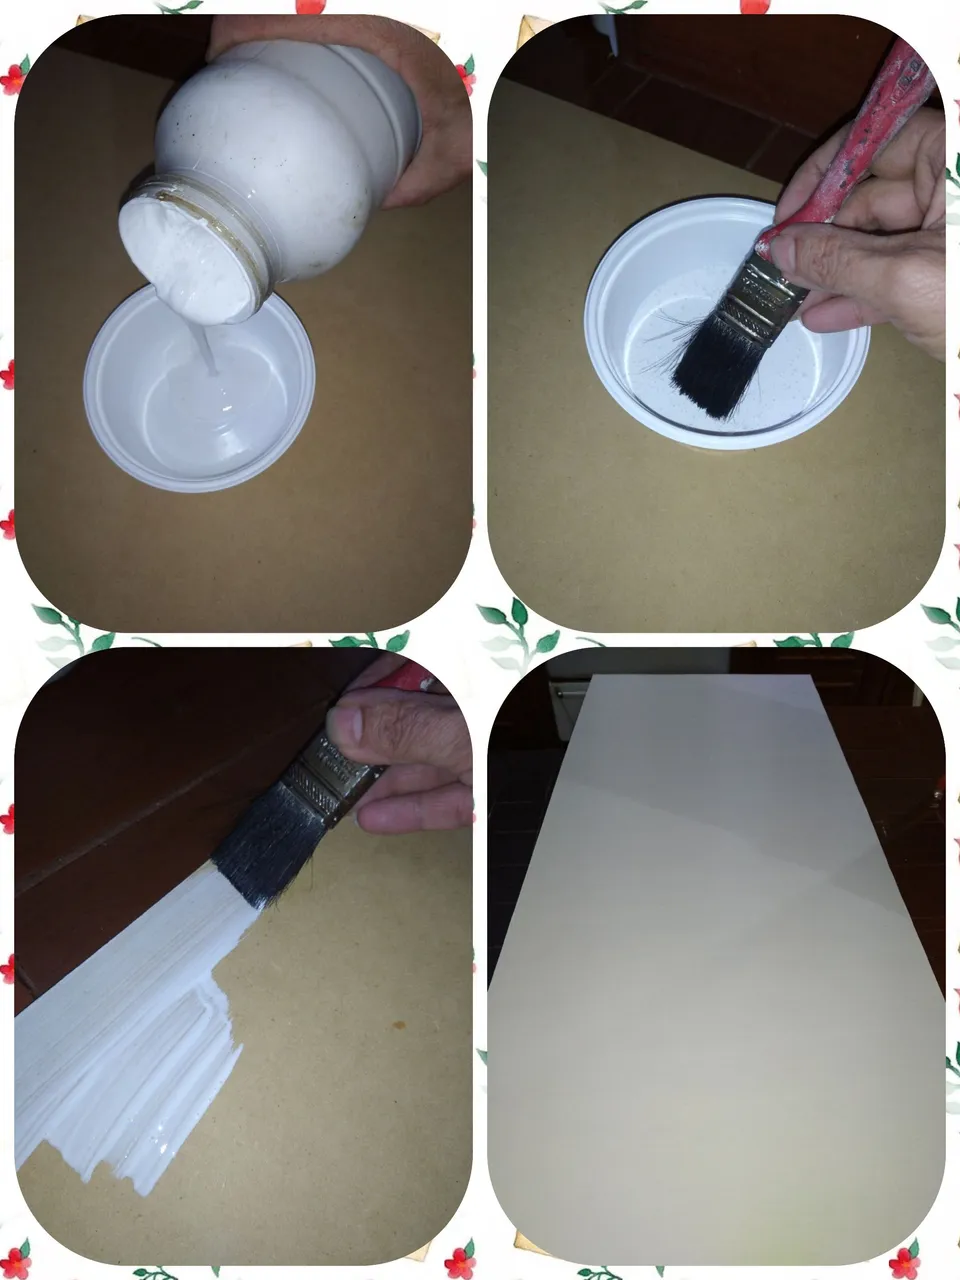
We paint the MDF with white rubber paint for walls, we do this to achieve a better finish, in addition to lowering costs, since if we do it with cold paint the expense is higher. With the use of the brush or brush we will give 3 layers for which it will be the front part and for the back only one layer.
PASO #2
Pintamos el MDF con la pintura de caucho blanca para paredes, esto lo hacemos para lograr un mejor acabado además que abaratamos costos, ya que si lo hacemos con pintura al frío el gasto es mayor. Con el uso de la brocha o pincel daremos 3 capas por la que será la parte delantera y por la por detrás sólo una capa.
STEP #3
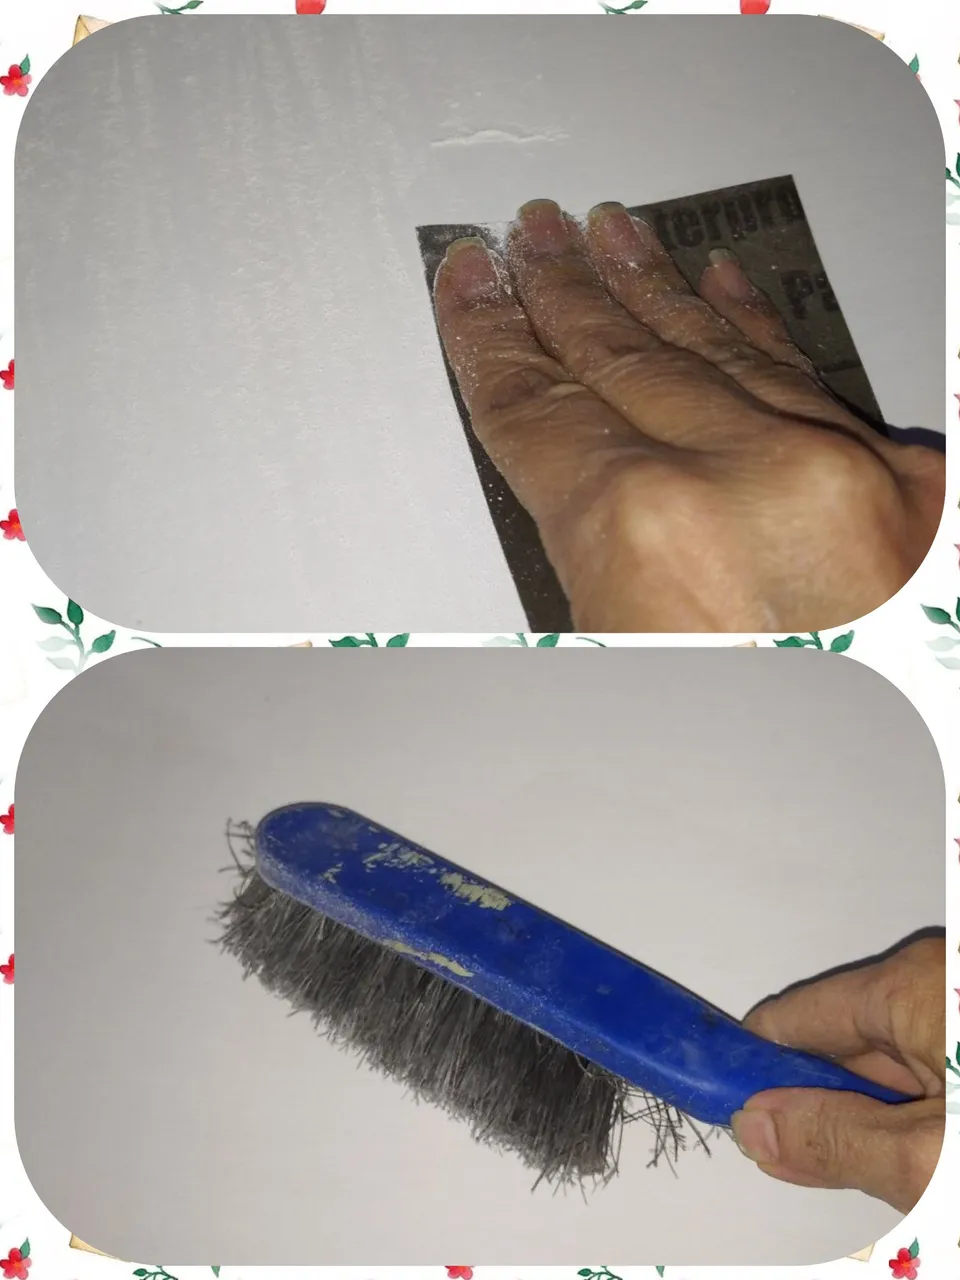
We pass the No. 150 sandpaper again. When we sand with this sandpaper we obtain a very smooth surface that is very pleasant to paint, since the pencil and brushes slide without any problem.
With the hand brush we remove the dust.
PASO #3
Pasamos nuevamente la lija Nº 150. Cuando lijamos con esta lija obtenemos una superficie muy lisa que resulta muy agradable para pintar, ya que el lápiz y los pinceles se deslizan sin ningún problema.
Con el cepillo de mano retiramos el polvillo.
STEP #4
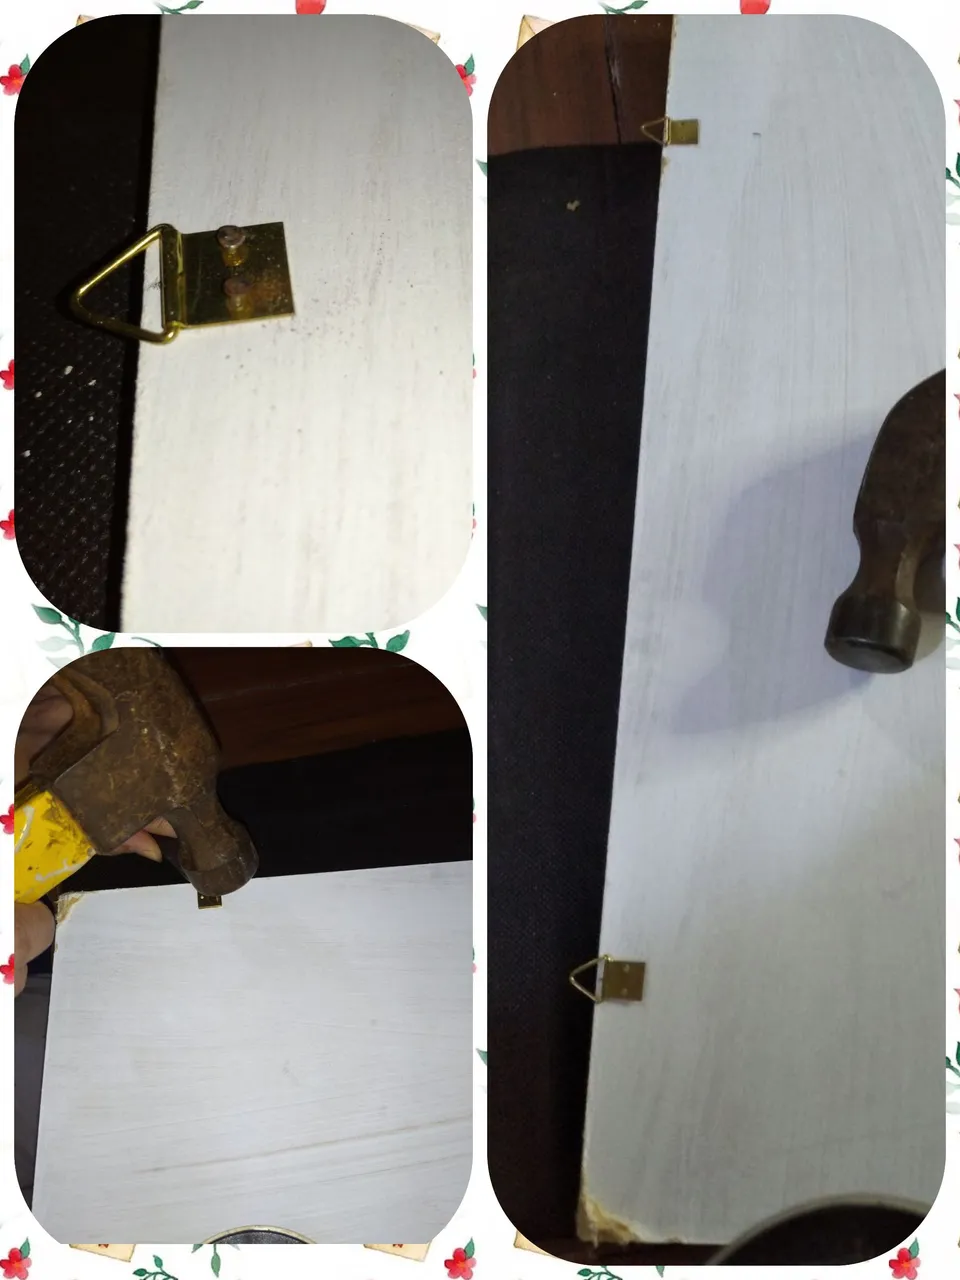
We do the framing. With the cutting pliers, we adapt the nails to the thickness of the MDF and then with the pliers and the hammer we place the marquetry hooks.
PASO #4
Realizamos el enmarcado. Con la pinza de corte, adaptamos los clavos al grosor del MDF y luego con la pinza y el martillo colocamos los ganchos de marquetería.
STEP #5
With the flat brush and the cold cream-colored paint we begin to paint the background for our painting. In this step we will only do one layer of paint, since the shade that we will achieve with the cold cream paint and the remains of dust from the rubber paint is appropriate for the art that we will do.
PASO #5
Con el pincel plano y la pintura al frío color crema comenzamos a pintar el fondo para nuestro cuadro. En este paso solo haremos una capa de pintura, ya que el matiz que conseguiremos con la pintura al frío crema y los restos de polvillo de la pintura de caucho, es apropiado para es el arte que haremos.
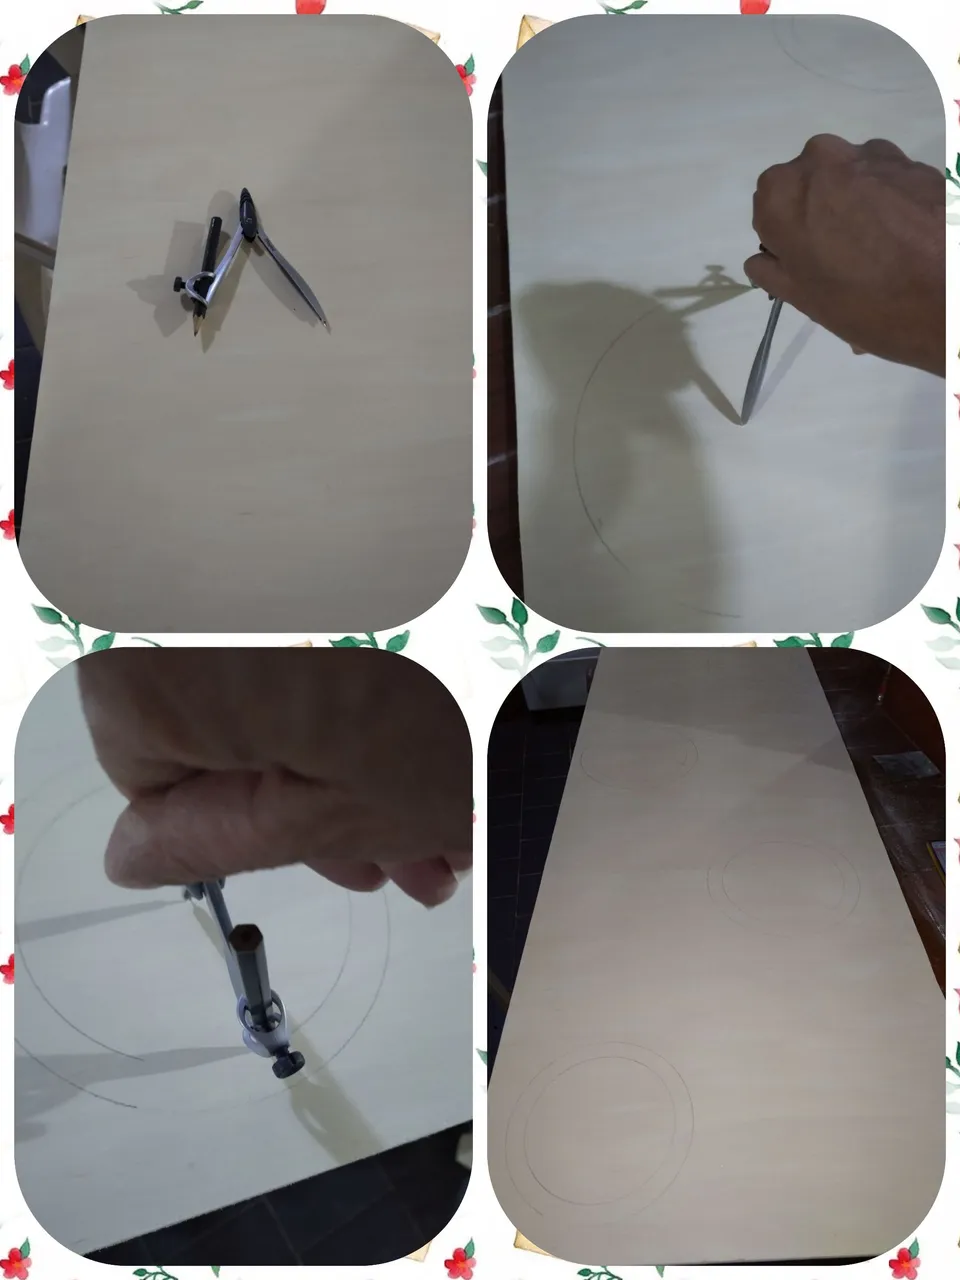
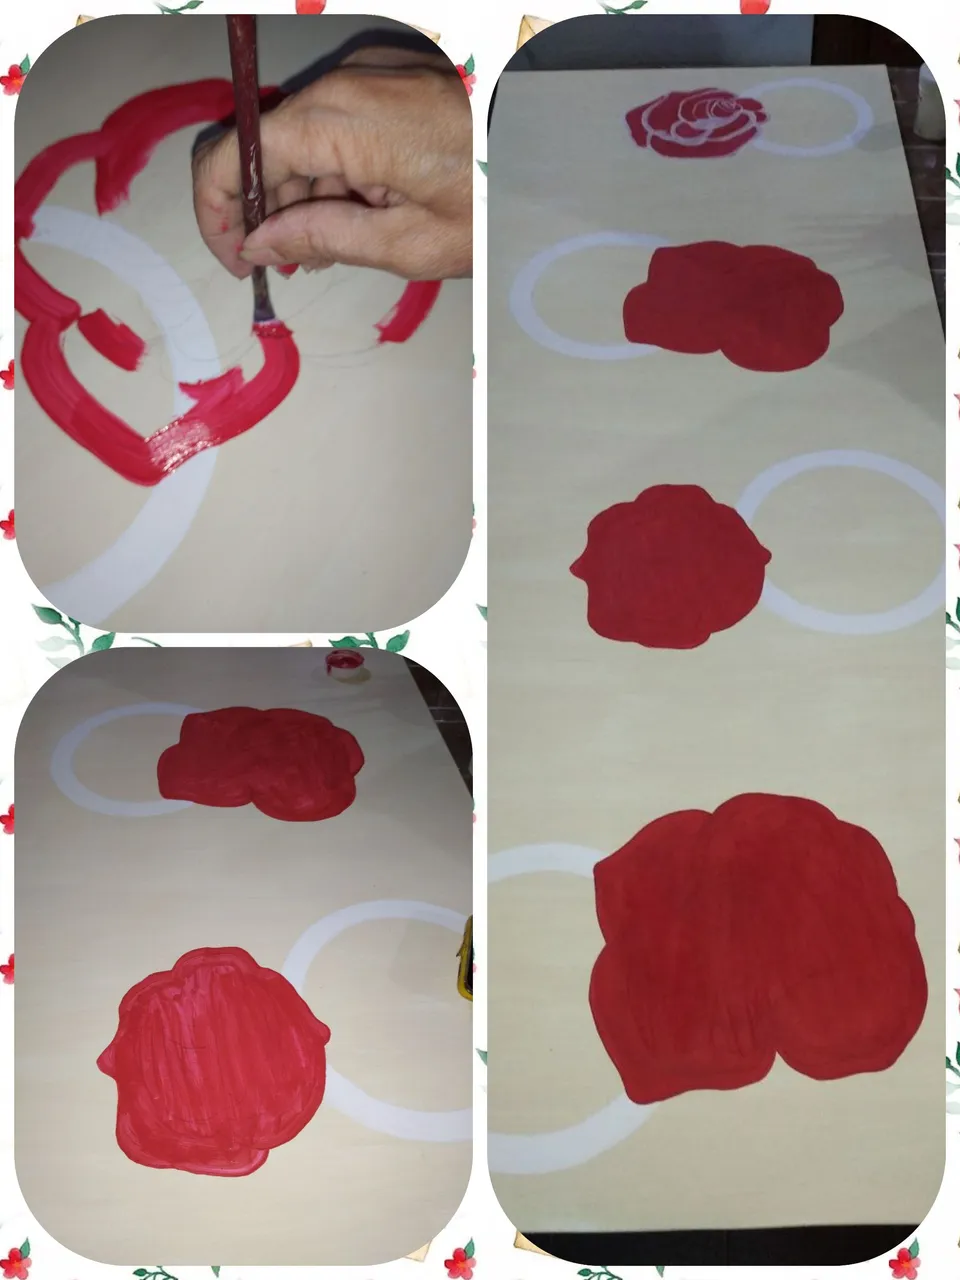
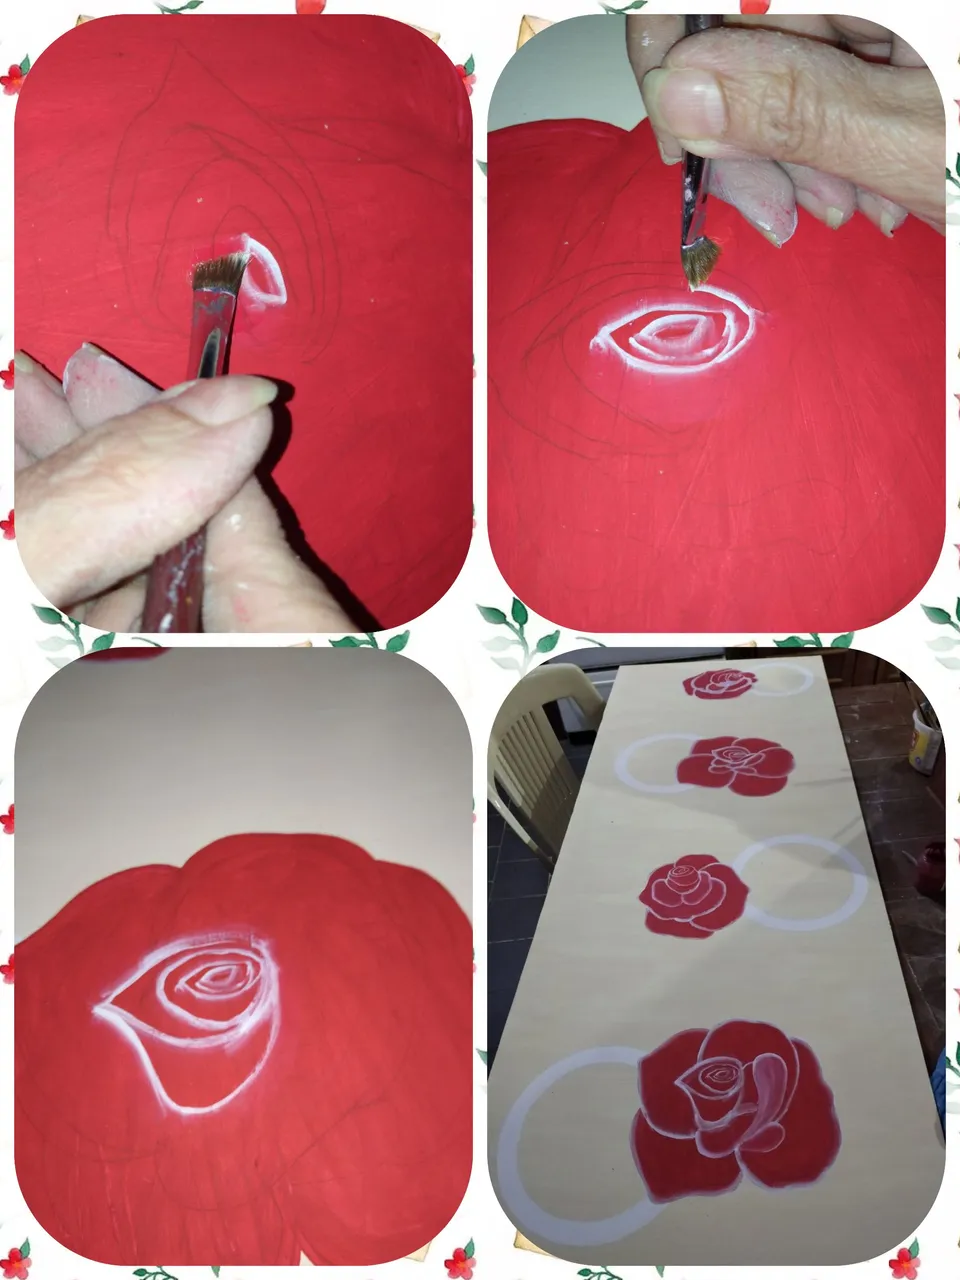
STEP #6
Once the paint is dry, we will make double circles in 4 spaces on the sheet. We will do this randomly both the size and the place where we want to do it. What we can do is coordinate it with the place where we will paint the roses. We will make 2 circles one inside the other to form a ring.
PASO #6
Una vez seca la pintura, realizaremos doble círculos en 4 espacios de la lámina. Esto lo haremos de forma aleatoria tanto el tamaño como el lugar donde lo queramos hacer. lo que si podremos hacer es coordinarlo con el lugar donde pintaremos las rosas. Haremos 2 círculos uno dentro del otro para formar un aro.
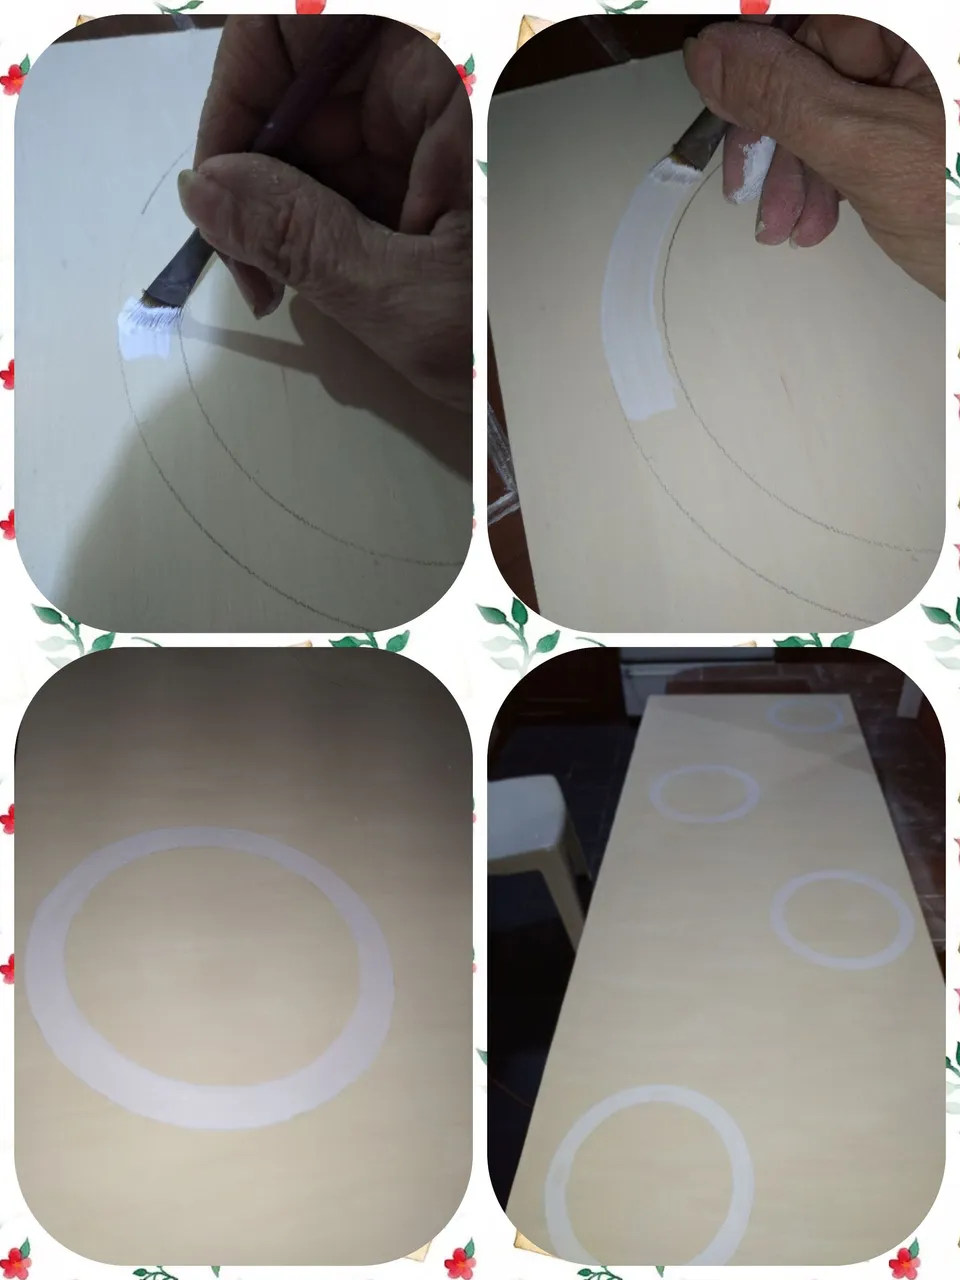
STEP #7
With the white cold paint and the angular brush we fill the rings, one by one. We give two hands to each hoop.
PASO #7
Con la pintura al frío blanca y el pincel angular rellenamos los aros, uno por uno. Damos dos manos a cada aro.
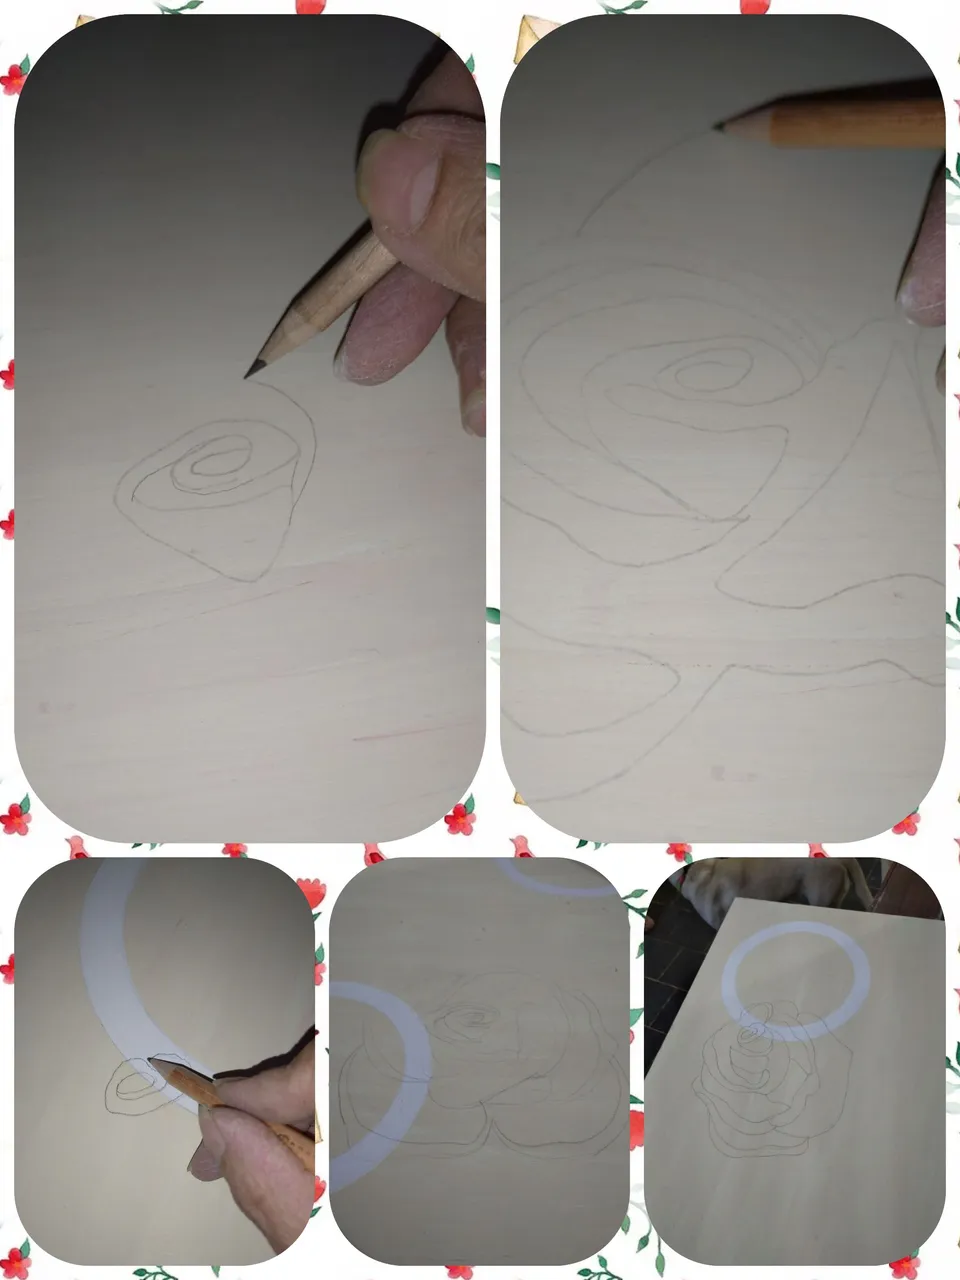
STEP #8
We begin to paint our 4 roses that will form the painting. For this we use the graphite pencil. We take as a guide for the hoops. Next to each one we will paint a rose.
PASO #8
Comenzamos a pintar nuestras 4 rosas que formará el cuadro. Para ello utilizamos el lápiz de grafito. Tomamos como guía para los aros. Al lado de cada uno pintaremos una rosa.
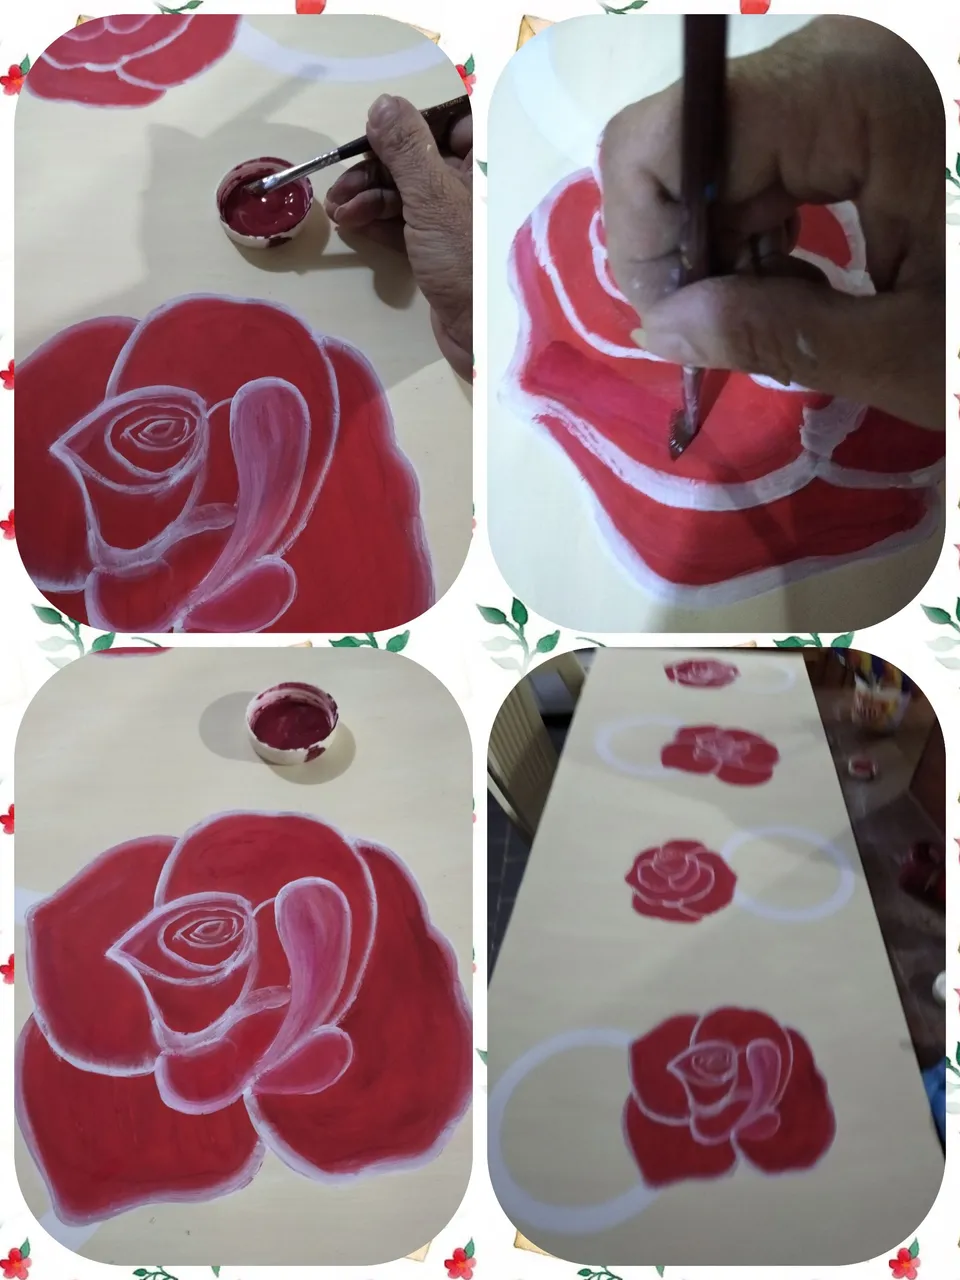
STEP #8
We begin to fill our roses with cold red paint and using the angular brush that will facilitate the outline of the rose. We will give two coats of paint.
PASO #8
Comenzamos a rellenar nuestras rosas con pintura al frío color rojo y utilizando el pincel angular que nos facilitará el delineado de la rosa. Daremos dos manos de pintura.
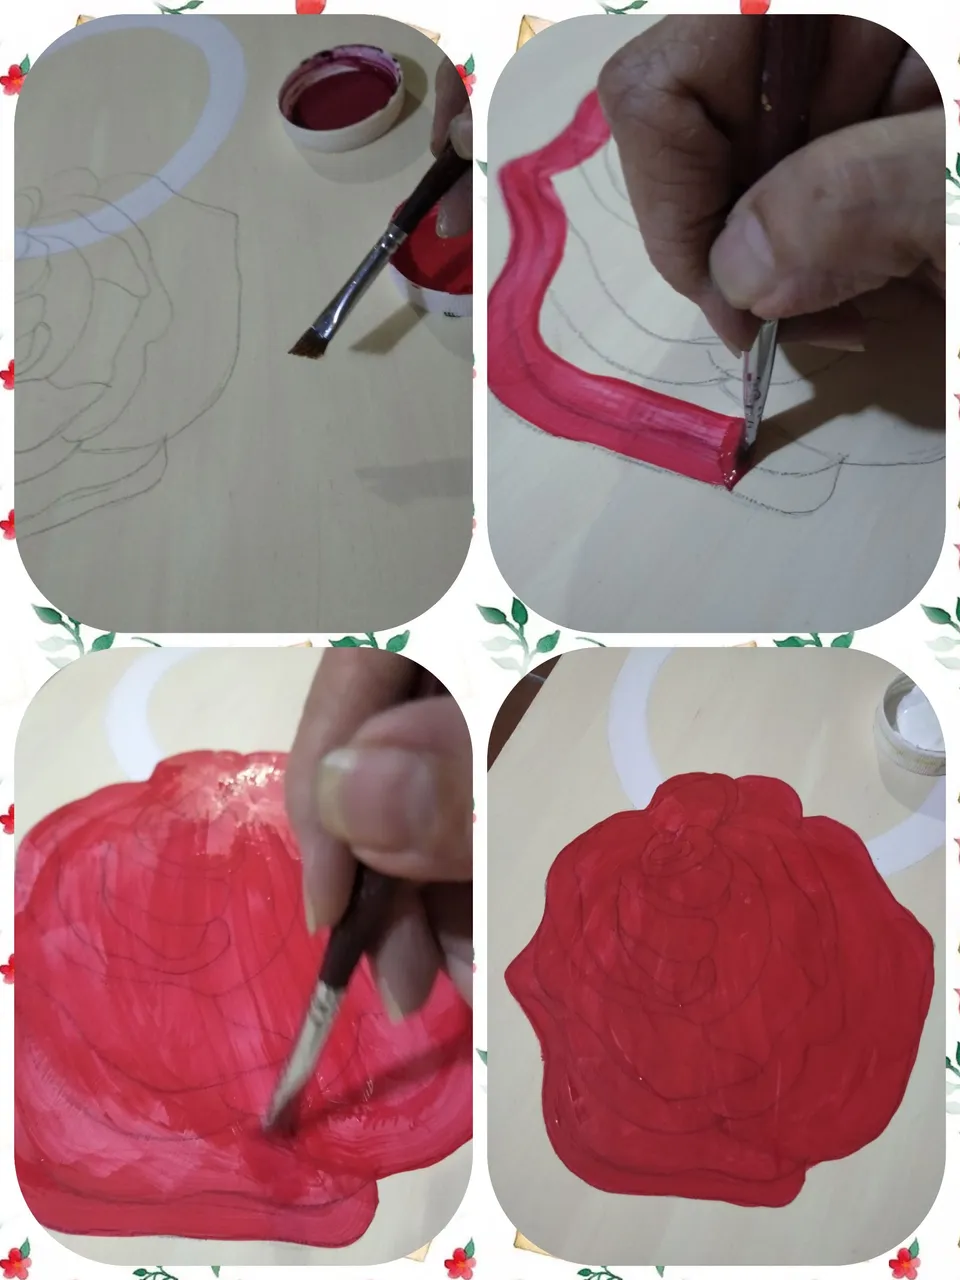
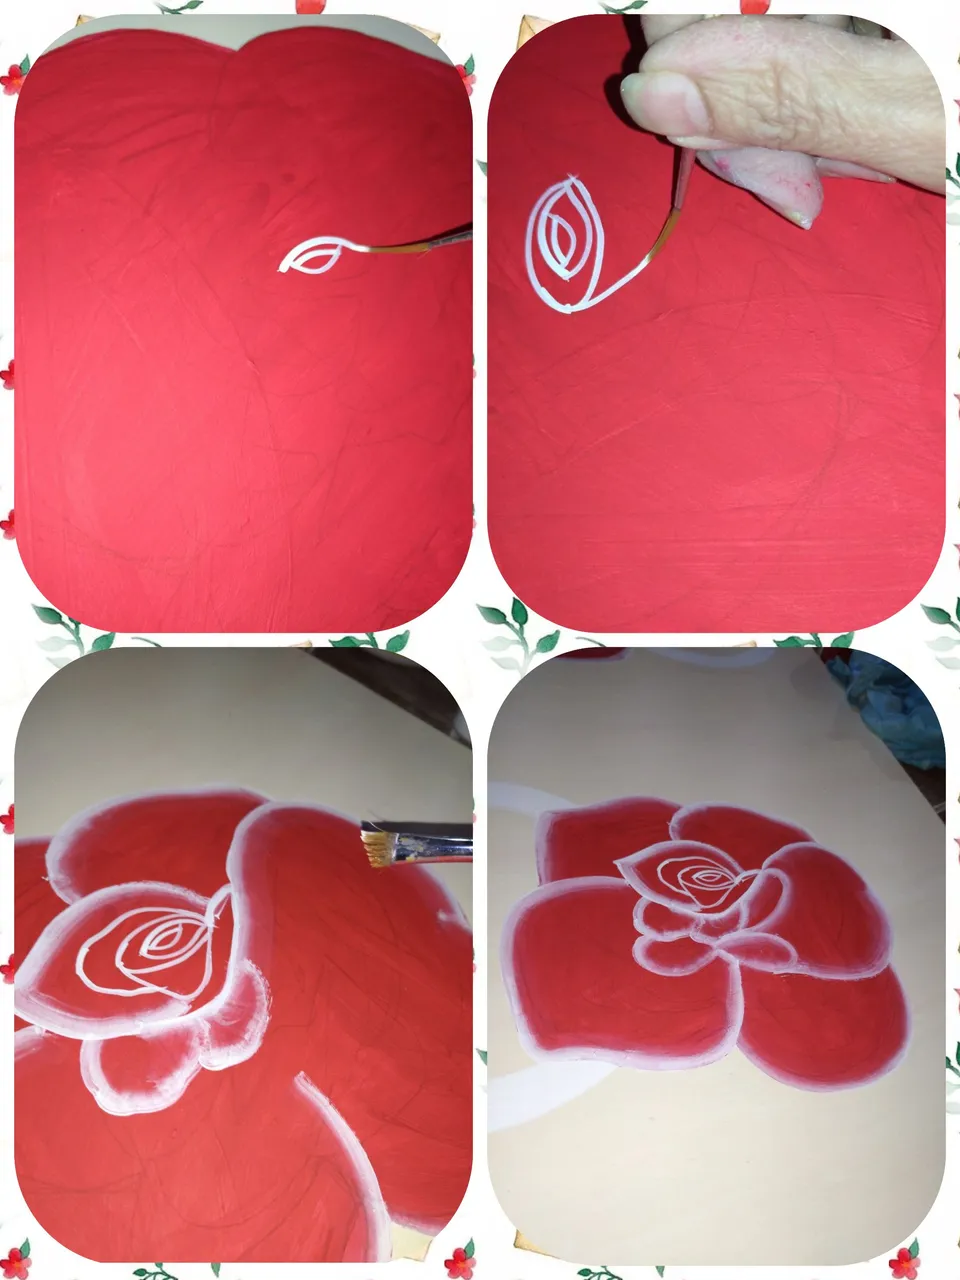
STEP #9
We begin to form the rose by making the paths with the guide of the lines previously marked when drawing. We use a flat brush to outline the rose and an angled brush to give volume and highlight the contours through the shading.
PASO #9
Empezamos a formar la rosa realizando los trazados con la guía de las líneas anteriormente marcadas al dibujar. Utilizamos un pincel plano para delinear la rosa y un pincel angular para dar volumen y resaltar los contornos a través del sombreado.
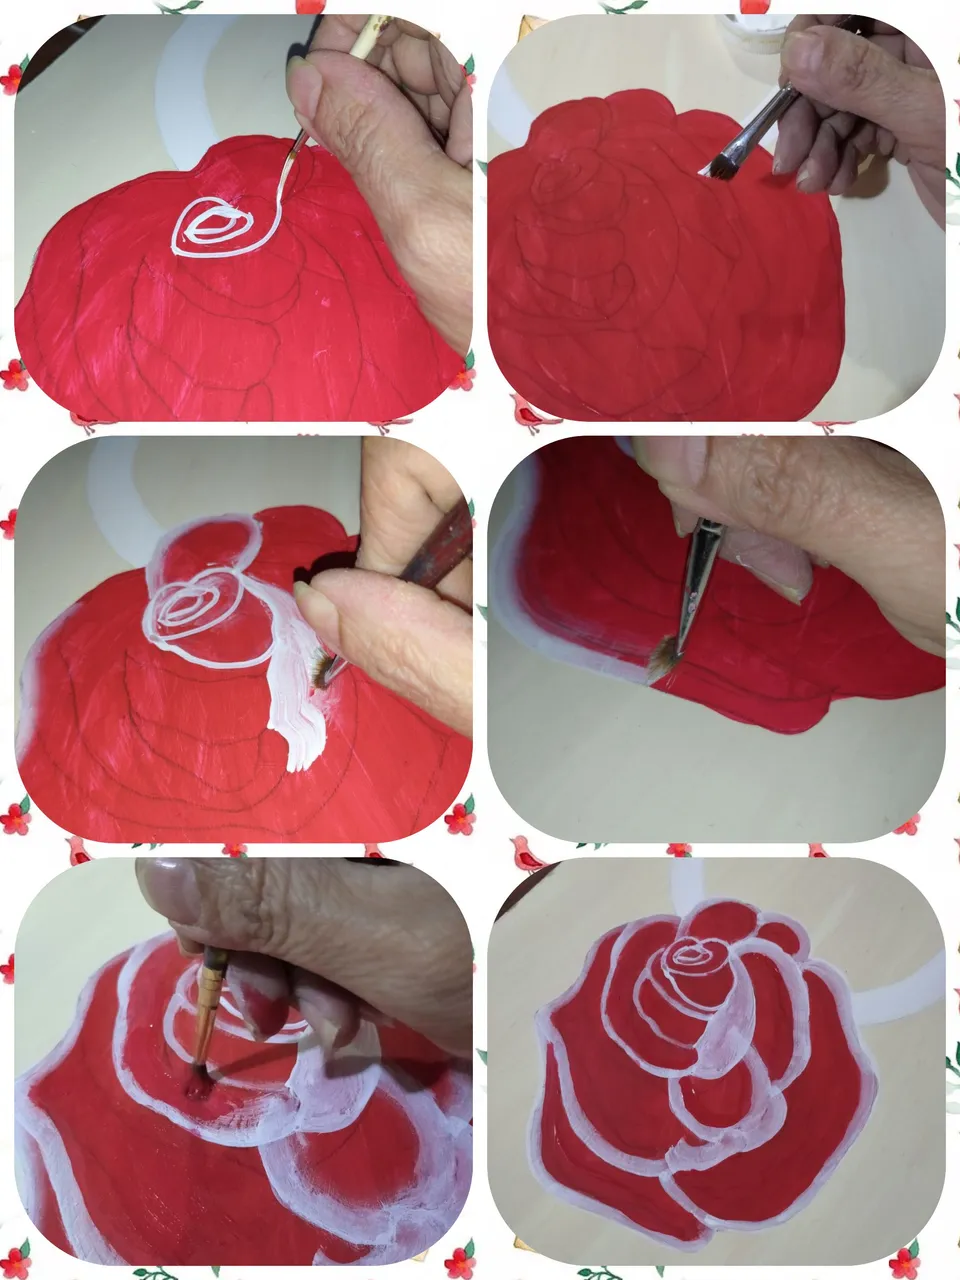
STEP #10
We will carry out the same procedure as in the previous step for the remaining 3 roses. We let dry.
PASO #10
Realizaremos el mismo procedimiento del paso anterior para los 3 rosas restantes. Dejamos secar.
STEP #11
We loaded the brush with cold red wine paint and then made scattered brushstrokes around the outline of all the roses to give more depth.
PASO #11
Cargamos el pincel en pintura al frío vino tinto y luego realizamos pinceladas dispersas por el contorno de todas las rosas para dar más profundidad.
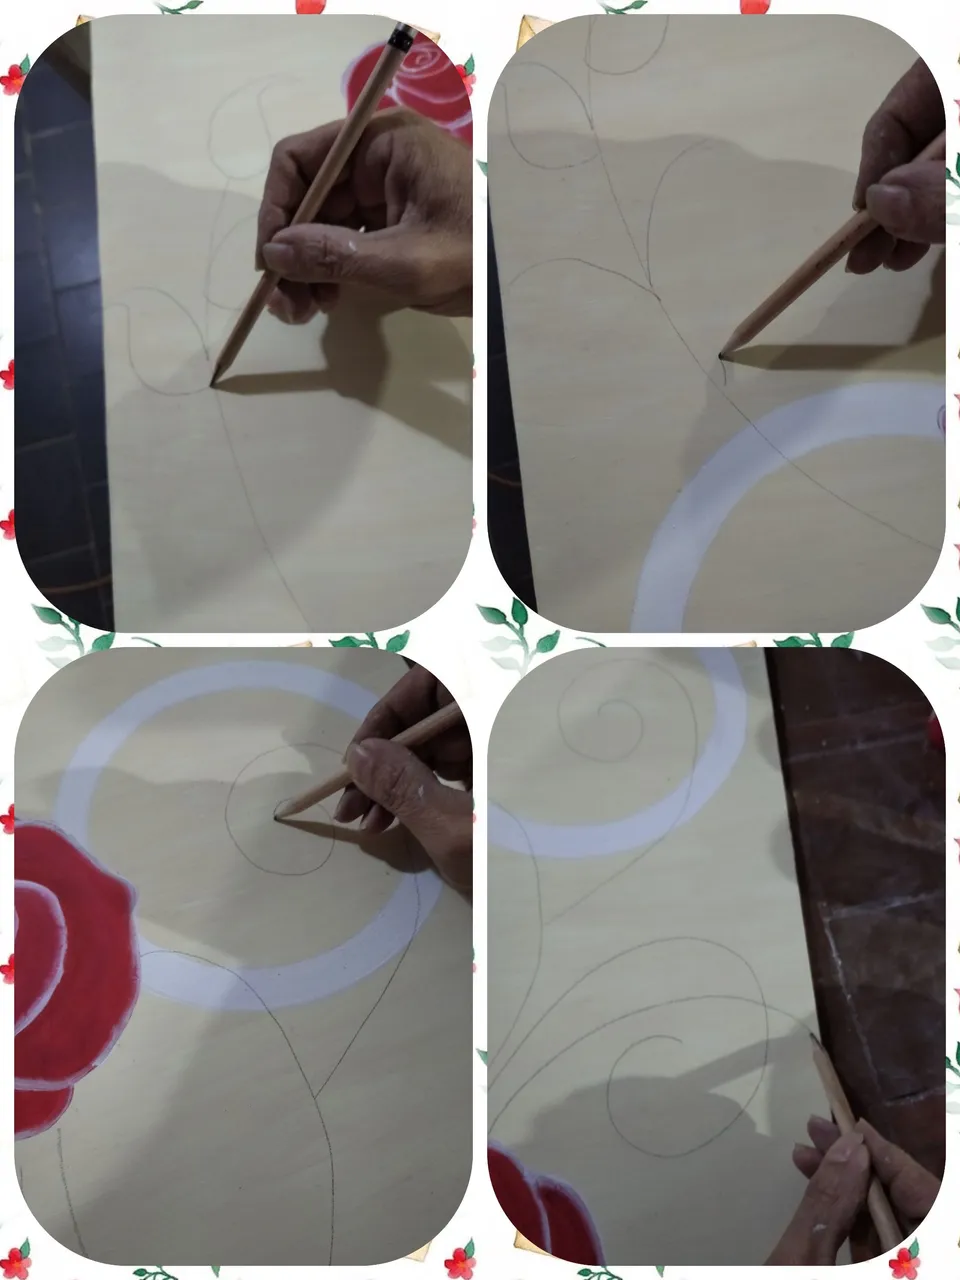
STEP #12
Ready our roses, now we will make the branches and the final details. With the graphite pencil we make different strokes in some we place leaves and the rest only for decoration.
PASO #12
Listas nuestras rosas, ahora realizaremos en enramado y los detalles finales. Con el lápiz de grafito realizamos diferentes trazos en unos colocamos hojas y el resto sólo para decoración.
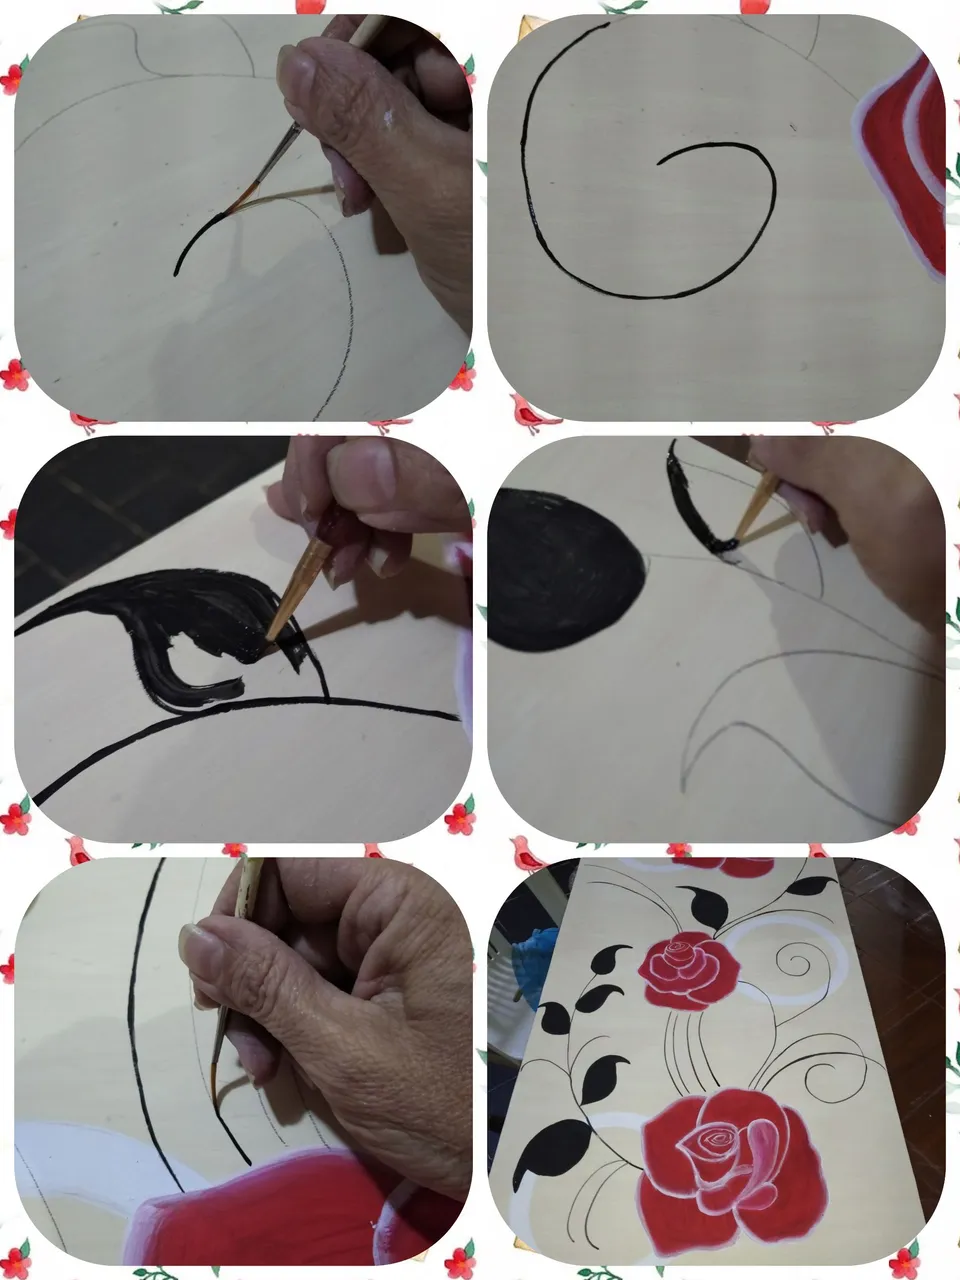
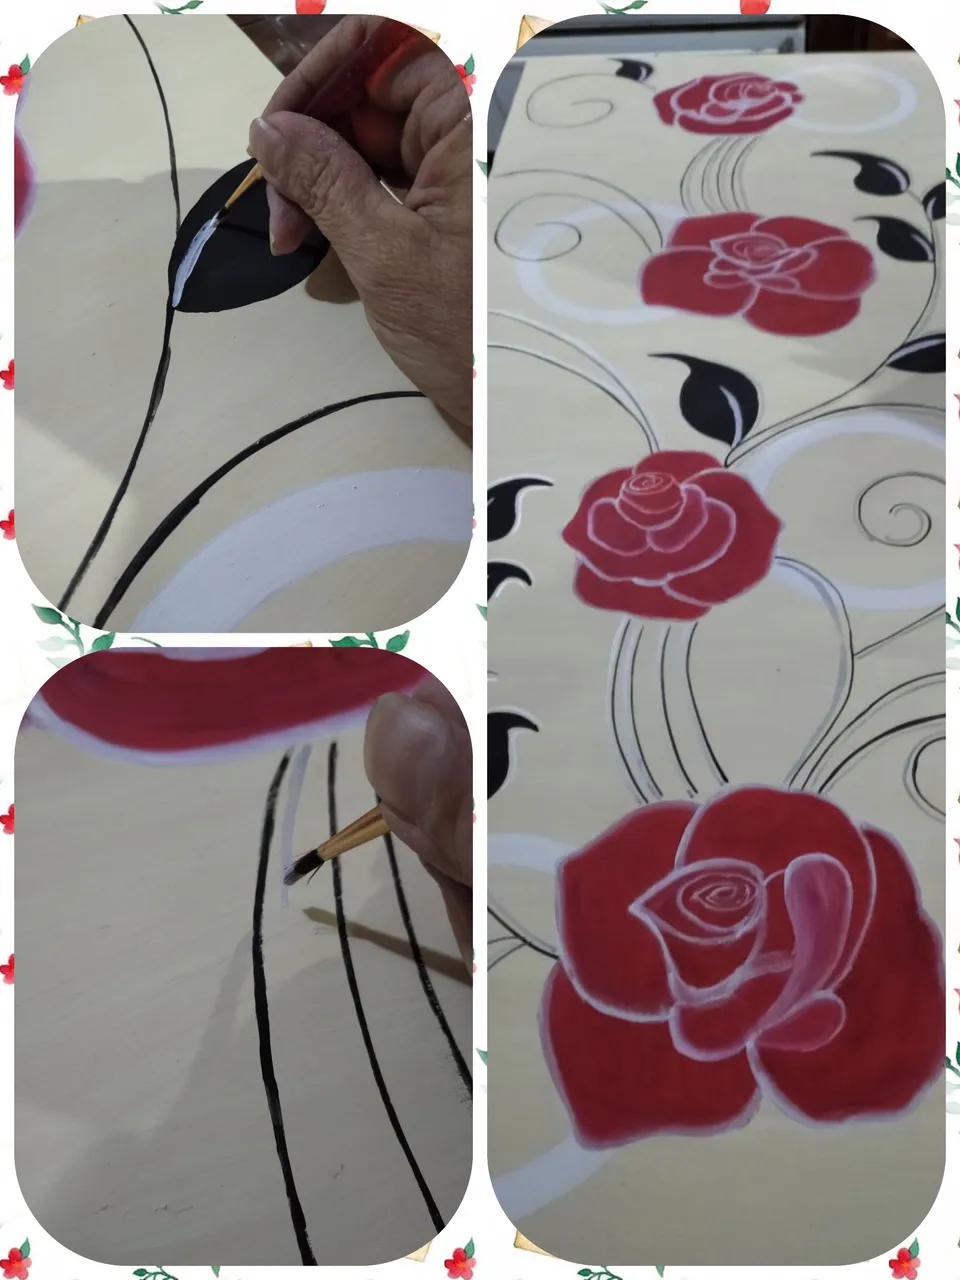
STEP #13
With the liner brush and black cold paint we begin to outline the lines previously made. And with the round brush we fill in the leaves. Already in this step we can visualize how this painting will look like.
PASO #13
Con el pincel liner y pintura al frío negra comenzamos a delinear los trazos anteriormente hechos. Y con el pincel redondo rellenamos las hojas. Ya en este paso podemos visualizar cómo quedará este cuadro.
STEP #14
To finish, we made the nerve of the leaves with white cold paint. And with the silver paint we will make various lines around the contours of the leaves and the rest of the lines to give the painting more attractiveness.
PASO #14
Ya para finalizar, realizamos con pintura al frío blanca el nervio de las hojas. Y con la pintura plateada haremos diversas líneas por los contornos de las hojas y el resto de líneas para darle más vistosidad al cuadro.
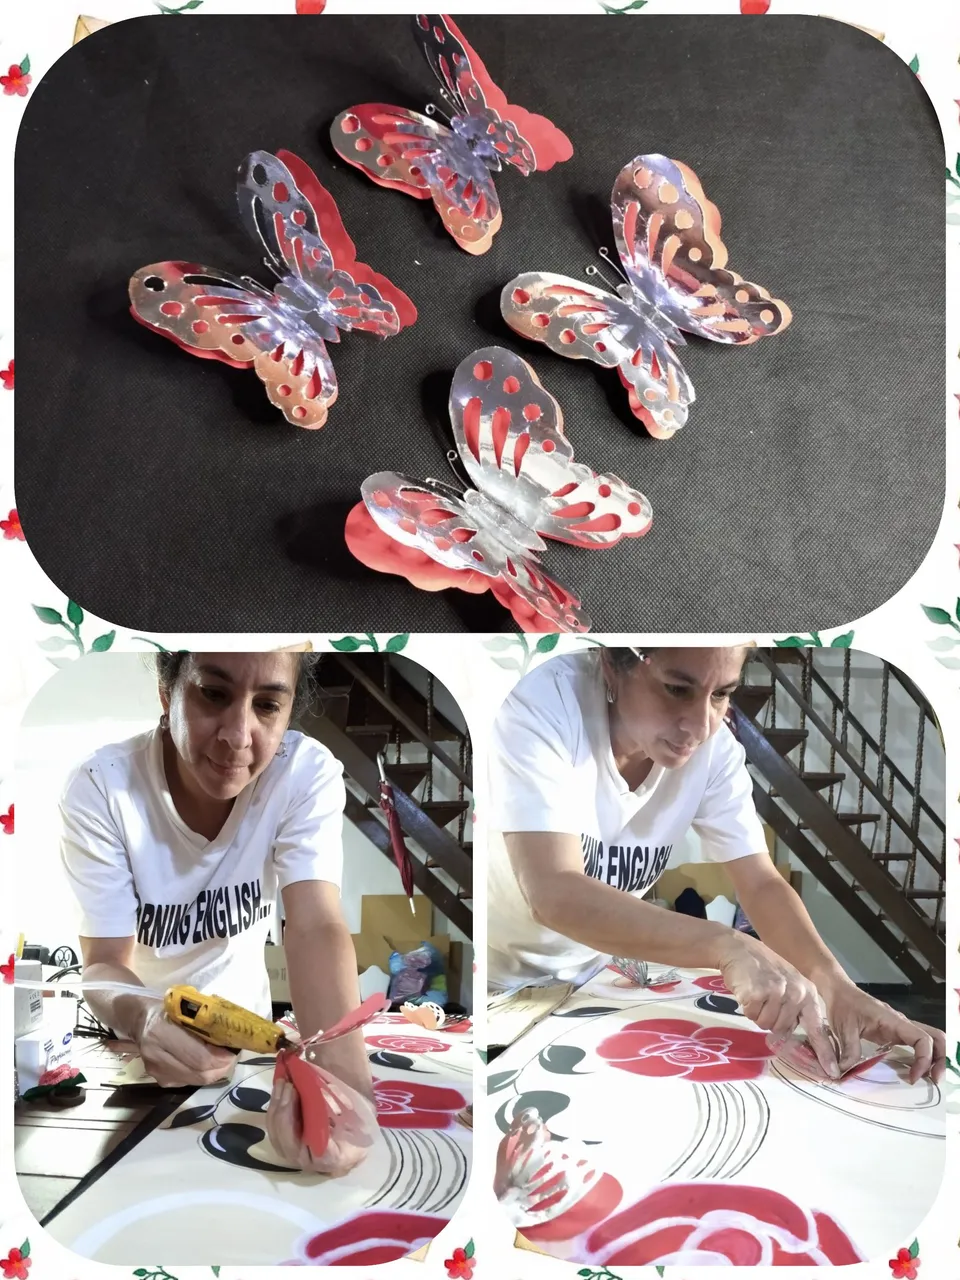
STEP #15
Until the previous step my project was made up, but I felt that something was missing. And it occurred to me to make some butterflies in 3D. If you want to know how I did them, I invite you to see my next publication where I will explain it to you in detail.
Very quickly I made them and placed them in the painting. Then I fixed them with the glue gun.
PASO #15
Hasta el paso anterior estaba conformado mi proyecto, pero sentía que algo faltaba. Y se me ocurrió realizar unas mariposas en 3D. Si quieres saber cómo las hice, te invito a que veas mi próxima publicación donde te lo explicaré con detalle.
Muy rápidamente las realicé y las ubiqué en el cuadro. Luego las fijé con la pistola de silicón.
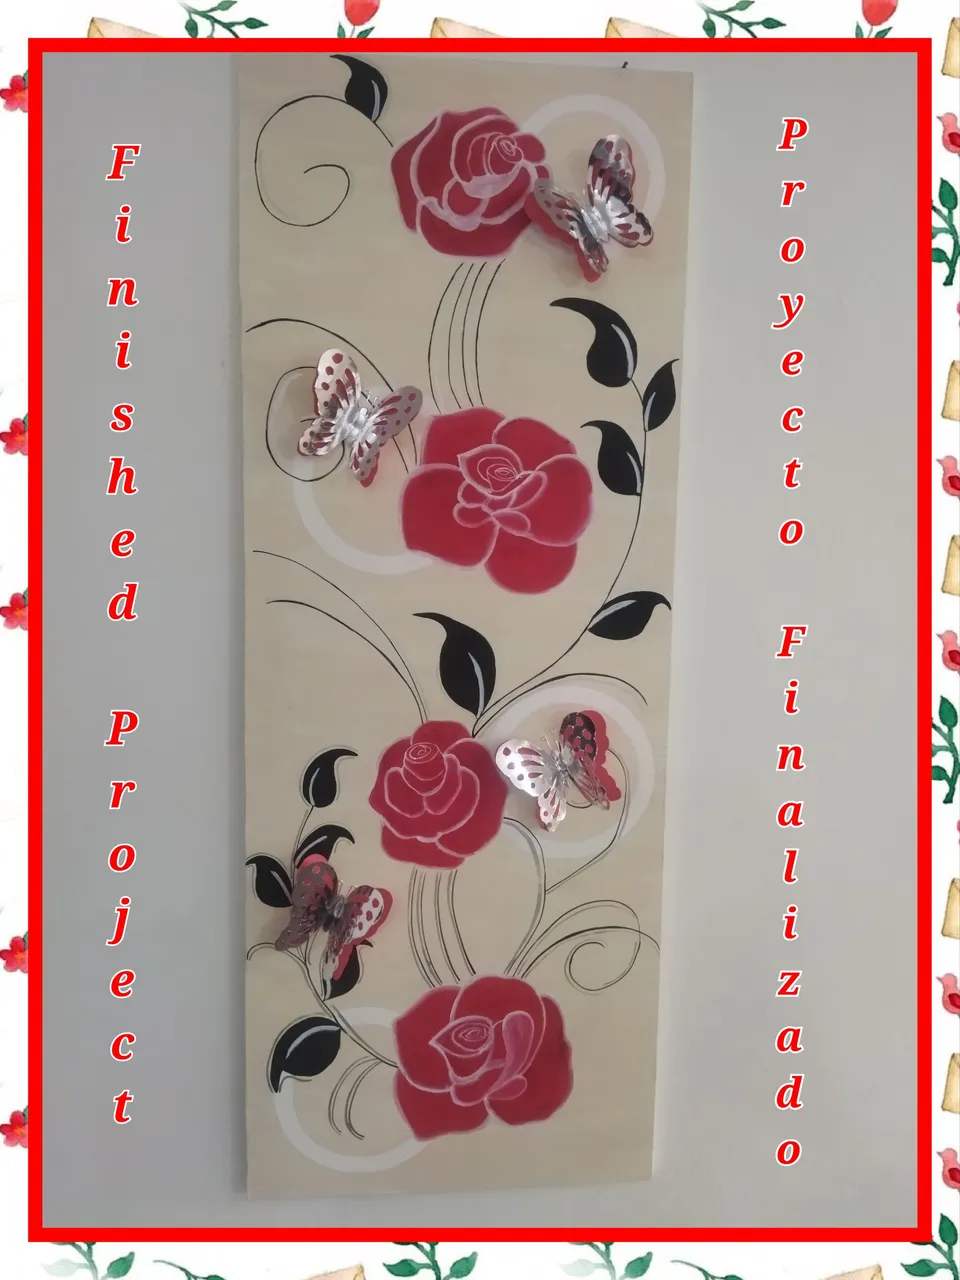
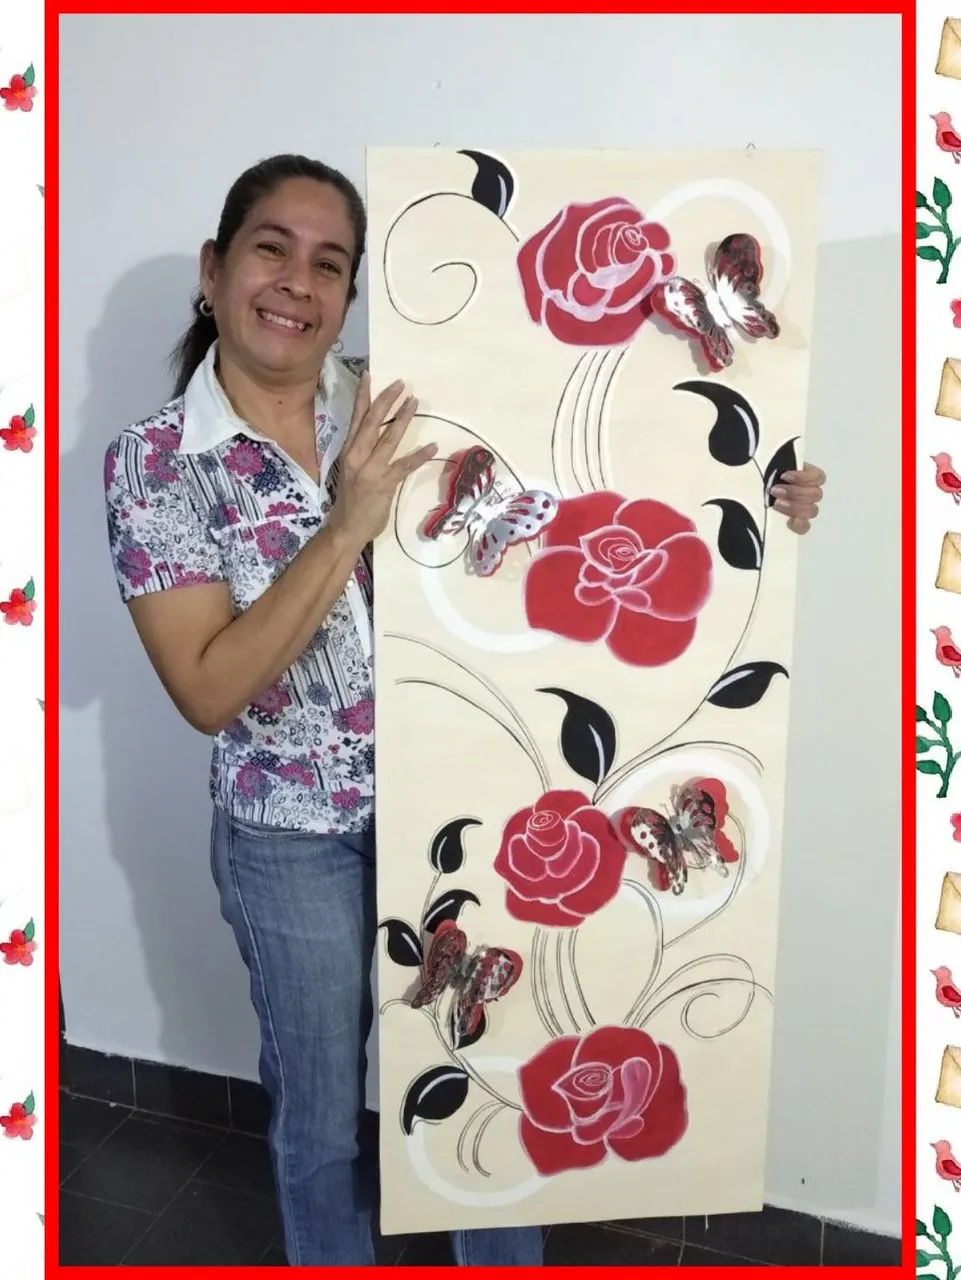
PROJECT COMPLETED
With this painting I make my participation in this contest. I must say that it has been very pleasant, gratifying and exciting to do it, despite the ailments and the time it took me to finish it. It was 3 days of work with rest to be able to finish it. Very, very satisfied with the result. Hope you like. See you next time.
PROYECTO FINALIZADO
Con este cuadro hago mi participación en este concurso. Debo decir que ha sido muy placentero, gratificante y emocionante realizarlo muy a pesar de las dolencias y el tiempo que me llevó terminarlo. Fueron 3 días de trabajo con descanso para poder terminarlo. Muy, muy conforme con el resultado. Espero que les guste. Nos vemos en la próxima.
Todas las fotos son de mi autoría, tomadas con mi teléfono POCO M3
Para la edición de las fotos y separadores utilicé Polish
Utilicé https://translate.google.com para la traducción

Para la edición de las fotos y separadores utilicé Polish
Utilicé https://translate.google.com para la traducción