
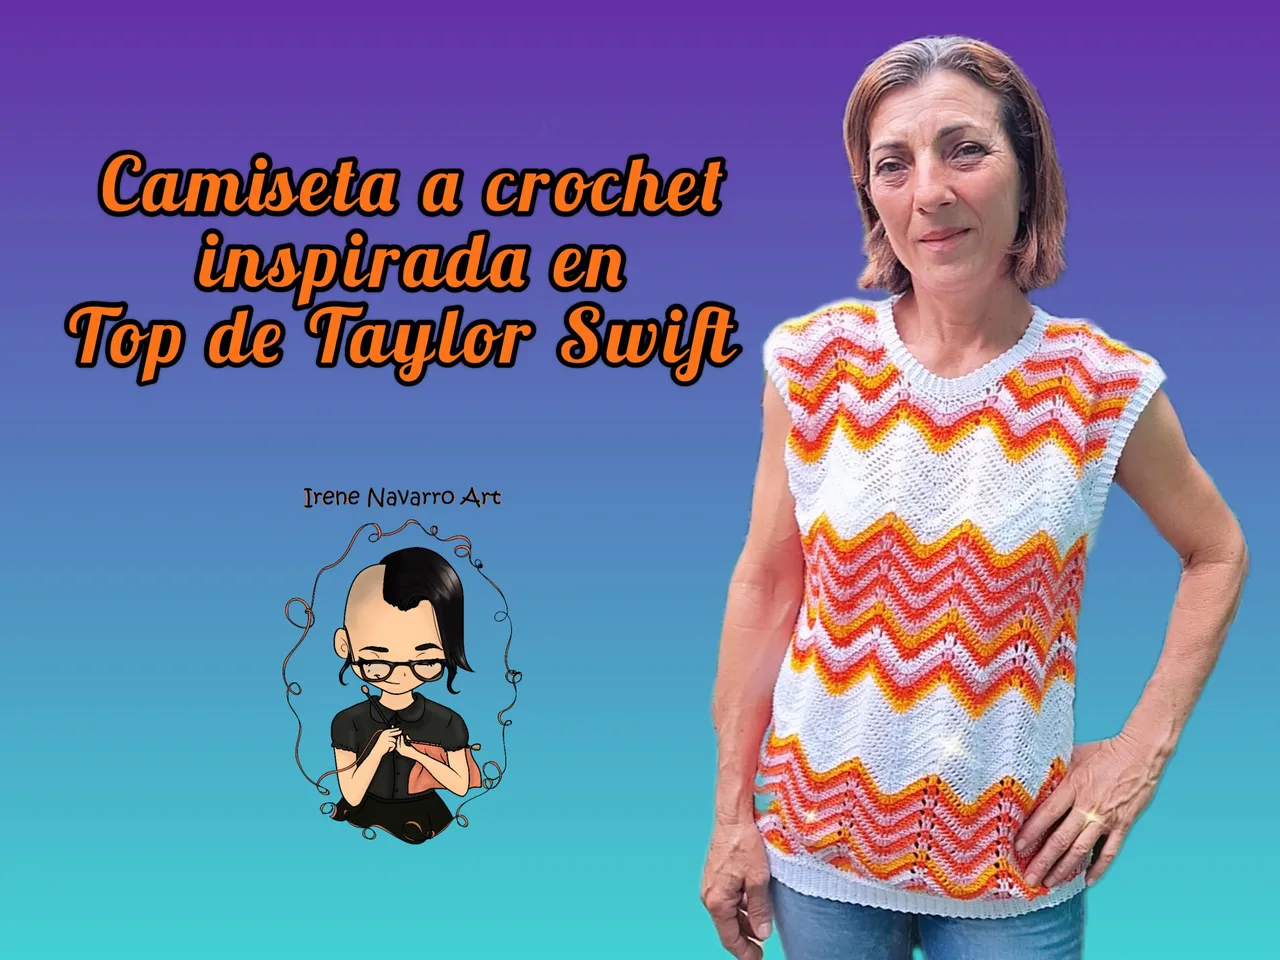
Saludos querida comunidad, finalmente hoy puedo compartir con ustedes un proyecto que me ha tomado mucho tiempo y esfuerzo 😄, como siempre mis clientes son muy especiales con las comisiones y siempre me plantean proyectos muy desafiantes, hace un tiempo me escribió un amigo excompañero de universidad, el deseaba que yo hiciera una camiseta a crochet que fuera una versión masculina del top que usó Taylor Swift en el video musical Lavender Hazey yo acepté, sin embargo el tiempo era reducido porque el debía viajar pronto, así que puse manos a la obra de inmediato.
Greetings dear community, finally today I can share with you a project that has taken me a lot of time and effort 😄, as always my clients are very special with commissions and always pose me very challenging projects, some time ago a former college classmate wrote me, he wanted me to make a crochet tank top that was a male version of the top worn by Taylor Swift in the music video Lavender Haze and I accepted, however time was tight because he had to travel soon, so I got to work immediately.

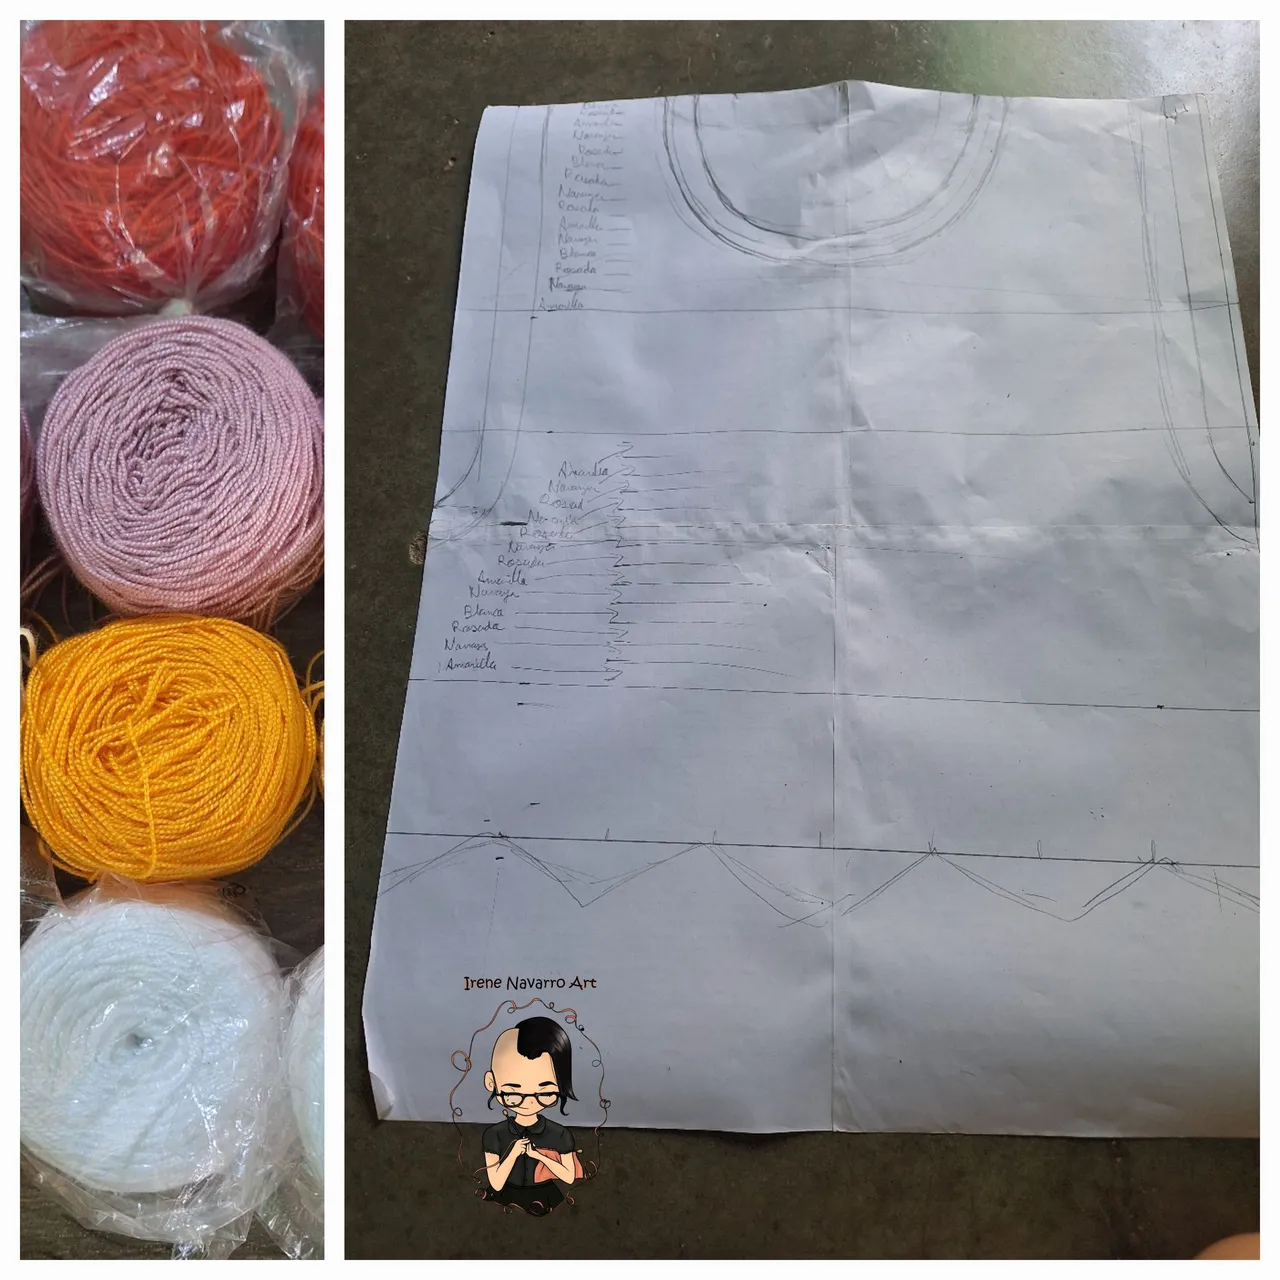
Lo primero que hice fue hacer un trabajo de investigación online, necesitaba encontrar buenas referencias de imágenes del top para poder determinar los colores específicos y también el tipo de puntada que se adaptase mejor a la forma, esto no fue nada sencillo porque en muchas imágenes el color dominante parecía blanco y en otras parecía amarillo muy claro, fue entonces cuando encontré imágenes más claras donde pude ver los colores: blanco, naranja, amarillo y rosado. Previamente le había pedido al cliente que tomara sus medidas con una cinta métrica, con esto hice un boceto en papel y determiné el número de franjas de colores a utilizar en cada segmento de la camiseta.
The first thing I did was to do some research work online, I needed to find good references of images of the top to be able to determine the specific colors and also the type of stitch that would best suit the shape, this was not easy because in many images the dominant color looked white and in others it looked very light yellow, it was then when I found clearer images where I could see the colors: white, orange, yellow and pink. I had previously asked the client to take his measurements with a tape measure, with this I made a sketch on paper and determined the number of color stripes to use in each segment of the tank top.
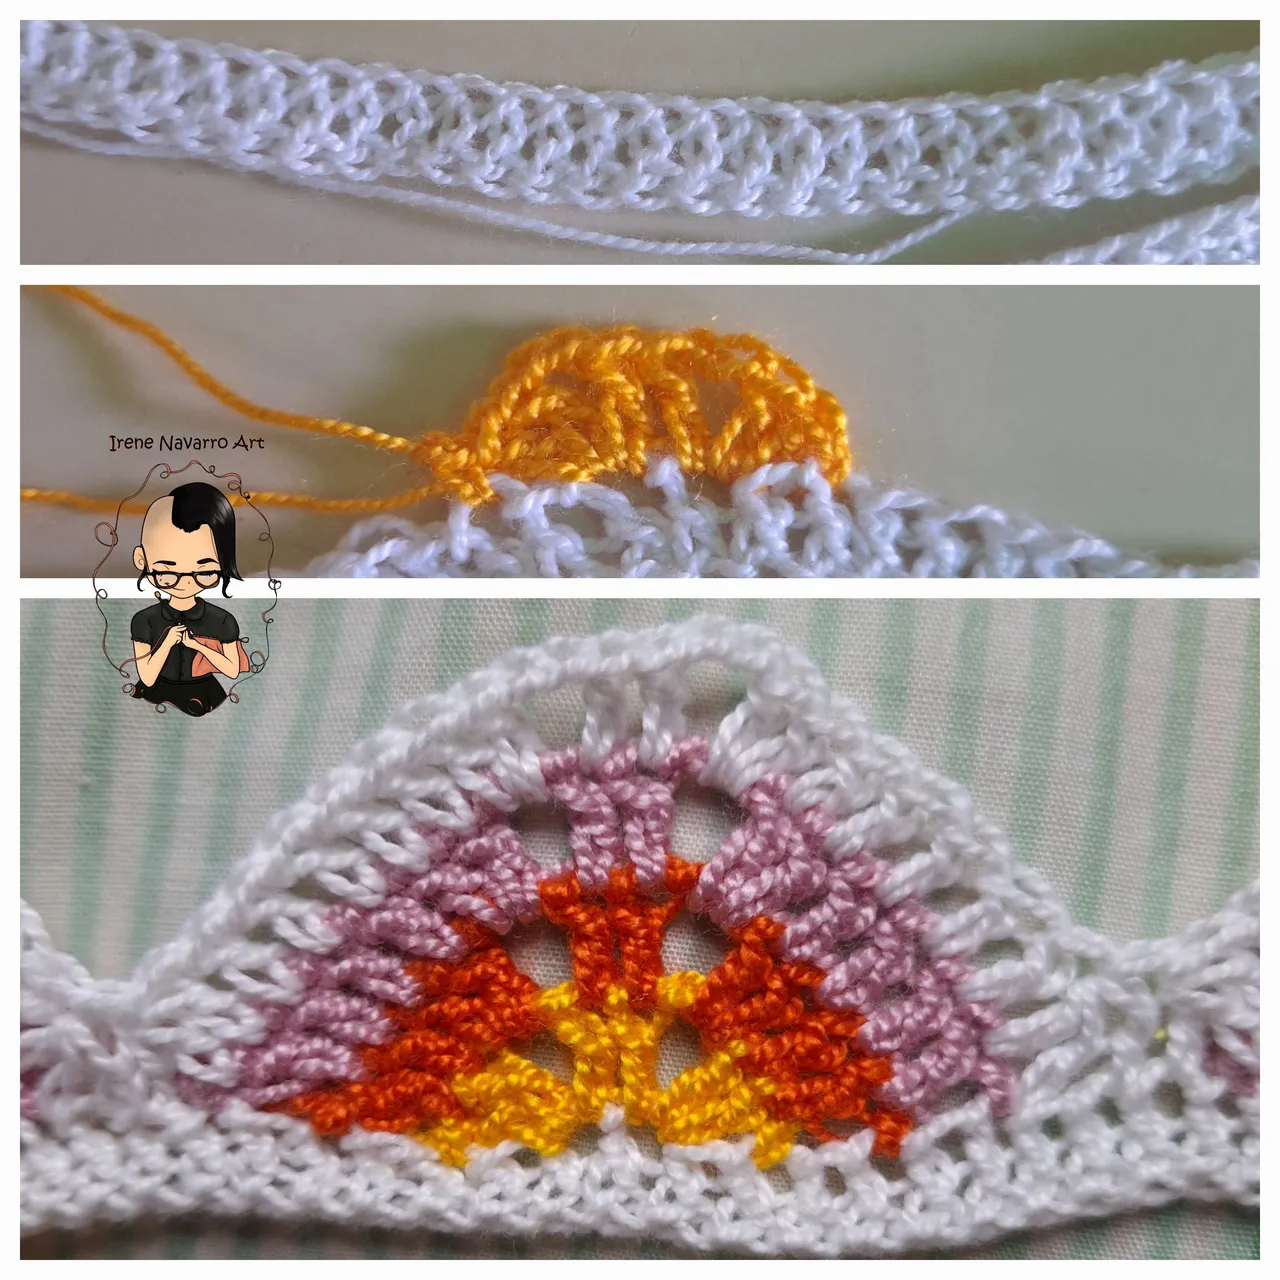
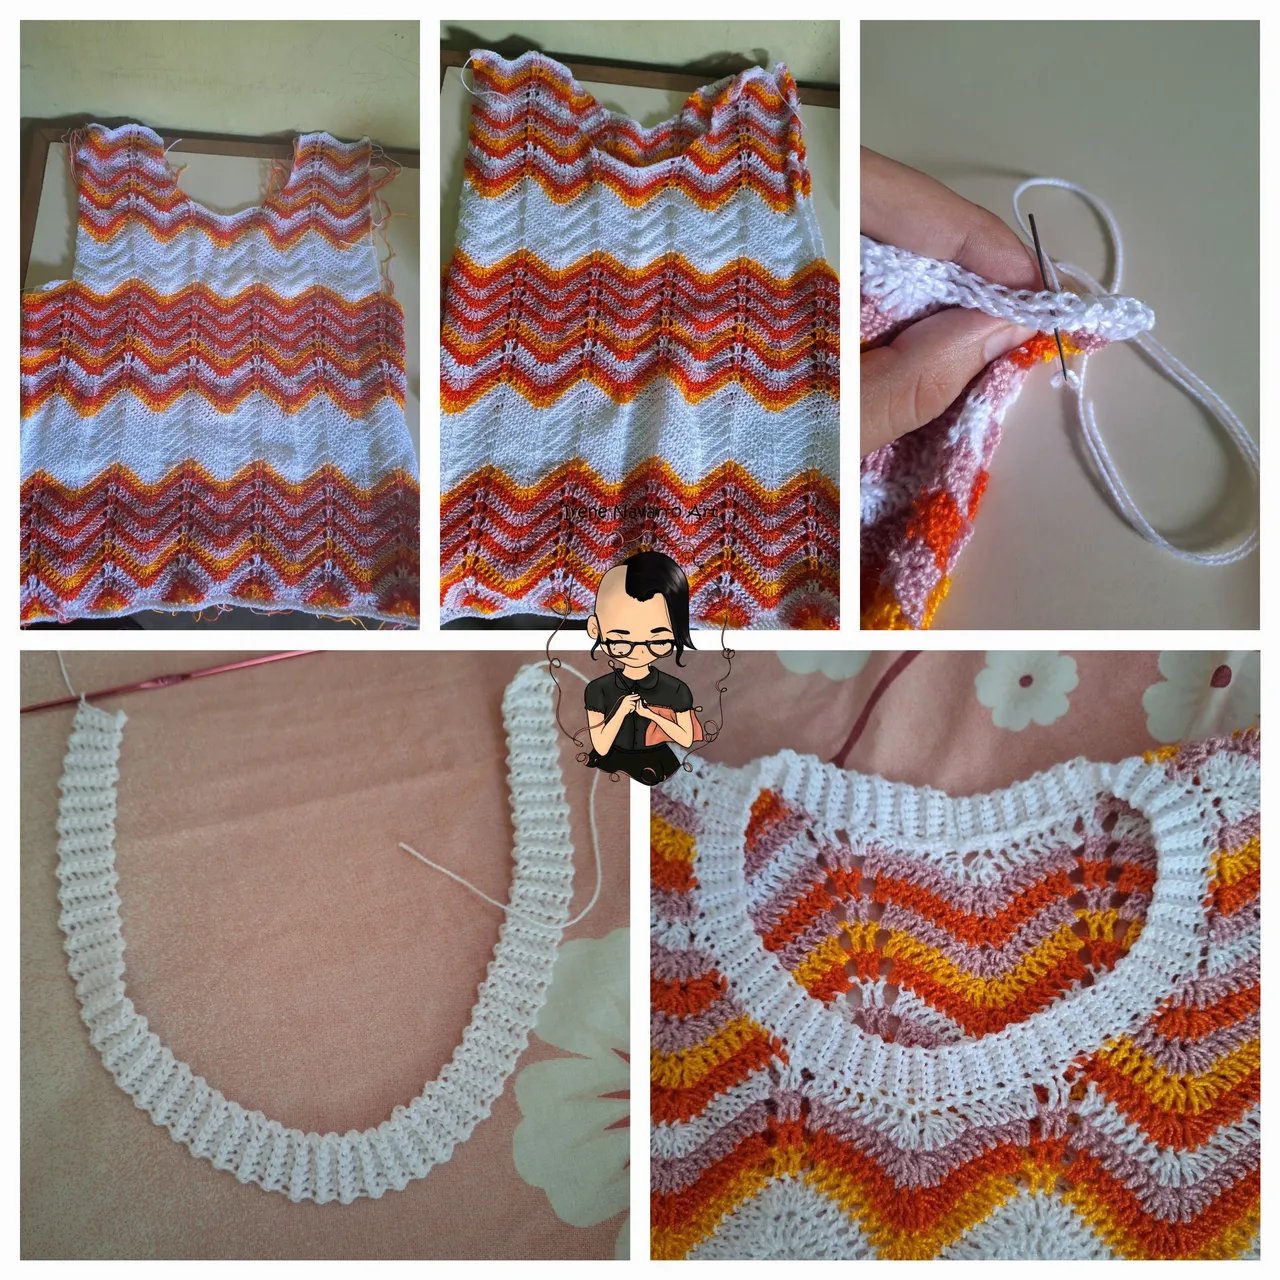
Hasta ese momento todo parecía ir bien, tenía al menos una semana para hacer la camiseta y había comprado los hilos, pero las cosas empezaron a salir mal, tanto así que tuve que desbaratar el trabajo desde la mitad al menos tres veces, la primera razón fue que al hacer la puntada tipo zigzag se reducía el ancho inicial así que tuve que empezar de nuevo con otra cantidad de puntadas iniciales, luego de eso noté que era imposible mantener las hileras inicial de manera recta, es decir que la terminación final no sería recta sino en la misma forma de zigzag, así que de nuevo abandoné esa idea, así que la tercera siempre es vencida (a veces 👀) empecé haciendo al hilera de puntos altos de base con el color blanco y luego dividí el número puntadas en 12 segmentos en donde haría un triángulo de franjas de color, este triangulo me permitiría posteriormente hacer la puntada tipo zigzag sin perder la forma recta de la hilera inicial, el plan funcionó pero no tomé en cuenta los aumentos que debía hacer para cada triángulos así que de nuevo quedó muy ancho. Así que la cuarta vez si lo logré en base a toda la experiencia obtenida de trabajar todos los días hasta la madrugada, pude emprender el camino correcto con el número de puntadas acorde a las medidas de mi cliente el día viernes. Empecé con 192 puntadas en al hilera de inicio, dividí entre 12 y obtuve 16 puntadas para la base de cada triángulo que va en aumento hasta obtener 22 puntadas por triángulo 😁
Until that moment everything seemed to go well, I had at least a week to make the tank top and I had bought the yarns, but things started to go wrong, so much so that I had to mess up the work from the middle at least three times, the first reason was that making the zigzag type stitch reduced the initial width so I had to start again with another amount of initial stitches, after that I noticed that it was impossible to keep the initial rows straight, meaning that the final ending would not be straight but in the same zigzag shape, so again I abandoned that idea, so the third time is always a charm (sometimes 👀) I started making the base row of double crochet with the white color and then I divided the number of stitches in 12 segments where I would make a triangle of colored stripes, this triangle would allow me later to make the zigzag stitch without losing the straight shape of the initial row, the plan worked but I did not take into account the increases that I had to make for each triangles so again it was too wide. So the fourth time I did it, based on all the experience gained from working every day until the wee hours of the morning, I was able to get on the right track with the number of stitches according to my client's measurements on Friday. I started with 192 stitches in the starting row, divided by 12 and got 16 stitches for the base of each triangle which increases to 22 stitches per triangle 😁.
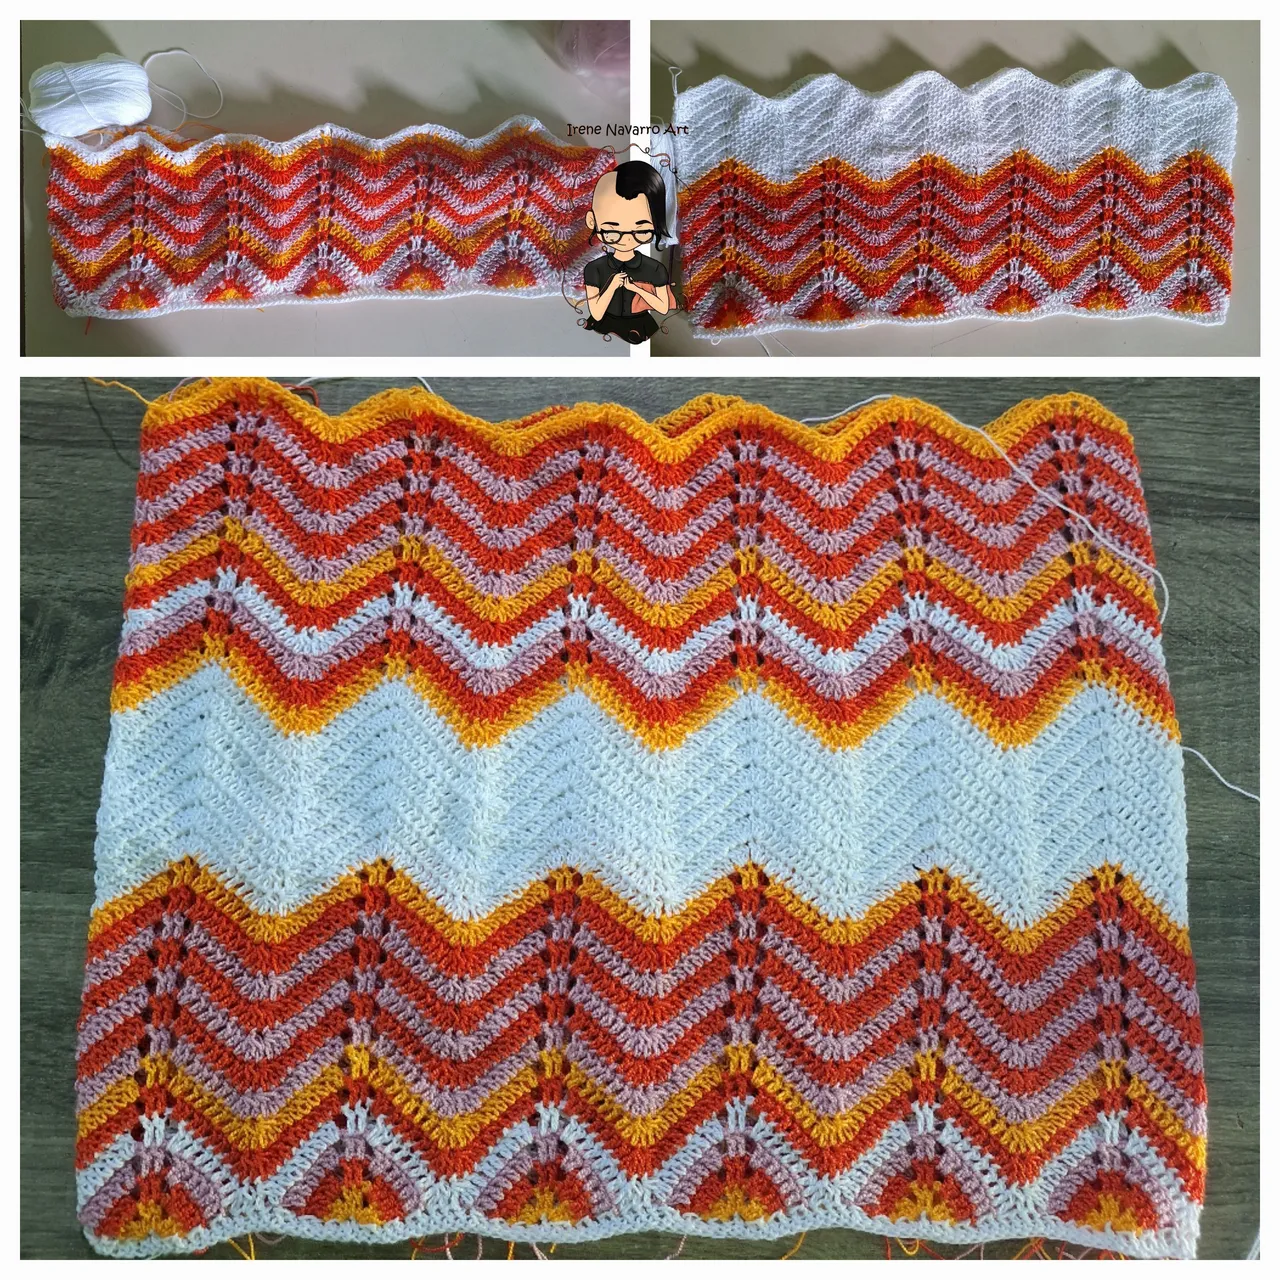
Hice el primer segmento de franjas en punto zigzag, luego la primera franja ancha de color blanco luego el segundo grupo de franjas de colores.
I made the first segment of stripes in zigzag stitch, then the first wide white stripe, then the second group of colored stripes.
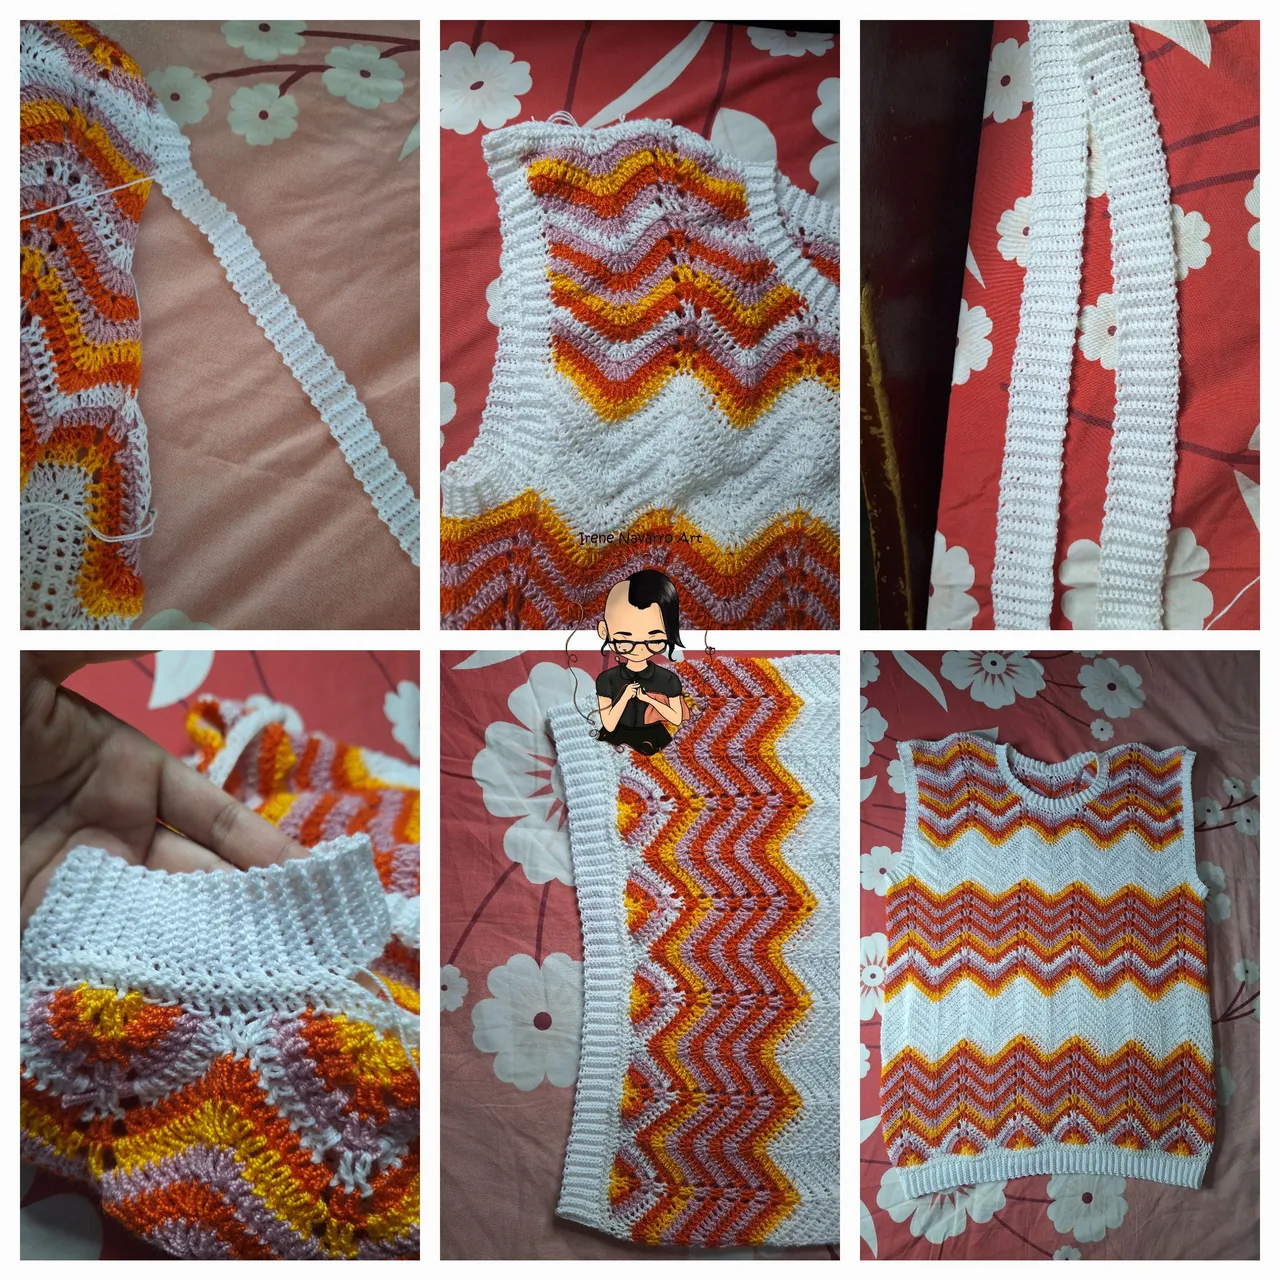
Hasta ese momento había trabajado en circular, pero ahora me tocaba formar la sisa , así que trabajé de forma recta la parte frontal haciendo también la medida del escote del cuello, luego hice la parte posterior de la camiseta , cosí los hombros de las dos partes. Luego con hilo blanco hice el cuello de la camiseta con punto elástico.
Until that moment I had worked in circular, but now I had to form the armhole, so I worked the front part straight making also the neckline measurement, then I made the back part of the shirt without, I sewed the shoulders of the two parts. Then with white thread I made the neck of the shirt with elastic stitch.
Proseguí haciendo punto elástico con solo hilo blanco para la sisa de cada lado, luego hice puntos elástico más ancho para la parte de debajo de la camiseta. Y así finalmente terminé después de 9 días de trabajo intenso 😄
I continued by doing ribbing stitch with only white yarn for the armhole on each side, then I did wider ribbing stitches for the underside of the shirt. And that's how I finally finished after 9 days of intense work 😄.
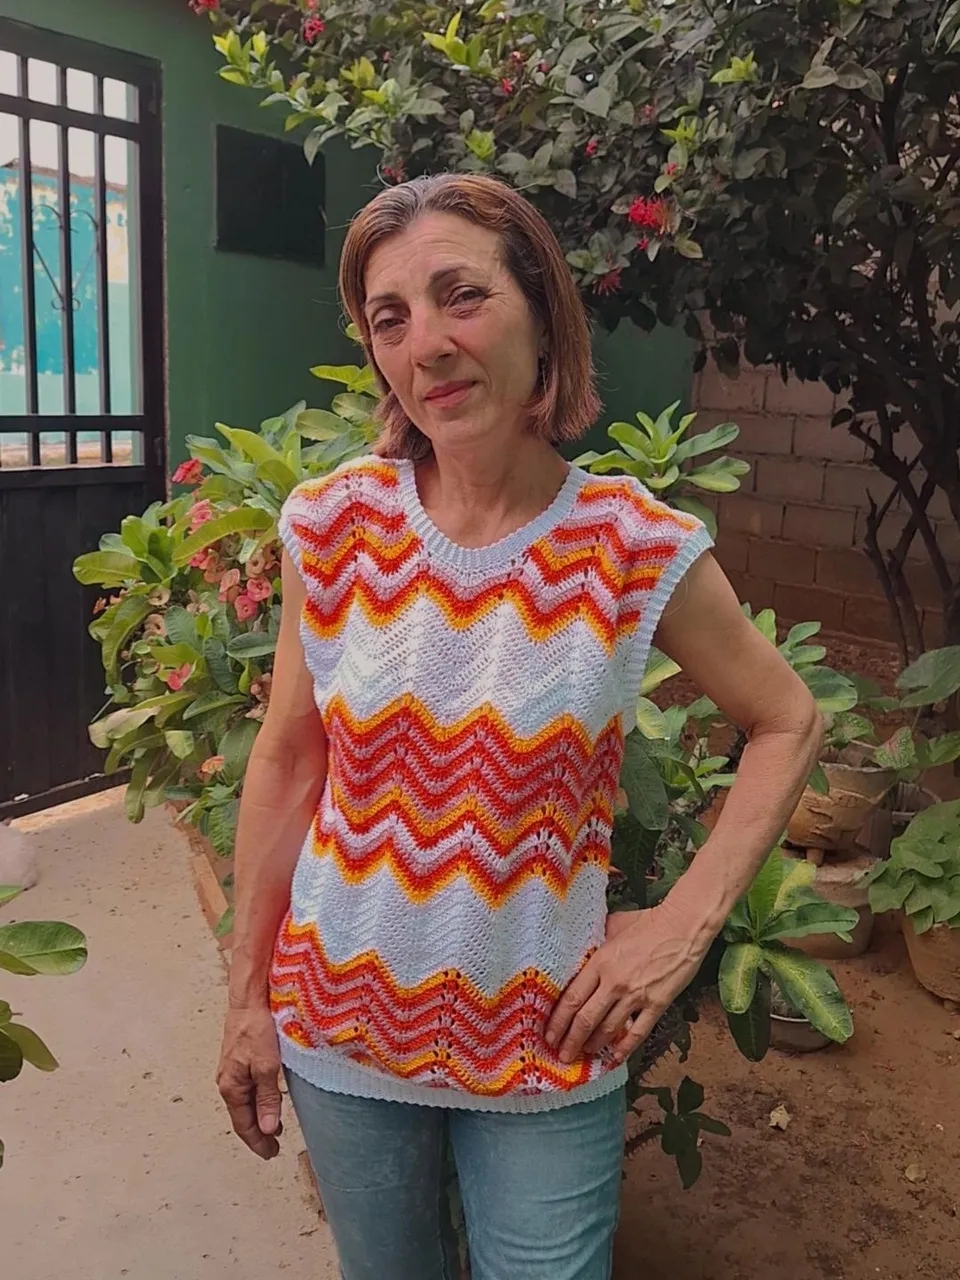
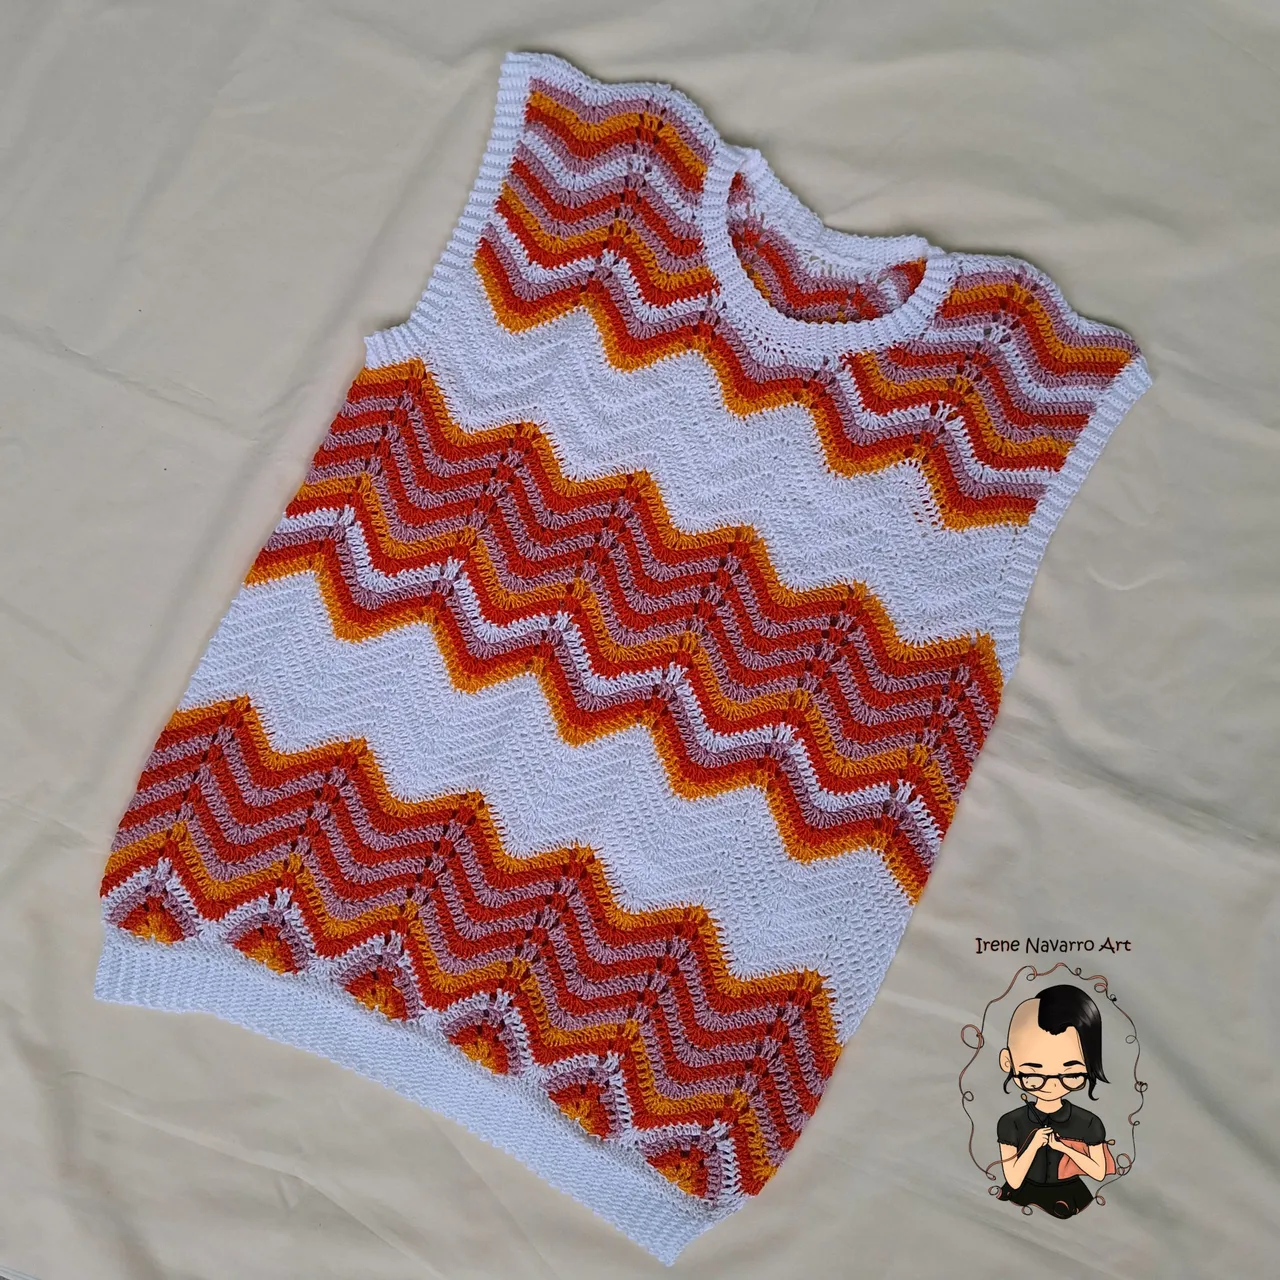
A pesar de todas las veces que retrocedí y volví a comenzar de nuevo, no me quejo para nada de esta experiencia, ha sido muy gratificante poder hacer este encargo, mi cliente esta feliz con la camiseta y además yo aprendí mucho en el proceso, estas experiencias me hacen aún más amar el crochet y las técnicas de trabajo en aguja porque aunque tenga muchos años de experiencia siempre hay algo nuevo que aprender y mejorar , nunca se puede estar aburrido de una técnica que permite hacer tantas cosas y cada día me siento afortunada de dedicarme a lo que me apasiona. Espero a ustedes también les guste. Por cierto no tenía un modelo masculino para lucir la prenda antes de entregarla al cliente, así que usé a mi mamá, aunque la camiseta le quedaba un poco grande a ella creo que se ve muy bien. ¿Ustedes que opinan? 🥰
Despite all the times I went backwards and started over again, I am not complaining at all about this experience, it has been very rewarding to do this order, my client is happy with the shirt and I learned a lot in the process, these experiences make me love crochet and needlework techniques even more because although I have many years of experience there is always something new to learn and improve, you can never be bored of a technique that allows you to do so many things and every day I feel fortunate to dedicate myself to what I am passionate about. I hope you like it too. By the way I didn't have a male model to show off the garment before delivering it to the client, so I used my mom, even though the shirt was a little big on her I think it looks great. what do you guys think? 🥰
Imágenes tomadas con dispositivo Samsung A54. Portada editada en Inshot
Pictures taken with Samsung A54 device. Cover edited in Inshot
Invítenme un Café/Support Me on Ko-Fi

https://ko-fi.com/irenenavarroart
Si deseas apoyar mi contenido también puedes hacer donaciones por el valor de un café en Ko-Fi
If you want to support my art you can also make donations for the value of a coffee (Ko-Fi)
Espero les haya gustado. Les invito a leer mis próximas publicaciones y siempre estaré dispuesta a responder sus preguntas y comentarios, también pueden seguirme y contactarme en cualquiera de mis redes sociales. ¡Muchas gracias!
I hope you liked it. I invite you to read my next publications and I will always be willing to answer your questions and comments, you can also follow me and contact me on any of my social networks. Thank you!