Repository
https://github.com/OpenShot/openshot-qt
Introduction
As I have, very briefly, introduced on the last post of the series, Openshot has a very simple and intuitive interface. Though my main editor is Kdenlive, and not the software analyzed on this series, I feel like I need to reaffirm to you that both of them work very similarly.
However, Openshot has an interface that might appeal to younger or elder people, the ones that see editing as a hobby and want to do their editing works on a "friendlier" interface. Kdenlive has a look that seems to be too flat and monotone. Openshot, on the other hand, has 3D timelines and colorful tools and clickable objects. You can check the previous post to compare the two interfaces and see what appeals more to you. I believe younger people might prefer the one with more colors and 3D effects.
On this post, I will show you my workflow on Openshot, from opening the program to importing the clip into the timeline and showing to you what are the tools I use the most.
Of course, my usage is low end, so I can't get too much in depth because I have not yet used this (and for the matter, any other) software to their limit, pushing the barriers to see what they can do and how do they perform on those tasks, because all I have ever had to do to edit my videos are cropping, snapping, adding titles, and, once or twice in my lifetime, to add chromakey to a video.
What is Openshot

Openshot is a free and open source video editor, it is available for all 3 major desktop operating systems. The interface is simple and intuitive, with colorful and 3D tools and sections to help even beginners have an intuitive notion of how to do things. The project has been running since 2008 and was originally created by Jonathan Thomas alone, though, nowadays he has the help of other developers too. Interestingly what motivated Jonathan to develop Openshot was the same reason that led me to search around on the internet, we are both Linux users, and, in the past, there were no good video editors on Linux.
Right off the bat
I can, right off the bat, after opening Openshot after a long time to use it to edit, I have already noticed one very small thing, that for the majority of people won't make a difference, but I could notice:
It takes 2 seconds to open the program! I was spoiled by Kdenlive because when that software takes too long to open, it is around 1 second, I don't even have time to think about it. Opening Kdenlive feels pretty much like opening a picture or a small text file on your computer, it is near instant. And it does not have to do with the fact that I am a Linux user, as Linux has a much more efficient file system, or that I am using an SSD, which by the way is around 4 years old and "slow" for modern SSD standards. I can't think of any video editor on Windows that opens at that speed.
And being spoiled by the insanely fast load time from Kdenlive, I could notice that Openshot takes around 2 seconds to open. And don't take it as a bad thing, it is actually a great thing! All other paid and "professional" video editors take much, much longer to load into the RAM and open on your desktop! 2 seconds is a great time, and not slow by any means! It is just that I couldn't help on noticing and reporting that I have time to think "oh, it did not open that fast".
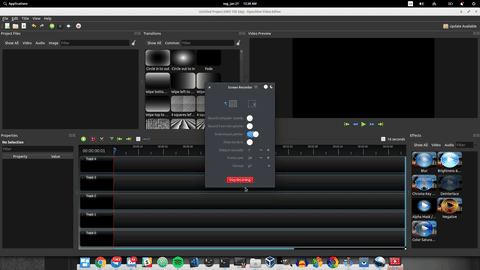
All effects at 1 click away

On the image shown above, you can see what I mean when I say that Openshot has a more "friendlier" and "colorful" interface. You can use the effect icons to apply blur, saturation, brightness, chroma key, and all of those nice effects that can be helpful even for professionals!
When I say that Kdenlive has a more "professional" and "serious" interface, I can illustrate exactly what I mean. To do a chroma key effect (delete a color from the video to show something else on the background) on Openshot it is simple, you see the icon on the effect panel (that is open by default on the starting screen!) and just drag and drop it to the clip!
On Kdenlive it is not that much harder, but definitely less intuitive and, I believe, less appealing for kids or elders. To do a chroma key on Kdenlieve you have to expand the "alpha manipulation", which I believe not everyone intuitively knows what does that mean:

And from there you can also just drag and drop the effect into the clip on your timeline, but another catch is that there is no image "describing what that effect means:

You can clearly see why I mention kids and elders probably preferring Openshot over Kdenlieve. Not just the interface has more colors, but the effect, an important part on editors, are illustrated with images showing what they do. I, honestly, would have never guessed what "deinterlace" means, but with the image showing what the effects do to the image, I can clearly guess what it will do to the video!
Workflow
Pretty much like most video editor out there, you do have the option to drag and drop videos in. However, differently, from one or two editors that I remember using, you do not have to wait for it to "import" the file or anything like that. Just drag, drop and start working on it.
One nice functionality that actually saves me a little bit of time is that I can cut a video and automatically delete one of the sides!
It is not a big deal for most people, but imagine you have lots of clips to work at. While recording the clips you have recorded the subject of the video, then the last seconds are you lowering the camera to press the "stop recording" button. In that scenario (happened to me) you would have to, for every clip, cut the beginning and delete the left side, then cut the ending and delete the right side.
This feature changes the workflow for such repetitive tasks substantially:
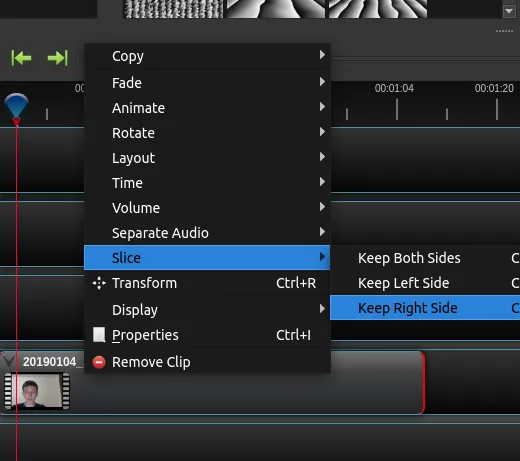
You can automatically cut the video and delete one of the sides! I suppose vloggers would love this feature.
But the tool also allows to keep both sides, so if you are talking, let us say, about a picture you have takes, you can cut, keep both sides, and place the picture in between.
For the situation described above, you might want to keep your voice while you talk about the subject of the picture, but show the picture on the whole screen instead of the video. I have used this feature before and I know a few YouTubers that abuse this feature (which is a great thing for the ADHD audience on the internet nowadays). For that, the separate audio feature is useful so you can keep it playing normally while deleting the video to replace by the picture:
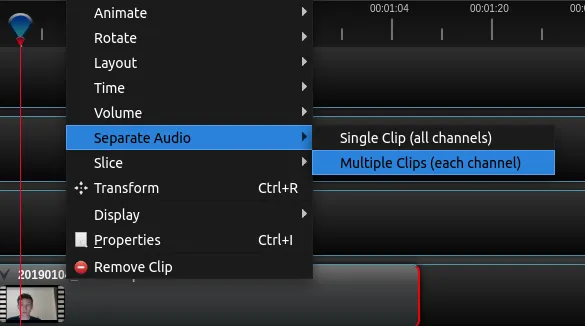
Of course, you could achieve the same effect by just dragging and dropping the picture above the clip, but here is a tip:
If you delete the clip and replace by the picture, it will render the project a little bit faster, because there would be fewer layers for the software to consider and calculate! It is, not, by any means, a huge deal, but if you care, or your computer is slow and you care about performance, you might take that into consideration!
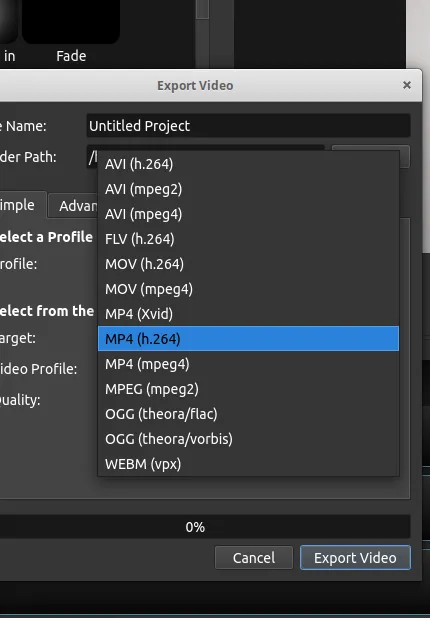
After you are done with the editing (which should not take long for the simple and intuitive interface), you can click the red dot on the up toolbar of the screen to choose the setting of the rendering
Wrap up
As you could be seen in the section above, Openshot is very intuitive. The simple and friendly interface makes it a very good recommendation for people with no prior editing experience. I have recommended it to my parents because they can infer what the effects do by the color and the workflow is simple enough for them to understand without having to call me for help (hehe).
The performance seems to not be as good as Kdenlive, but it is not a great deal and I, personally do not care. The tools cover most anything that a beginner user might need, and even might be a great and affordable alternative for professionals that are trying to cut operating costs!
If you need to do more advanced tasks, you might want to take a look at the user guide, available on their website.
Resources
Openshot main website
https://www.openshot.org/
Download page
https://www.openshot.org/download/
Use guide
https://www.openshot.org/static/files/user-guide/index.html
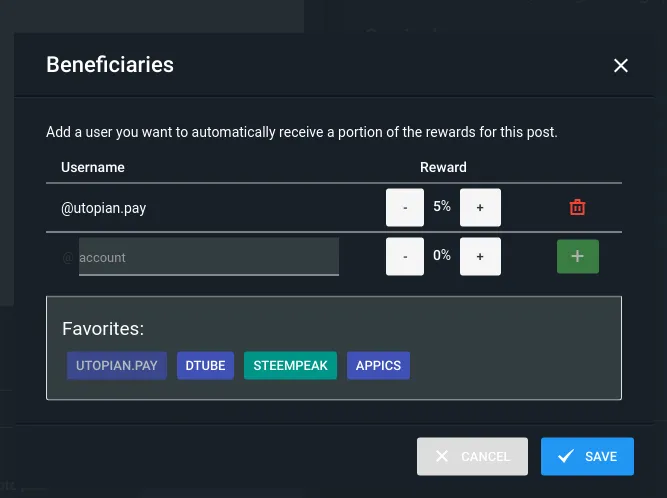
Beneficiaries
This post has as beneficiaries
@utopian.pay with 5%
using the SteemPeak beneficiary tool