

This tutorial is part of a series on ‘How To Build Bot’s Using Steem-JS Open Source Library’ it aims to demonstrate practical applications for bots and demystify the code used to create them.
In part 1 we built an auto-liking bot and in part 2 we created a curation trail bot. Please follow those tutorials first as we will build on knowledge learned.
The completed bot code is here - I know some people find it easier to see everything in one block and follow along that way. ⬅️
Outline 📝
We will create a follow bot, our bot will automatically follow accounts that any of our target listed start following. If you’re looking for new accounts to follow and trust other accounts to only follow quality this can be a good way to find new content
Requirements
- A plain text editor (I use atom.io )
- Your private posting key - This is found in your wallet on the permissions tab on steemit.com, click ‘show private key’ (remember to keep this safe). This is what allows the bot to vote for you
Difficulty
This tutorial is intended to be beginner friendly. (I appreciate feedback on the teaching level)
Learning Goals
- re-use knowledge learned about steem-js in parts 1 & 2
- look at the
custom_jsonpart of a Steem blockchain transaction - parse JSON into readable information
- look at broadcasting our own customJson over the Steem network to follow new accounts with the API
Step 1 - Setup 💻
For this tutorial our bot will run in the web browser, a more effective way to use this bot would be on the command-line but I feel we’ll still benefit from this minimal in browser approach for now.
Use this template to get started - This is a base file for today's project and includes code from the previous two tutorials. You’ll see the output in your browser console again like last time (refer to the previous post if you can’t remember). Familiarise yourself with the functions included and notice they are the same as we have already used. You may notice I changed the name we had on tutorial 1 from isFriend to isTarget, it’s important in programming to name things as appropriately as possible even if this code is just for yourself, it’ll help.
Fill in your account information as per usual. In this tutorial, we’ll be working with a list of targets, whenever any of those accounts follow a new account we will too. Add as many names to TARGET_ACCOUNTS as you would like, if possible make it an account you have access to so it’s easier to test it’s working.
        // Tutorial 03 - curation trail bot
        const ACCOUNT_NAME = ''
        const ACCOUNT_KEY = ''
        const TARGET_ACCOUNTS = ['sambillingham', 'cryptoctopus', 'kevinwong', 'wehmoen', 'cutemachine']
Step 2 - Check Connection 👀
You should see streamTransactions function setup. Go ahead and add a console.log(txType, txType) to check everything is working as expected. See example below.
steem.api.streamTransactions('head', function(err, result) {
      let txType = result.operations[0][0]
      let txData = result.operations[0][1]
      console.log(txType, txData)
});
This should feel familiar so lets jump into something new.
Step 3 - Access Custom JSON For Followers 💾
There is no transaction type ‘follow’.
The fundamental parts of the Steem blockchain voting, commenting, rewards etc work regardless of what type of platform it’s running. While Steemit a blog style website was the first app to run on Steem it was never it’s sole purpose and we already see many types of apps. ‘Followers’ although not unique to blogs is an idea that might not be necessary for all platforms. With that in mind followers are stored as ‘custom_json’ (JSON - Javascript Object Notation - is a format for organising data in a file) where any app or platform might use slightly different ‘custom_json’.
For today we’re going to check for json as our transaction type.
if(txType == 'custom_json') {
        console.log(txData)
}
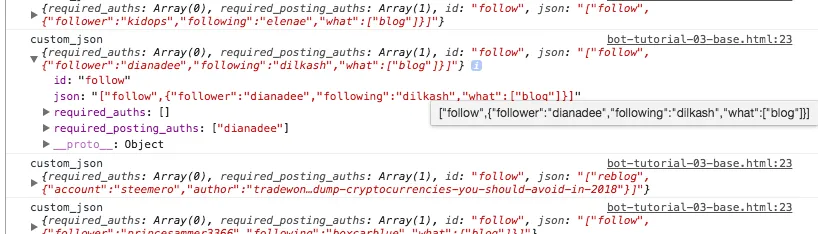
Looking at the screenshot we can see the data we have to work with. The json is an Array (list of data ) where the first item is the type of data and the second item is the content
json : "["follow" {"follower":"dianadee","following":"dilkash","what":["blog"]}]"
to work with this in javascript we need to parse the json. PARSE? I hear you. json is stored as text and by default a computer would think you really wanted those brackets and quotes as part of a sentence. Parsing breaks the long chink of text into a group of readable information that we can pick and choose from.
let json = JSON.parse(txData.json)
let dataType =  json[0]
let dataContent = json[1]
Store part one as the type and part two as the content, remember we’re trying to make our life easier by giving things helpful names.
that dataContent is further broke down into follower and following, you guessed it we’re going to check if the follower (that who just followed a new person) is someone we’re watching. The following is the person they just followed.
We can use the same function we made in part one to make this nice and simple. occasionally you might se a ‘reblog’ (also stored under custom_json) so we need to check that the datatype is a follow
if ( dataType == 'follow'  && isTarget(dataContent.follower) ){
    console.log(`${dataContent.follower} started following ${dataContent.following}`)
}
Now we’ll start to see a list of who our targets started following, ask a friend if they can follow someone knew while you’re bot is running to test it out.
Step 3 - Broadcast A Follow To Steem 🏃♂️
In the last two parts we looked at sending votes, send json aka a follow request is very similar but it has a little more setup.
Let’s make a function for this action. We’ll have a single parameter called name, that’s who we want to follow.
function followAccount(name){}
We’re going to create an array and turn it into json just like what we saw when watching transactions coming in on the blockchain.
let info = ['follow', {
  follower: ACCOUNT_NAME,
  following: name,
  what: ['blog']
}]
We have an array with the first item ‘follow’ and the second item is our set of data. Our ACCOUNT NAME is going to become the follower and whoever we set as the parameter(input data) will be who we follow. Next turn it into json, javascript works hand in hand with json so there is a function built in for this.
let json = JSON.stringify(info);
Now let’s send that over the network
steem.broadcast.customJson( ACCOUNT_KEY, [], [ACCOUNT_NAME], 'follow', json, function(err, result) {
    console.log(`${ACCOUNT_NAME} has just started following ${name}`)
    console.log(err, result);
});
Input the required data into the customJson function and it will work it’s magic. Now we can use the function followAccount(‘sambillingham’) and it would go-ahead and follow whoever name we use. Pretty ace once it’s working.
Step 4 Combine it all Together 🏅
The final step! Use our new function inside of our transaction stream like so.
if ( dataType == 'follow'  && isTarget(dataContent.follower) ){
    followAccount(dataContent.following)
}
💥 Just like that it will start copying the follows of any of you’re target list.
Our third Bot is now finished and ready to copy followers. This bot runs in the browser so for it to work we’ll have to keep the page open, we’ll look at making background tasks for bots once we’ve learned a few more tools
There’s still a lot more we can do with bots and the Steem API but I hope you find this interesting and useful. If you’re looking into building bots let me know or ask any questions below ✌️
Other Posts in This series
- Part 1 - Beginner friendly - Build your first steem bot in Javascript - 30minutes
- Part 2 - Beginner friendly - Building bots With steem-js #2
Posted on Utopian.io - Rewarding Open Source Contributors